Philips M100: Difference between revisions
From Zenitel Wiki
(→M100) |
|||
| (21 intermediate revisions by the same user not shown) | |||
| Line 1: | Line 1: | ||
{{A}} | |||
[[File:M100int.png|thumb|800px]] | [[File:M100int.png|thumb|800px]] | ||
| Line 8: | Line 9: | ||
* The software daemon AMCd which is running the AlphaCom XE Main Software | * The software daemon AMCd which is running the AlphaCom XE Main Software | ||
* The embedded web server which is used to configure AMCd and M100d (AlphaWeb). | * The embedded web server which is used to configure AMCd and M100d (AlphaWeb). | ||
The latest supported AMC version is 11.2.3.11 | |||
==M100== | ==M100== | ||
| Line 26: | Line 28: | ||
=Audio Link Interface= | =Audio Link Interface= | ||
[[File:M100Int_1.PNG]] <br/> | [[File:M100Int_1.PNG|thumb|left|500px]] | ||
The Audio Link Interface Unit is powered from the M100 module. Solder a 3-wire power cable to the three solder studs labeled '''+5V, 0V''' (GND), and '''-5V''' on the M100 backplane. Connect the other free end of the cable to a 3-way plug-in screw terminal that connects to the receptor labeled '''-5V GND +5V''' at the back of the Audio Link Interface Unit. | <br style="clear:both;" /> | ||
[[File:M100Int_2.PNG]] | The Audio Link Interface Unit is powered from the M100 module. Solder a 3-wire power cable to the three solder studs labeled '''+5V, 0V''' (GND), and '''-5V''' on the M100 backplane. Connect the other free end of the cable to a 3-way plug-in screw terminal that connects to the receptor labeled '''-5V GND +5V''' at the back of the Audio Link Interface Unit. | ||
[[File:M100Int_2.PNG|thumb|left|500px]] | |||
<br style="clear:both;" /> | |||
=Data Connection= | =Data Connection= | ||
==AlphaCom== | ==AlphaCom== | ||
Use a crossed RS232 cable with | Use a crossed RS232 cable with male 9-pin D-sub connectors at each end to connect the AlphaCom XE7 serial '''Port 0''' to the Audio Link Interface connector labeled '''AlphaCom RS232'''. | ||
==M100== | ==M100== | ||
| Line 140: | Line 144: | ||
==Installation== | ==Installation== | ||
Install and start AlphaPro on your PC. | Install and start AlphaPro on your PC. | ||
[[File:M100Int 16.PNG|thumb|left | [[File:M100Int 16.PNG|thumb|left]] | ||
<br style="clear:both;" /> | <br style="clear:both;" /> | ||
| Line 150: | Line 154: | ||
* Enter '''2''' in the '''Node Number''' field | * Enter '''2''' in the '''Node Number''' field | ||
** This node number must be higher than the M100 node number | ** This node number must be higher than the M100 node number | ||
* Select '''AlphaCom | * Select '''AlphaCom XE from the '''Node Type''' drop-down menu | ||
Enter other relevant data for the network. | Enter other relevant data for the network. | ||
| Line 171: | Line 175: | ||
* Select the AlphaCom node created previously | * Select the AlphaCom node created previously | ||
* Click the '''Exchange & System''' icon | * Click the '''Exchange & System''' icon | ||
[[File: | [[File:AP icon Exch.png|left|thumb]] | ||
<br style="clear:both;" /> | <br style="clear:both;" /> | ||
* Click '''Net Routing''' | * Click '''Net Routing''' | ||
| Line 185: | Line 189: | ||
==Define Audio Connections== | ==Define Audio Connections== | ||
* Click the '''Exchange & System''' icon | * Click the '''Exchange & System''' icon | ||
[[File: | [[File:AP icon Exch.png|left|thumb]] | ||
<br style="clear:both;" /> | <br style="clear:both;" /> | ||
* Click '''Net Audio''' | * Click '''Net Audio''' | ||
| Line 204: | Line 208: | ||
All the M100 numbers needs to be defined in the AlphaCom XE Audio Server. | All the M100 numbers needs to be defined in the AlphaCom XE Audio Server. | ||
* Click the '''Directory & Features''' icon | * Click the '''Directory & Features''' icon | ||
[[File: | [[File:AP icon Dir.png|left|thumb]] | ||
<br style="clear:both;" /> | <br style="clear:both;" /> | ||
* Click '''Insert'''' | * Click '''Insert'''' | ||
| Line 221: | Line 225: | ||
<u>'''Local Group'''</u> | <u>'''Local Group'''</u> | ||
* Click the '''Groups''' icon and select '''Local Groups''' | * Click the '''Groups''' icon and select '''Local Groups''' | ||
[[File: | [[File:AP icon Grp.png|left|thumb]] | ||
<br style="clear:both;" /> | <br style="clear:both;" /> | ||
* Select '''Station Group 2''' from the list on the left and click '''Change''' | * Select '''Station Group 2''' from the list on the left and click '''Change''' | ||
| Line 238: | Line 242: | ||
* Click the '''Groups''' icon and select '''Global Groups''' | * Click the '''Groups''' icon and select '''Global Groups''' | ||
[[File: | [[File:AP icon Grp.png|thumb|left|500px]] | ||
<br style="clear:both;" /> | <br style="clear:both;" /> | ||
* Select '''Global Group 2''' from the list on the left and click '''Change''' | * Select '''Global Group 2''' from the list on the left and click '''Change''' | ||
* Click the ''''Members''' tab | * Click the ''''Members''' tab | ||
* Under '''Not Members''' on the left, select node number '''2''' in the '''Node''' drop-down list | * Under '''Not Members''' on the left, select node number '''2''' in the '''Node''' drop-down list | ||
* Select ''' | * Select '''Global Group 2''' in the '''Group''' list on the left | ||
* Click the right-arrow to move it to the '''Members''' list on the right | * Click the right-arrow to move it to the '''Members''' list on the right | ||
* Click '''OK''' and close the window | * Click '''OK''' and close the window | ||
| Line 252: | Line 256: | ||
==Updating the Exchange== | ==Updating the Exchange== | ||
Set your PC’s IP address to '''169.254.1.2'''. Connect a network cable from the computer to the '''Eth0''' port on the exchange. | Set your PC’s IP address to '''169.254.1.2'''. Connect a network cable from the computer to the '''Eth0''' port on the exchange. | ||
* In AlphaPro, click the ''' | * In AlphaPro, click the '''SendAll''' button. | ||
* | * When prompted enter the default username and password: | ||
** Username: '''admin''' | ** Username: '''admin''' | ||
** Password: '''alphaadmin''' | ** Password: '''alphaadmin''' | ||
* | * When prompted change the node number from default 1 to '''2'''. | ||
* | * When upload is completed, click close. | ||
=Programming in AlphaWeb= | =Programming in AlphaWeb= | ||
| Line 316: | Line 319: | ||
<br style="clear:both;" /> | <br style="clear:both;" /> | ||
{{Note|Whenever a change to the AlphaWeb settings are done and '''Save''' is clicked, the software writes the changes to an XML file in the audio server/exchange. To make the audio server/exchange read the new XML file, a Small Reset has to be carried out.}} | |||
{{Warn|'''<u>Any</u>''' changes in the AlphaCom directory numbers list '''<u>requires</u>''' a '''Save''' under '''External Systems -> General''' followed by a '''Small Reset''' in AlphaWeb.}} | |||
=Door Opening= | =Door Opening= | ||
This application describes how to perform door opening from Alphacom to M100, and is based on the AlphaCom Ringing Group Feature. <br/> | This application describes how to perform door opening from Alphacom to M100, and is based on the AlphaCom Ringing Group Feature. <br/> | ||
The M100 Door Station dials a number (in this example | The M100 Door Station dials a number (in this example 6701), then direct this call to a Ringing Group in the AlphaCom. The Ringing Group contains one (or more) stations that should receive door calls. | ||
==AlphaPro== | ==AlphaPro== | ||
| Line 417: | Line 417: | ||
* The person at M100 station 500 leaves and wants to forward his calls to an operator at AlphaCom station 110. | * The person at M100 station 500 leaves and wants to forward his calls to an operator at AlphaCom station 110. | ||
* M100 user presses F1. | * M100 user presses F1. | ||
* | * Any M100 station calling 500 will be rerouted to 110. | ||
* The transfer is turned off by pressing F0 at M100 station 500. | * The transfer is turned off by pressing F0 at M100 station 500. | ||
Latest revision as of 09:53, 8 July 2022
Software Requirements
AlphaCom
The AMC-IP board must have software version 10.20 or higher. Latest software version is always recommended. The latest version for AlphaCom can be downloaded here.
The AMC-IP software includes the following software routines:
- The software daemon (M100d) which is running the M100 format with the AlphaCom XE main software.
- The software daemon AMCd which is running the AlphaCom XE Main Software
- The embedded web server which is used to configure AMCd and M100d (AlphaWeb).
The latest supported AMC version is 11.2.3.11
M100
Supported SW:
6U Computer Card LBB 7103/07: SW LBB 7216/83
3U Computer Card LBB 7103/05: SW LBB 7216/83
FC Card LBB 7103/13:          SW LBB 7202/28
Programming Tools
AlphaCom
The programming tool for AlphaCom is AlphaPro software version 10.28 or higher.
Download the latest version here.
AlphaPro is used to identify M100 modules as nodes in the AlphaNet and to configure the AGA audio routing.
M100
The programming tool for M100 is SysMain software version 3.0. It is available on request from alphasupport@zenitel.com.
Audio Link Interface
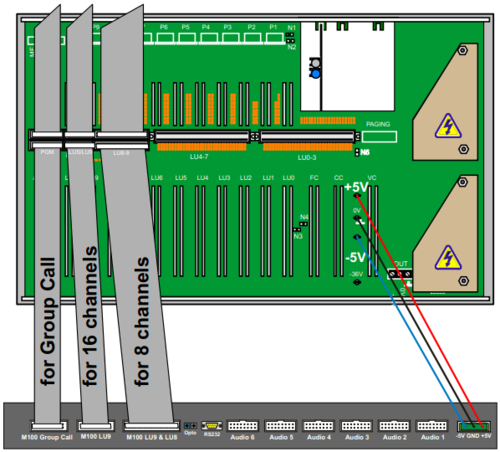
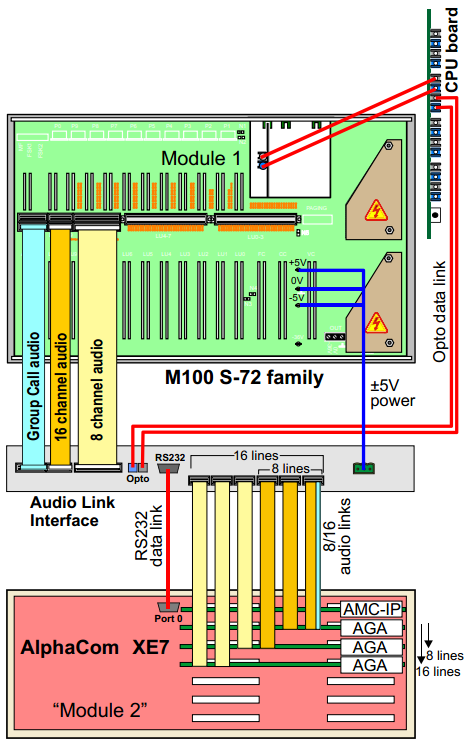
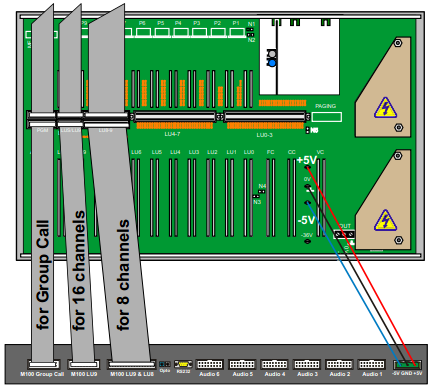
The Audio Link Interface Unit is powered from the M100 module. Solder a 3-wire power cable to the three solder studs labeled +5V, 0V (GND), and -5V on the M100 backplane. Connect the other free end of the cable to a 3-way plug-in screw terminal that connects to the receptor labeled -5V GND +5V at the back of the Audio Link Interface Unit.
Data Connection
AlphaCom
Use a crossed RS232 cable with male 9-pin D-sub connectors at each end to connect the AlphaCom XE7 serial Port 0 to the Audio Link Interface connector labeled AlphaCom RS232.
M100
The M100 system communicates via optical fiber cables. The opto cable (LBB 7103/61) connects from the M100 Computer Card (LBB 7103/05) to the Audio Link Interface Unit. On the Computer Card, connect the opto cable to the connector labeled Module 1 (assuming that the M100 is a single-module system). The other end of the opto cable connects to the receptors labeled M100 Serial - Opto at the back of the Audio Link Interface Unit.
Audio Connection
AlphaCom
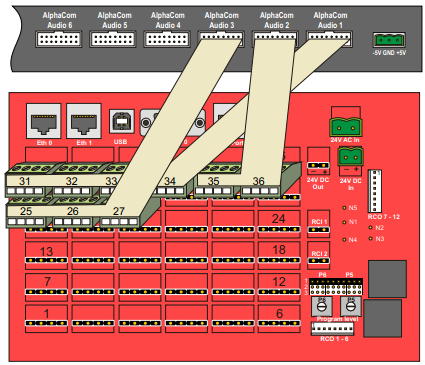
Group Call & 8 Audio Channels
To connect 8-channel Group Call audio for AlphaCom:
- Cut off one connector on three 8-pair flat cables.
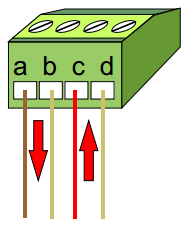
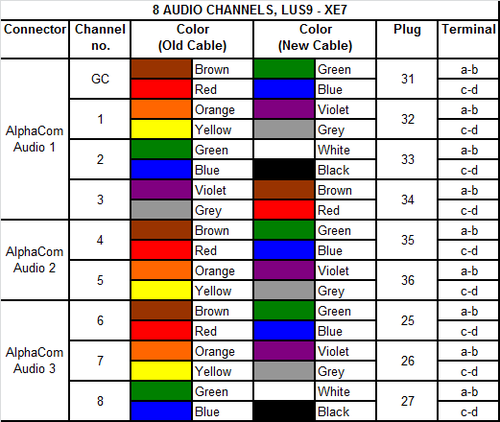
- Connect the free ends to nine 4-way plug-in screw terminals according to table 1.
- Connect the plugs to the corresponding connectors at the back of the AlphaCom XE7 Audio Server according to table 1.
- Connect the other end of the cables to the connectors at the back of the Audio Link Interface labeled AlphaCom Audio 1 to 3.
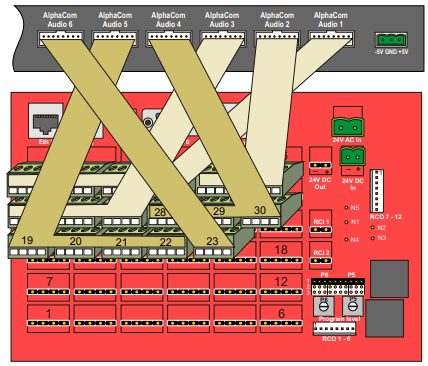
Group Call & 16 Audio Channels
To connect 16-channel Group Call audio for AlphaCom:
- Cut off one connector on six 8-pair flat cables.
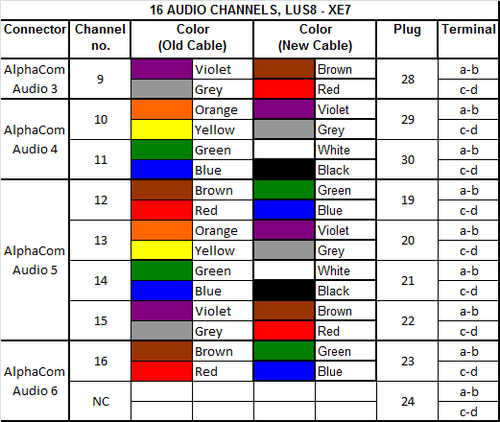
- Connect the free ends to seventeen 4-way plug-in screw terminals according to tables 1 and 2.
- Connect the plugs to the corresponding connectors at the back of the AlphaCom XE7 Audio Server according to tables 1 and 2.
- Connect the other end of the cables to the connectors at the back of the Audio Link Interface labeled AlphaCom Audio 1 to 6.
M100
Group Call
To connect Group Call audio for M100:
- Connect a 20-core ribbon cable to the free connector labeled PGM at the back of the M100 module.
- Only the Group Call channel is transmitted and not the Program Distribution channels.
- Connect the other end to the connector at the back of the Audio Link Interface labeled M100 Group Call.
8 audio channels - 1 LUS board
To connect 8-channel audio for M100:
- Connect a 32-core ribbon cable to the free connector labeled LU8-9 at the back of the M100 module.
- Connect the other end to the connector at the back of the Audio Link Interface labeled M100 LU9 & LU8.
16 audio channels - 2 LUS boards
To connect 16-channel audio for M100:
- Connect a 16-core ribbon cable to the free connector labeled LUS/LU9 at the back of the M100 module.
- Connect the other end to the connector at the back of the Audio Link Interface labeled M100 LU9.
Programming in SysMain (M100)
Installation
Install and start SysMain on your PC.
Getting Started for New M100 System
- Select File -> New
- A setup wizard will start
- Click Next
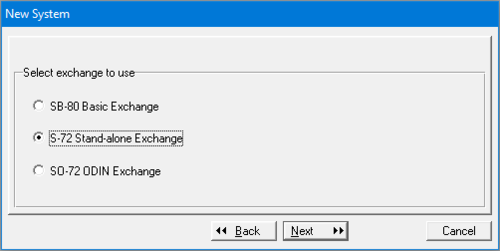
- Select S-72 Stand-alone Exchange and click Next
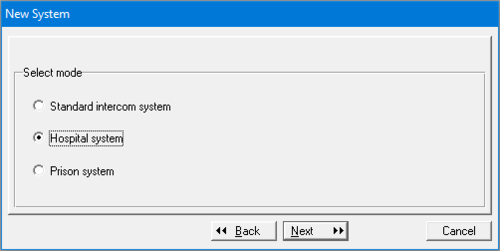
- Select the type of system of your choice. In this example Hospital System is selected.
- Click Next
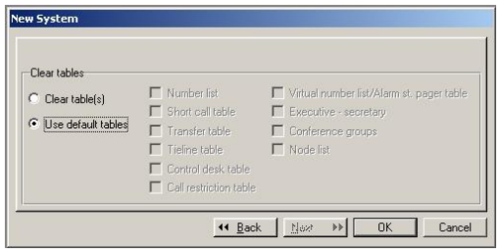
- Select Use default tables and click OK
Setting system parameters
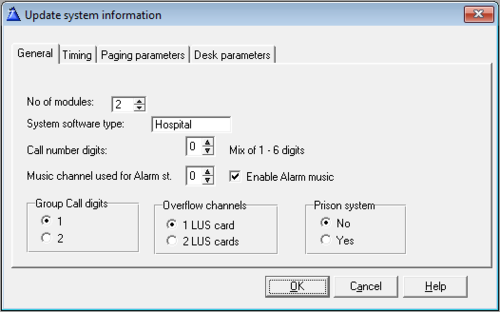
After setup is completed, the Update system information window automatically opens:
- Set No. of modules to 2.
- Select the number of LUS cards installed.
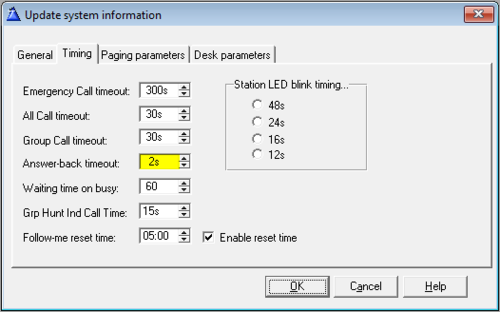
- Switch to the Timing tab.
- Set Answer-back timeout to 2 seconds. (This is the time that the M100 waits for someone to answer back on a group call/voice page. During this time it is not possible to do new group calls.
- Click OK
Updating the exchange
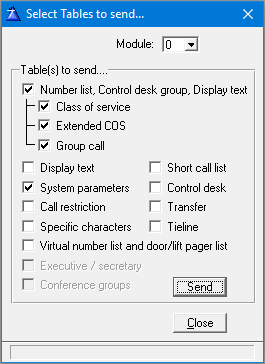
In the menu, click Exchange and select Send data to the exchange
- Select Module 0
- Enable Number list and System parameters
- Click Send
Adding new module to existing M100 exchange
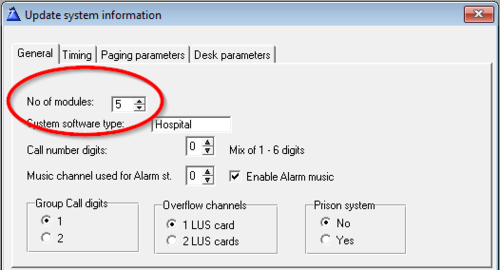
When there is an existing M100 exchange with modules that are already defined, a new module has to be added before connecting to the Audio Link Interface. In the Update system information window in SysMain, activate a new module by increasing the number of existing modules by one:
The opto cable connects to the first available output. If no outputs are available, an ACIA card (LBB 7103/56) has to be installed. The ACIA card requires that the exchange is already fitted with the Computer Card (LBB 7103/05).
See M100 documentation for further details.
Programming in AlphaPro (AlphaCom)
The programming procedures described in this section is for setting up a single-module M100 exchange with an AlphaCom XE7. The setup procedures for equipment other than the above will differ somewhat from that described in this section.
Installation
Install and start AlphaPro on your PC.
Creating Nodes
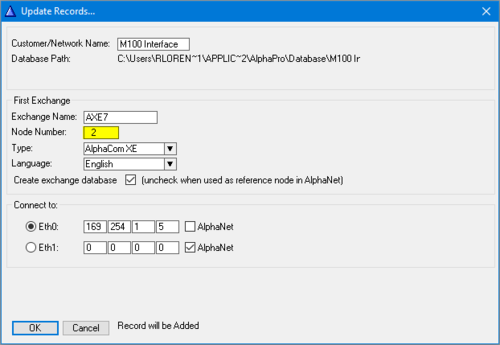
Create a network and an AlphaCom node:
- From the menu bar, select [+] next to the Select Network drop-down menu.
- Enter 2 in the Node Number field
- This node number must be higher than the M100 node number
- Select AlphaCom XE from the Node Type drop-down menu
Enter other relevant data for the network.
Create an M100 node:
- From the menu bar, select [+] next to the Select Exchange drop-down menu
- Enter 1 in the Node Number field
- This node number must be lower than the AlphaCom node number
- Select M100 Node from the Node Type drop-down menu
Enter other relevant data for the node.
Define Data Communication
- Select the AlphaCom node created previously
- Click the Exchange & System icon
- Click Net Routing
- Click Insert
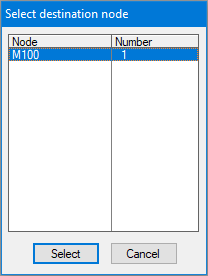
- Highlight M100 as the destination node and click Select
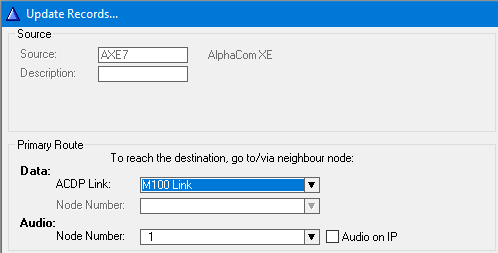
- Under Primary Route, select M100 Link from the ACDP Link drop-down list
- Click Close' to close the Net Routing window
Define Audio Connections
- Click the Exchange & System icon
- Click Net Audio
- Click Insert
- Highlight M100 as the destination node and click Select
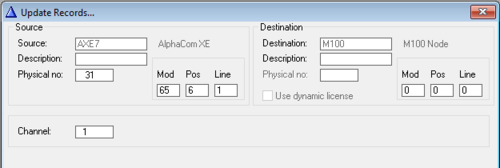
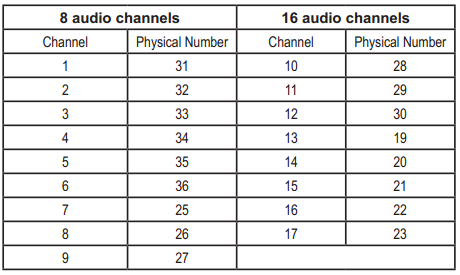
- Enter 31 in the Physical no. field
- Enter 1 in the Channel field
- Click Close to close the Net Audio window
Repeat this procedure for the number of audio channels desired according to the table below.
Define Global Numbers
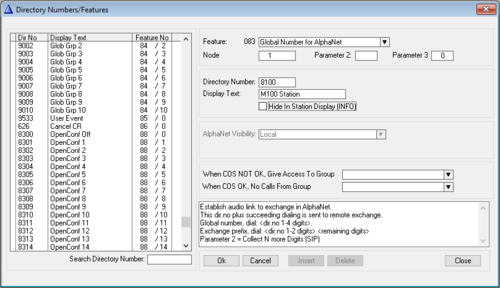
All the M100 numbers needs to be defined in the AlphaCom XE Audio Server.
- Click the Directory & Features icon
- Click Insert'
- Select Global Number for AlphaNet – 83 from the Feature drop-down list
- Enter 1 in the Node field
- In the Directory Number field, enter the M100 directory number
- In the Display Text field, enter an appropriate station name (special characters, such as &, must be avoided)
- Confirm by clicking OK
Repeat this procedure for all the M100 directory numbers.
Define a Group
Local Group
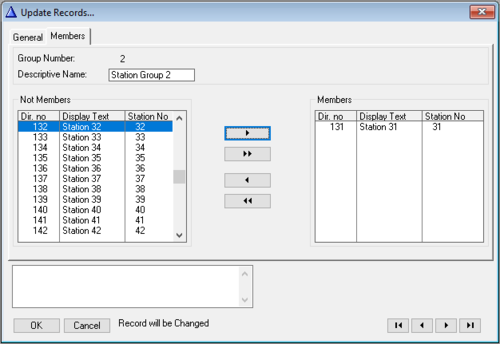
- Click the Groups icon and select Local Groups
- Select Station Group 2 from the list on the left and click Change
- Click the Members tab
- Scroll down in the Not Members list on the left and select Station 31
- Click the right-arrow to move it to the Members list on the right
- Click OK and close the window
Note:
To prevent AGA positions from being connected during an All Call, delete these positions as members of Local Group Number 1.
Global Group
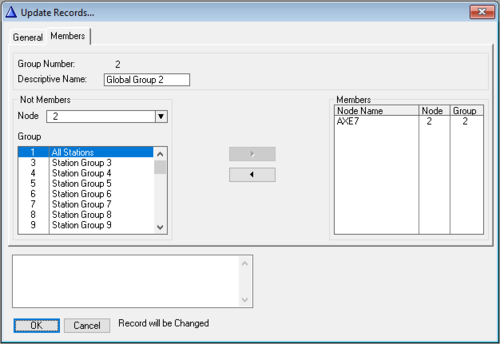
- Click the Groups icon and select Global Groups
- Select Global Group 2 from the list on the left and click Change
- Click the 'Members tab
- Under Not Members on the left, select node number 2 in the Node drop-down list
- Select Global Group 2 in the Group list on the left
- Click the right-arrow to move it to the Members list on the right
- Click OK and close the window
Updating the Exchange
Set your PC’s IP address to 169.254.1.2. Connect a network cable from the computer to the Eth0 port on the exchange.
- In AlphaPro, click the SendAll button.
- When prompted enter the default username and password:
- Username: admin
- Password: alphaadmin
- When prompted change the node number from default 1 to 2.
- When upload is completed, click close.
Programming in AlphaWeb
The programming is done in the web-based tool, AlphaWeb.
- Open a web browser and enter the IP address of the AlphaCom.
- Default IP address: 169.254.1.5
- Log in using the same default username and password as for the AlphaPro.
- Click the System Configuration tab and then click Licensing from the left menu.
- Click Insert new License Key and enter a valid license key required to run the M100 interface software in AlphaCom and click Insert Key
- Click the External Systems tab and click M100 from the left menu.
General Settings
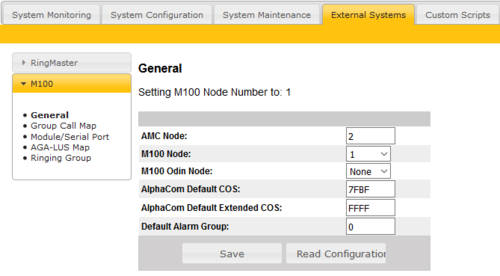
- Under General settings, enter 2 in the AMC Node field and set M100 Node to 1.
- Click Save
Group Call Map
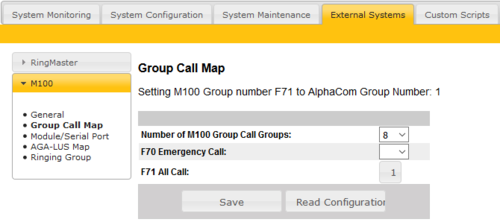
- Click Group Call Map from the left menu
- From the drop-down list, F71 All Call to 1 - 9001
- Click Save
Module/Serial Port
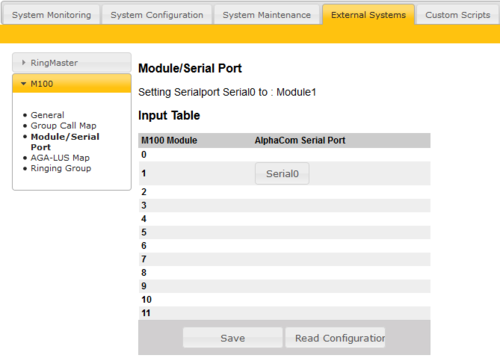
- Click Module/Serial Port from the left menu
- Under Input Table, for M100 Module number 1 select Serial0 from the AlphaCom Serial Port drop-down list
- Click Save
AGA-LUS Map
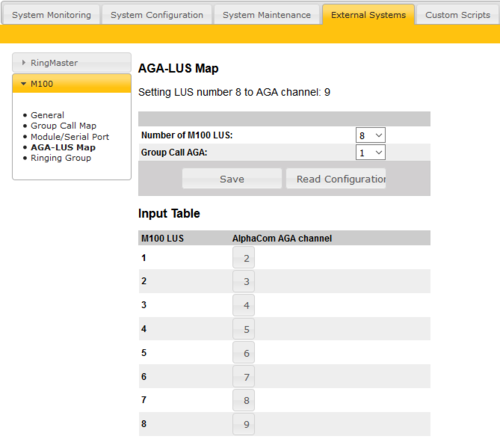
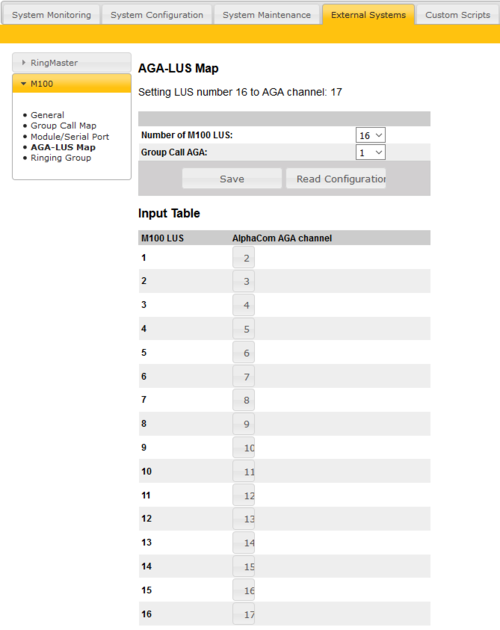
To enter settings for 8 or 16 audio channels, click AGA-LUS Map.
8 Audio Channels
- Set Number of M100 LUS to 8
- Set Group Call AGA to 1
- Under Input Table enter the data according to the image below
- Click Save
16 Audio channels
- Set Number of M100 LUS to 16
- Set Group Call AGA to 1
- Under Input Table enter the data according to the image below
- Click Save
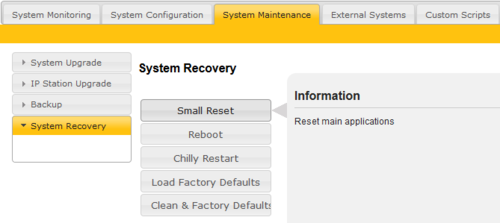
Small Reset
To carry out a small reset:
- Click the System Maintenance tab
- Select System Recovery in the left menu
- Click Small Reset
- Confirm by clicking Yes

|
'''Any changes in the AlphaCom directory numbers list requires a Save under External Systems -> General followed by a Small Reset in AlphaWeb. |
Door Opening
This application describes how to perform door opening from Alphacom to M100, and is based on the AlphaCom Ringing Group Feature.
The M100 Door Station dials a number (in this example 6701), then direct this call to a Ringing Group in the AlphaCom. The Ringing Group contains one (or more) stations that should receive door calls.
AlphaPro
Ringing Group Members
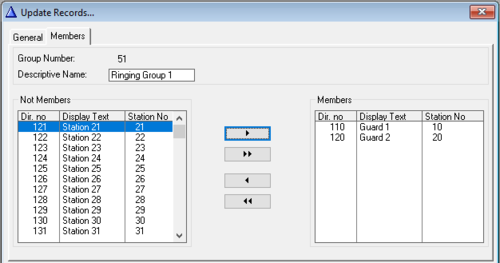
In Groups -> Local Groups scroll down to group 51 - Ringing Group 1. Choose which AlphaCom stations that should receive door calls as members:
Door opening Feature
In Directory&Features, find entry 6 - Open Door:
Change entry 6 - Open Door from feature 58 - Remote Control to feature 108 - Event During Conversation with ID 0:
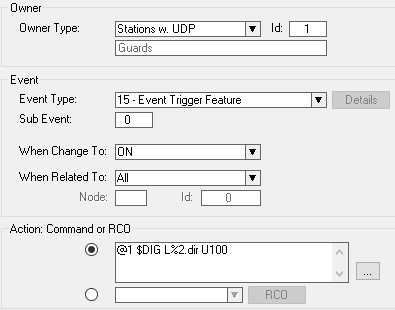
Door Opening Event
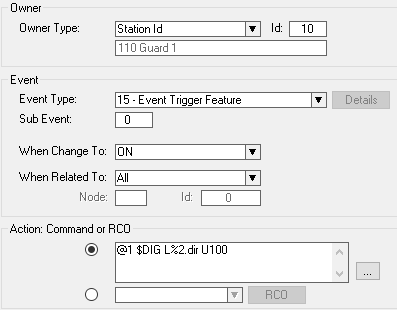
In Exchange&System, click Events and then Insert:
If there are more stations that should be able to do Door Opening, then these should be in a UDP group:
Then the owner in previous event must be changed:
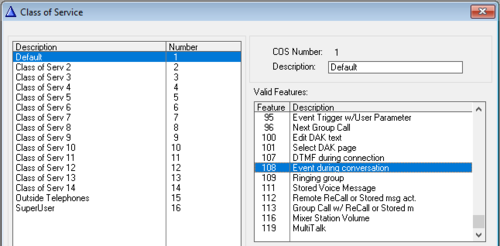
Class of Service
For all stations that should execute Door Opening or Event During Conversation feature, make sure that the 108 - Event During Conversation feature is included in the stations COS:
AlphaWeb
- Navigate to External Systems -> M100 -> Ringing Group:
- Enter the M100 Number to Activate Ringing Group (same number as dialed when the M100 Door station presses the door key (typically key 6).
This is also configured in the M100 SysMain Short Call list for the specified Door station and key (use direct or indirect).
- Select the configured Ringing Group that should receive the Door Calls.
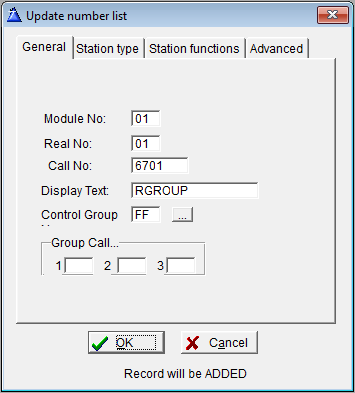
SysMain
- Navigate to Tables -> Number List.
- Click Insert.
- Set a shown below and click OK.
Secretary/Transfer
This application describes how to create the possibility to use the Secretary functionality from M100 stations to AlphaCom stations.
Programming
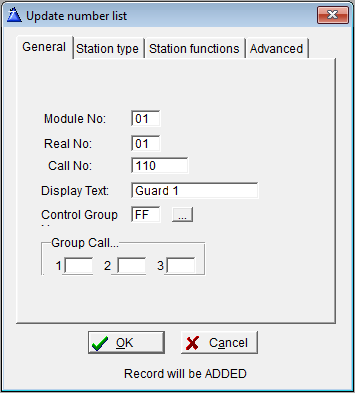
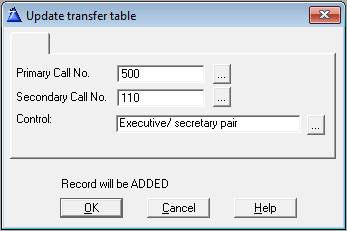
AlphaCom stations that are supposed to be transferred to, must be added as numbers in the virtual module in M100. Go to Tables -> Number List and press Insert:
- Module No: This is the module number in the M100 that the AlphaCom is connected as.
- Real No: This is the physical connection in an M100 module. Since this is a virtual module it doesn’t matter which is number is used.
- Call No: The directory number of the station in AlphaCom that the transfer should go to.
- Leave the rest to default and press OK. Close the Number list Table.
To set up the Executive/Secretary relationship, go to Tables -> Transfer list with Group hunt and press Insert:
- Primary Call No: The M100 station that can initiate transfer by using the F1/F0 codes.
- Secondary Call No: The AlphaCom station that receives the calls to 500 when 500 has used F1.
- Control: The mechanism used for this transfer.
Press OK and close the Transfer list with Group hunt table.
Go to Exchange -> Send data to the exchange and select module 00 (The M100 module). Select Number list (all) and Transfer to be sent.
Operation
- M100 Station 500 receives the calls as normal.
- The person at M100 station 500 leaves and wants to forward his calls to an operator at AlphaCom station 110.
- M100 user presses F1.
- Any M100 station calling 500 will be rerouted to 110.
- The transfer is turned off by pressing F0 at M100 station 500.
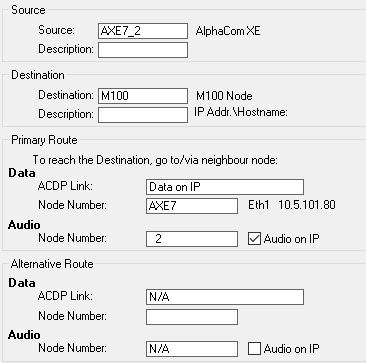
AlphaNet
When there are more AlphaComs in the system that should communicate with M100 stations some extra care must be taken.
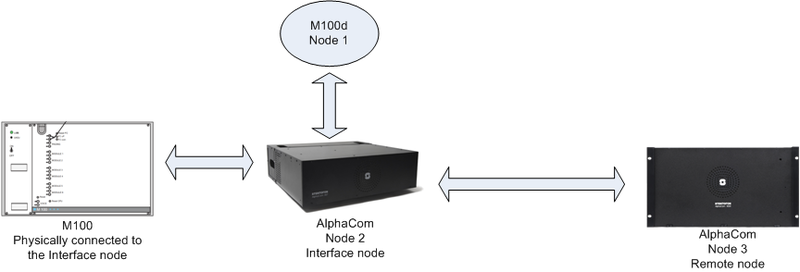
All other AlphaComs must have the correct routing. The AlphaCom that is physically connected to the M100 system will act as a transit node. In the example image below AXE7 is the interface node. AXE7_2 is the second AlphaCom:

