Asterisk configuration: Difference between revisions
From Zenitel Wiki
No edit summary |
|||
| (18 intermediate revisions by one other user not shown) | |||
| Line 43: | Line 43: | ||
=Turbine station configuration= | =Turbine station configuration= | ||
===Configure Station mode=== | ===Configure Station mode=== | ||
*Click '''''Main Settings''''' from the left menu and select '<nowiki/>''' | |||
*Click '''''Main Settings''''' from the left menu and select '<nowiki/>'''SIP.'''' | |||
*From the '''''Model:''''' drop down menu choose ''TCIS 1-3,TCIS 4-5, TCIV-3/TCIV-6, TFIE 1-2'' or ''Mini (TMIS-1)'' depending on which model type you are configuring. | *From the '''''Model:''''' drop down menu choose ''TCIS 1-3,TCIS 4-5, TCIV-3/TCIV-6, TFIE 1-2'' or ''Mini (TMIS-1)'' depending on which model type you are configuring. | ||
*Click '''''Save''''' when done. A screen will appear (not shown) to confirm the setting, click '''''Apply''''' and Turbine will reboot. | *Click '''''Save''''' when done. A screen will appear (not shown) to confirm the setting, click '''''Apply''''' and Turbine will reboot. | ||
[[File: | [[File:SIP_Station_Main.png|thumb|left|500px]] | ||
<br clear=all> | |||
===Configure SIP Settings=== | ===Configure SIP Settings=== | ||
====Account Settings==== | ====Account Settings==== | ||
Click on '''''SIP Configuration''''' → ''''' | Click on '''''SIP Configuration''''' → '''''Account / Call''''' and configure the following in the '''''Account Settings''''' section. | ||
Turbine stations support UDP, TCP and TLS configuration options. | Turbine stations support UDP, TCP and TLS configuration options. | ||
| Line 57: | Line 59: | ||
For TCP and TLS options it is necessary to set '''''Outbound Proxy''''' to have the same value as '''''Server Domain'''''. | For TCP and TLS options it is necessary to set '''''Outbound Proxy''''' to have the same value as '''''Server Domain'''''. | ||
<br> | <br> | ||
[[File:Account_settings_sip. | [[File:Account_settings_sip.png|thumb|left|500px]] | ||
<br clear=all> | |||
=====UDP outbound transport===== | =====UDP outbound transport===== | ||
*'''Display name:''' Enter the desired name. | *'''Display name:''' Enter the desired name. | ||
*'''Directory Number (SIP ID):''' Enter a user extension administered station extension section (sip_additional.conf). | *'''Directory Number (SIP ID):''' Enter a user extension administered station extension section (sip_additional.conf). | ||
| Line 65: | Line 70: | ||
*'''Authentication Password:''' Enter the Secret from station extension section (sip_additional.conf). | *'''Authentication Password:''' Enter the Secret from station extension section (sip_additional.conf). | ||
*'''Outbound Proxy (mandatory for TCP and TLS, optional for UDP):''' Enter the IP address of Asterisk and 5060 as the Port for UDP/TCP | *'''Outbound Proxy (mandatory for TCP and TLS, optional for UDP):''' Enter the IP address of Asterisk and 5060 as the Port for UDP/TCP | ||
[[File:Turbine sip udp.png]] | |||
[[File:Turbine sip udp.png|thumb|left|500px]] | |||
<br clear=all> | |||
=====TCP outbound transport===== | =====TCP outbound transport===== | ||
*'''Display name:''' Enter the desired name. | *'''Display name:''' Enter the desired name. | ||
*'''Directory Number (SIP ID):''' Enter a user extension administered station extension section (sip_additional.conf). | *'''Directory Number (SIP ID):''' Enter a user extension administered station extension section (sip_additional.conf). | ||
| Line 75: | Line 83: | ||
*'''Outbound Proxy (mandatory):''' Enter the IP address of Asterisk and 5060 as the Port for TCP | *'''Outbound Proxy (mandatory):''' Enter the IP address of Asterisk and 5060 as the Port for TCP | ||
<br> | <br> | ||
[[File:Turbine_sip_tcp.png]] | [[File:Turbine_sip_tcp.png|thumb|left|500px]] | ||
<br clear=all> | |||
=====Secure SIP configuration with Secure RTP===== | =====Secure SIP configuration with Secure RTP===== | ||
*'''Display name:''' Enter the desired name. | *'''Display name:''' Enter the desired name. | ||
*'''Directory Number (SIP ID):''' Enter a user extension administered station extension section (sip_additional.conf). | *'''Directory Number (SIP ID):''' Enter a user extension administered station extension section (sip_additional.conf). | ||
| Line 84: | Line 95: | ||
*'''Authentication User Name:''' Enter a user extension administered in station extension section (sip_additional.conf). | *'''Authentication User Name:''' Enter a user extension administered in station extension section (sip_additional.conf). | ||
*'''Authentication Password:''' Enter the Secret from station extension section (sip_additional.conf). | *'''Authentication Password:''' Enter the Secret from station extension section (sip_additional.conf). | ||
<br> | <br> | ||
*'''Outbound Proxy''' (mandatory): Enter the IP address of Asterisk and 5061 as the Port for TLS | *'''Outbound Proxy''' (mandatory): Enter the IP address of Asterisk and 5061 as the Port for TLS | ||
<br> | <br> | ||
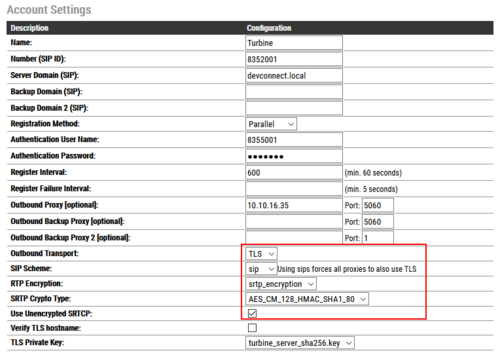
*'''SIP Scheme:''' Choose sips from the drop down. | *'''SIP Scheme:''' Choose sips from the drop down. | ||
*'''RTP Encryption:''' Select srtp_encryption from the drop down. | *'''RTP Encryption:''' Select srtp_encryption from the drop down. | ||
*choose SRTP crypto type from the drop down and TLS private key | *choose SRTP crypto type from the drop down and TLS private key | ||
[[File:turbine_sip_tls_srtp_sips.png]] | |||
[[File:turbine_sip_tls_srtp_sips.png|thumb|left|500px]] | |||
<br clear=all> | |||
=====How install certificate on Turbine station===== | =====How install certificate on Turbine station===== | ||
[[Upload Certificate]] | [[Upload SIP Certificate]] | ||
===Relay settings=== | ===Relay settings=== | ||
[[Relay Settings (Pulse | [[Relay Settings (Pulse)]] | ||
[[Relay Settings (SIP)]] | |||
===Configure Direct Access Key=== | ===Configure Direct Access Key=== | ||
[[Direct Access Key & Ringlist Settings (Pulse | [[Direct Access Key & Ringlist Settings (Pulse)]] | ||
[[Direct Access Key & Ringlist Settings (SIP)]] | |||
=Verification Steps= | =Verification Steps= | ||
| Line 105: | Line 127: | ||
From the Stentonfon web interface, select Information from the left menu. Verify that the Registration state shows Registered. Place a call to another endpoint to verify basic call operation. | From the Stentonfon web interface, select Information from the left menu. Verify that the Registration state shows Registered. Place a call to another endpoint to verify basic call operation. | ||
<br> | <br> | ||
[[File:Turbine registration. | [[File:Turbine registration.png|thumb|left|500px]] | ||
<br> | <br clear=all> | ||
==Verify registration on Asterisk== | ==Verify registration on Asterisk== | ||
Latest revision as of 10:00, 1 October 2024
Asterisk Configuration(CHAN_SIP)
Configuration with UDP/TCP transport protocol and video support
[general]
context=default
bindaddr=0.0.0.0
videosupport=yes
port=5060

//Extension
[5001]
type=friend
host=dynamic
secret=password
disallow=all
allow=ulaw,alaw,g722,g729
Configuration with TLS and SRTP
[general]
context=default
bindaddr=0.0.0.0
port=5061
transport=udp,tls
encryption=yes
videosupport=yes
tlsprivatekey=/etc/asterisk/keys/default.key
tlscertfile=/etc/asterisk/keys/default.crt
tlsbindaddr=[::]:5061
tlsdontverifyserver=no
tlsclientmethod=tlsv1
tlsenable=yes

[5001]
type=friend
host=dynamic
secret=password
disallow=all
allow=g722
allow=g729
allow=ulaw
allow=alaw
Turbine station configuration
Configure Station mode
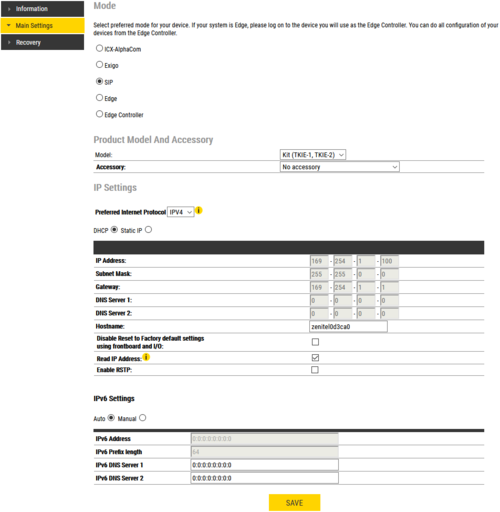
- Click Main Settings from the left menu and select 'SIP.'
- From the Model: drop down menu choose TCIS 1-3,TCIS 4-5, TCIV-3/TCIV-6, TFIE 1-2 or Mini (TMIS-1) depending on which model type you are configuring.
- Click Save when done. A screen will appear (not shown) to confirm the setting, click Apply and Turbine will reboot.
Configure SIP Settings
Account Settings
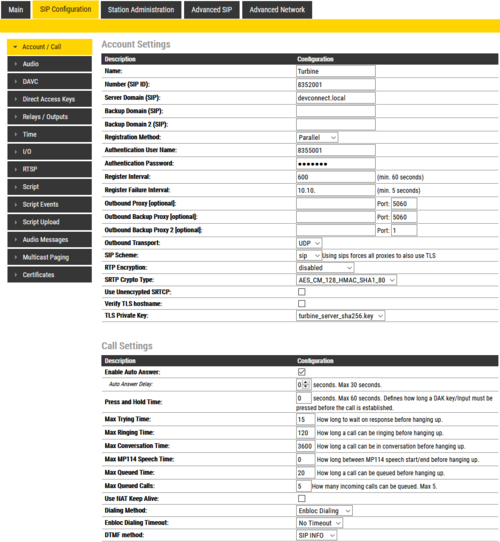
Click on SIP Configuration → Account / Call and configure the following in the Account Settings section.
Turbine stations support UDP, TCP and TLS configuration options.
For TCP and TLS options it is necessary to set Outbound Proxy to have the same value as Server Domain.
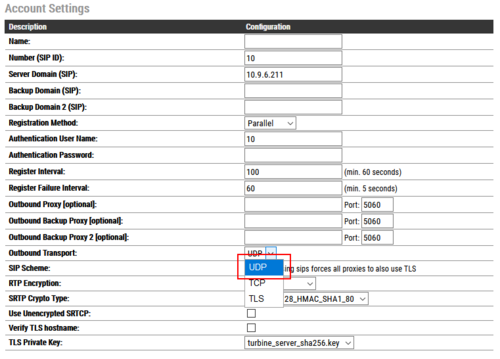
UDP outbound transport
- Display name: Enter the desired name.
- Directory Number (SIP ID): Enter a user extension administered station extension section (sip_additional.conf).
- Server Domain (SIP): Enter the IP address of Asterisk.
- Authentication User Name: Enter a user extension administered in station extension section (sip_additional.conf).
- Authentication Password: Enter the Secret from station extension section (sip_additional.conf).
- Outbound Proxy (mandatory for TCP and TLS, optional for UDP): Enter the IP address of Asterisk and 5060 as the Port for UDP/TCP
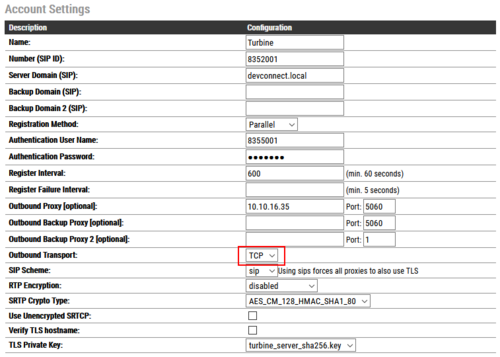
TCP outbound transport
- Display name: Enter the desired name.
- Directory Number (SIP ID): Enter a user extension administered station extension section (sip_additional.conf).
- Server Domain (SIP): Enter the IP address of Asterisk.
- Authentication User Name: Enter a user extension administered in station extension section (sip_additional.conf).
- Authentication Password: Enter the Secret from station extension section (sip_additional.conf).
- Outbound Proxy (mandatory): Enter the IP address of Asterisk and 5060 as the Port for TCP
Secure SIP configuration with Secure RTP
- Display name: Enter the desired name.
- Directory Number (SIP ID): Enter a user extension administered station extension section (sip_additional.conf).
- Server Domain (SIP): Enter the IP address of Asterisk.
- Authentication User Name: Enter a user extension administered in station extension section (sip_additional.conf).
- Authentication Password: Enter the Secret from station extension section (sip_additional.conf).
- Outbound Proxy (mandatory): Enter the IP address of Asterisk and 5061 as the Port for TLS
- SIP Scheme: Choose sips from the drop down.
- RTP Encryption: Select srtp_encryption from the drop down.
- choose SRTP crypto type from the drop down and TLS private key
How install certificate on Turbine station
Relay settings
Configure Direct Access Key
Direct Access Key & Ringlist Settings (Pulse)
Direct Access Key & Ringlist Settings (SIP)
Verification Steps
Verify Turbine SIP Registration
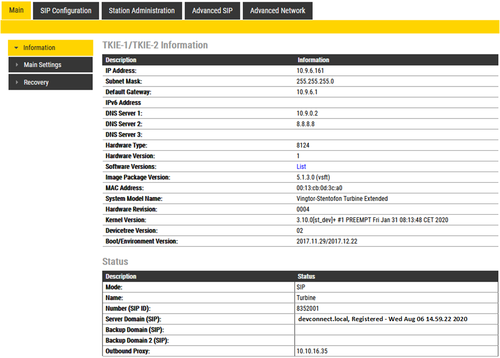
From the Stentonfon web interface, select Information from the left menu. Verify that the Registration state shows Registered. Place a call to another endpoint to verify basic call operation.
Verify registration on Asterisk
The following commands can be used to verify registration.
sip show peers
sip show users
sip show DIRNO
Verify Successful Calls
Place a call to and from the Turbine endpoint. Verify 2-way audio is heard and validate call terminates successfully.
Related Articles
This section references the Asterisk and Zenitel product documentation that are relevant to these Application Notes.
These documents form part of the Asterisk reference documentation suite.
[1] https://wiki.asterisk.org/wiki/display/AST/Getting+Started
The Zenitel Turbine documentation can be found at http://www.zenitel.com.
[1] A100K11013-Pulse-Getting-Started.pdf.

