GSM Gateway (Pulse): Difference between revisions
From Zenitel Wiki
| (9 intermediate revisions by 2 users not shown) | |||
| Line 11: | Line 11: | ||
===Install license=== | ===Install license=== | ||
Before a SIP Gateway Account can be created on the Pulse Server, you need to obtain the '''Pulse Telephone Gateway''' license: | Before a SIP Gateway Account can be created on the Pulse Server, you need to obtain the '''Pulse Telephone Gateway''' license: | ||
* 1009662001: Pulse-Server-TelTrunk (Pulse | * 1009662001: Pulse-Server-TelTrunk (requires that the Pulse Server is a [[:Category:Stations#Turbine_stations|Turbine station]] running firmware 4.2 and higher), or | ||
* 1009643121: Pulse telephone gateway license ( | * 1009643121: Pulse telephone gateway license (supported by all platforms ([[:Category:Stations#INCA_stations|INCA stations]] and [[:Category:Stations#Turbine_stations|Turbine stations]]), and by all software versions) | ||
* To install the license, log on to the Pulse Server, and under '''Station Administration''' > '''Licensing''' insert the License Key: | * To install the license, log on to the Pulse Server, and under '''Station Administration''' > '''Licensing''' insert the License Key: | ||
| Line 175: | Line 175: | ||
After a software upgrade you must load default settings by selecting '''Update''' > '''Default Settings''' > '''Default'''. | After a software upgrade you must load default settings by selecting '''Update''' > '''Default Settings''' > '''Default'''. | ||
Latest revision as of 12:17, 19 May 2020

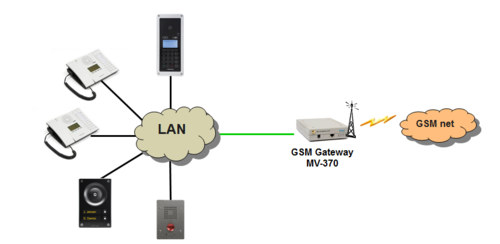
This article describes the setup of the MV-370 GSM Gateway (item 220 0003 000) in a PULSE environment.
Prerequisites
- A Pulse System with a Pulse Server already installed
- SIM card (mini-SIM size) for the gateway. You need to know the phone number and the PIN code for the SIM card.
PULSE Configuration
Install license
Before a SIP Gateway Account can be created on the Pulse Server, you need to obtain the Pulse Telephone Gateway license:
- 1009662001: Pulse-Server-TelTrunk (requires that the Pulse Server is a Turbine station running firmware 4.2 and higher), or
- 1009643121: Pulse telephone gateway license (supported by all platforms (INCA stations and Turbine stations), and by all software versions)
- To install the license, log on to the Pulse Server, and under Station Administration > Licensing insert the License Key:

Create the SIP Gateway account
On the Pulse Server, select Server Management > Server Configuration > Directory Settings.

Set the following values:
- Directory Number: 0 (This is the number to dial to get access the telephone line. Other number can be used)
- Name: <name of your choice>
- Profile: Default
- Password: Normally leave this field blank. When a password is entered, the SIP gateway must register using this password.
Click Add, followed by Save.
Note: The "Gateways" option will only appear on the Pulse Server if there is a valid license installed.
GSM Gateway Configuration
Important: If you have a SIM card with PIN code activated, DO NOT insert the SIM card yet.
Load Factory Default values
The GSM Gateway comes with default network parameters (factory default parameters). The default IP address is 192.168.0.100.
You can load factory network parameters and reset the username and password to its default settings (username: voip, password: 1234) by following these steps:
- Press and hold the button SW1 located at the bottom of the unit (you have to remove the lid) for about 7-8 seconds
- Wait for the "Mobile" and "LAN" leds to start blinking
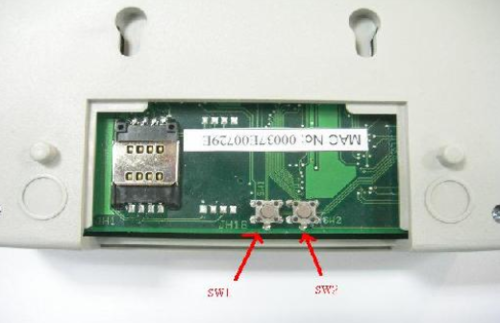
- The GSM Gateway will now get the IP address 192.168.0.100, subnet mask 255.255.255.0.
Accessing the gateway
- Change the IP address of your PC to 192.168.0.99, subnet mask 255.255.255.0.
- Connect the LAN port of the PC to the Ethernet port of the GSM Gateway.
- Start your Web Browser and type 192.168.0.100 in the URL field.
- Type in username voip and password 1234. (Case-sensitive!)
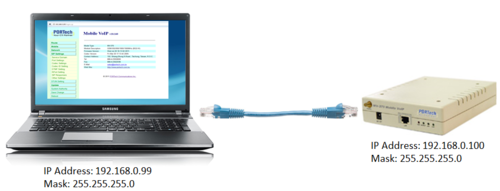
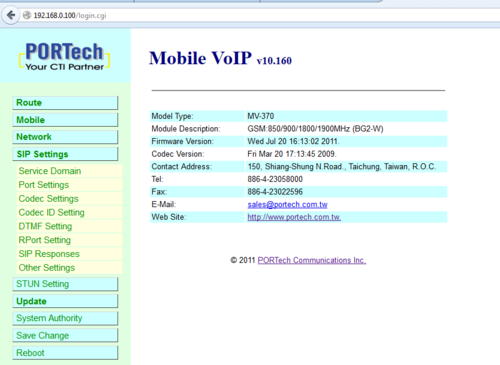
- The Home page of the Web Interface will appear:
Network Configuration
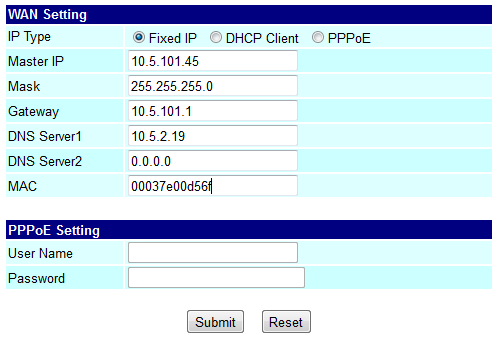
To change the IP address of the GSM gateway, go to Network > WAN Settings, and enter:
- IP Type: Fixed IP
- Master IP: The IP address of this gateway. Must be in the IP address range of the subnet for the PULSE system
- Mask: Subnet mask for the gateway. Other parameters are optional.
- Press Submit, then Save. The gateway will restart.
After having changed the IP Address of the gateway, follow these steps to re-access the gateway:
- Change the IP address of your PC to match the new network settings of the gateway. The PC and Gateway must be on the same subnet.
- Re-access the Gateway by typing the new assigned IP address in the URL field of your web browser.
SIP Parameters
To define the SIP settings, go to SIP Settings -> Service Domain:
- Active = ON
- Display Name: Any text
- User Name: Enter the directory number used to access the gateway. This number must be identical to the number entered in the PULSE Server.
- Proxy Server: Enter the IP address of the PULSE Server
- Press Submit, then Save. The gateway will restart.
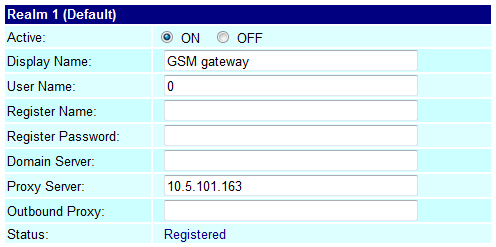
- Status = Registered: Shows that the gateway is successfully registered to the PULSE server.
Mobile Settings
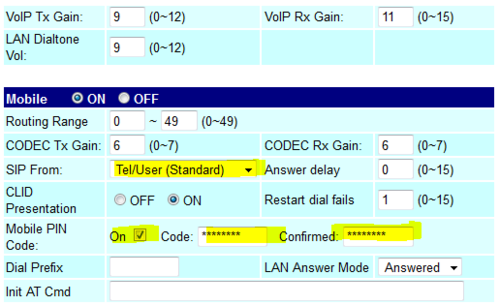
Go to Mobile > Settings and define the following parameters:
- SIP From = Tel/User (Standard)
- Mobile PIN Code = ON. Code: Enter the PIN code for the SIM card. Confirmed: Enter the PIN code again.
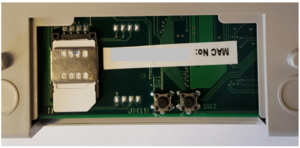
The SIM card can now be inserted. The gateway uses Standard (Mini) SIM card (15x25mm).
After the SIM card is inserted, you can check that the gateway is successfully registered to the GSM network in Mobile > Status.
Some parameters to look for are:
- Operator = The telecom provider
- Signal Quality = Shows the signal strength. The signal should be in the range of 10 - 31.
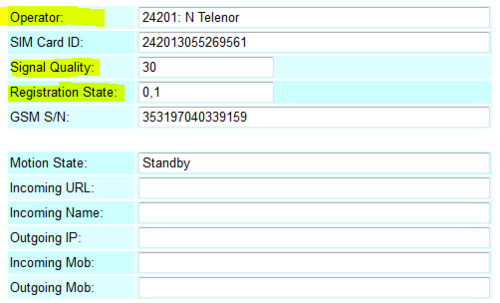
If these parameters does not show, your gateway is not registered to the GSM network. Check that SIM card is properly inserted, and that the PIN code is correctly entered.
TIP: Try the SIM card in a regular mobile phone.
Configure outgoing calls to the GSM network
To automatically dial an external phone number when gateway is accessed, go to Route > Lan To Mobile Settings.
On item 0, enter:
- URL = *
- Call Num = <external phone number to dial>

If Call Num instead is set to "*", there will be 2-stage dialing. I.e. you will get a second dial tone after having dialed "0", and the gateway will wait for further digits.
Configure incoming calls from the GSM network
Alternative 1: Route incoming calls to a predefined number.
Select Route > Mobile to LAN Settings, and set:
- CID = *
- URL = <intercom number>

Alternative 2: There will be a second dial-tone presented on incoming calls. The user must dial the intercom number. The dialing can be terminated by '#', or alternatively one can wait for 5 seconds and the call will be established.
Select Route > Mobile to LAN Settings, and set:
- CID = *
- URL = *

DTMF Input from outside line
During a conversation between a Pulse station and a telephone, the telephone operator can activate an output (e.g. trigger a relay for door opening) in the Pulse System by pressing a digit on the phone.
To enable digit actions from the telephone line during conversation, go to set SIP Settings > DTMF Setting, and enable "SIP INFO":

Software Upgrade
To do a software upgrade, go to Update > New Firmware:
- Select the firmware code type "Risc".
- Click the Browse button and navigate to the file you want to download
- Click the Submit button

After a software upgrade you must load default settings by selecting Update > Default Settings > Default.
