Akuvox R29S (ICX-Alphacom): Difference between revisions
From Zenitel Wiki
No edit summary |
No edit summary |
||
| Line 16: | Line 16: | ||
# Select '''Send All''' or '''Send Change''' to update to the ICX-Alphacom server | # Select '''Send All''' or '''Send Change''' to update to the ICX-Alphacom server | ||
[[File: | [[File:R29_alphapro.jpg|thumb|left|500px|Configure the Akuvox R29S in the ICX-Alphacom server]] | ||
<br clear=all/> | <br clear=all/> | ||
===Door Opening Feature=== | |||
During a conversation between Akuvox R29 and a master station, the master station operator can activate the [[Door opening|Door Opening feature]] in the AlphaCom by pressing digit 6. | |||
The Door Opening feature is programmed in the Event Handler. When Akuvox R29S is involved, an event must be created to send the DTMF signal. By default, Akuvox R29S uses sign "#" to activate Relay A, digit "2" to activate Relay B and digit "3" to activate Relay C. | |||
In [[AlphaPro]], open [[Users_%26_Stations_(AlphaPro)|Users & Stations]], select the Akuvox R29S and press [[Users_%26_Stations_(AlphaPro)#Events|Events]]. In the [[Users_%26_Stations_(AlphaPro)#Events|Events]] window press Insert and create the following event | |||
[[Image:R29_dooropeningevent.jpg|left|thumb|500px|Door Opening event for Akuvox R29S]] | |||
<br style="clear:both;" /> | |||
{| | |||
|- | |||
|width="100pt"|'''Event Owner''': | |||
|width="400pt"|The Akuvox R29S | |||
|- | |||
|'''Event type''': || [[Door_Opening_-_During_Conversation_(Event_Type)|2 – Door Opening - During Conversation]] | |||
|- | |||
|'''Subevent''': || 0 | |||
|- | |||
|'''When change to''': || ON or OFF | |||
|- | |||
|'''When related to''': || All | |||
|- | |||
|'''Action:''' || IF %chg(1,0) <br> $D2S L146 B 1 <br> stop <br> endif <br> $D2S L146 B 0 | |||
|- | |||
|} | |||
When digit 6 is pressed on the master station, the symbol "#" will be sent to the Akuvox R29S and will activate Relay A. | |||
{{note | In action [[D2S]], parameter 1 can have the following values to represent a digit: <br> 0-9 = DTMF tones 0-9 <br> A and B = '*' and '#'}} | |||
== Configuration of the Akuvox R29S == | == Configuration of the Akuvox R29S == | ||
Revision as of 11:58, 3 June 2020
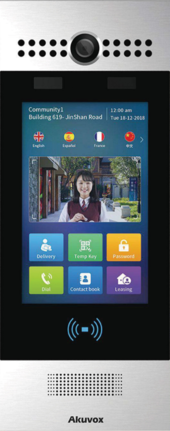
This article describes how to set up the Akuvox R29S to operate in a ICX or AlphaCom system. The Akuvox R29S can be used for audio only, or it can also send the video image to a station with a video display, like the ITSV-1.
Licensing
- The Akuvox R29S requires a SIP Station license in the ICX-Alphacom server.
ICX-Alphacom server configuration
The Directory Number (SIP User ID) and Name of the Akuvox R29S must be configured in the ICX-Alphacom server.
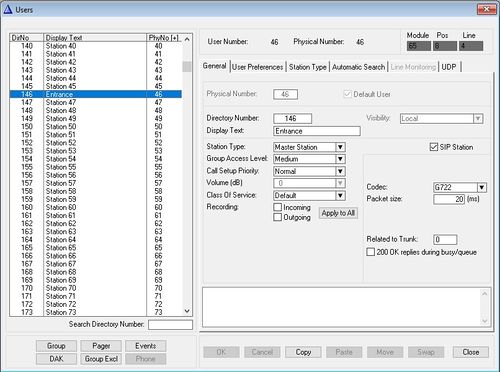
- In AlphaPro, open Users & Stations and select a free user from the list box.
- Enter Directory Number and Display Text, and enable the "SIP Station" flag. Set Codec = G.722.
- Select Send All or Send Change to update to the ICX-Alphacom server
Door Opening Feature
During a conversation between Akuvox R29 and a master station, the master station operator can activate the Door Opening feature in the AlphaCom by pressing digit 6.
The Door Opening feature is programmed in the Event Handler. When Akuvox R29S is involved, an event must be created to send the DTMF signal. By default, Akuvox R29S uses sign "#" to activate Relay A, digit "2" to activate Relay B and digit "3" to activate Relay C.
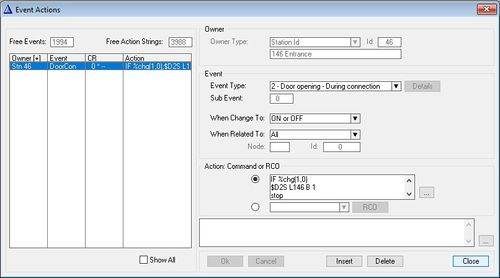
In AlphaPro, open Users & Stations, select the Akuvox R29S and press Events. In the Events window press Insert and create the following event
| Event Owner: | The Akuvox R29S |
| Event type: | 2 – Door Opening - During Conversation |
| Subevent: | 0 |
| When change to: | ON or OFF |
| When related to: | All |
| Action: | IF %chg(1,0) $D2S L146 B 1 stop endif $D2S L146 B 0 |
When digit 6 is pressed on the master station, the symbol "#" will be sent to the Akuvox R29S and will activate Relay A.

|
In action D2S, parameter 1 can have the following values to represent a digit: 0-9 = DTMF tones 0-9 A and B = '*' and '#' |
Configuration of the Akuvox R29S
Network settings
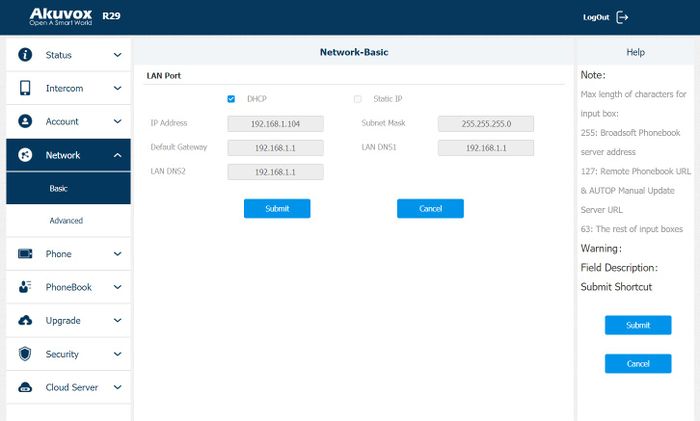
Akuvox R29S uses DHCP by default, which means that IP address, subnet mask, and default gateway will be obtained from the DHCP server automatically. To find the IP address of the station follow these steps:
- Power up the Akuvox R29S
- Go through the initial setup of selecting language and theme
- Push on the touch screen, and select Dial or Call, depending on the theme you selected
- Enter the secret code for the settings, by default "9999", and press the Call button
- Enter the password for the Setting menu, by default "3888" and press OK
- Go to Info to find the IP address of the station. If the IP address is 0.0.0.0, this means there is no DHCP Server in the network. You need to manually set the IP address, subnet mask and default gateway. To do this go to the Network menu, disable DHCP, enter the required information and press Save.
- Open a web browser on your computer, enter the IP address into the address bar and press Enter.
- Enter the user name (default: admin) and password (default: admin) in the pop-up dialogue box and click Login
- Select Network > Basic to configure the phone to use DHCP (obtain an IP address automatically) or Static IP address.
SIP account settings
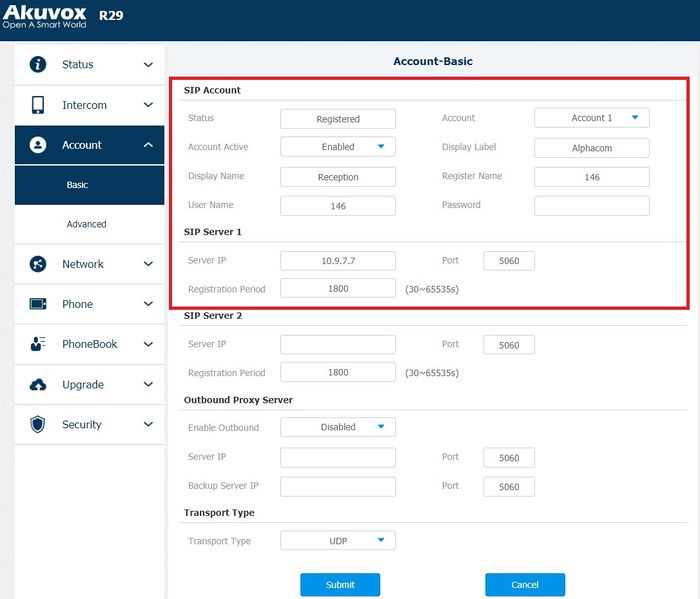
A SIP account must be configured using the settings from the IC-Edge controller. To set it up go to Account > Basic
SIP Account
- Status: Shows the status of the SIP account
- Account: Select "Account 1" or "Account 2"
- Account Active: Select "Enabled"
- Display Label: To enter the label name of this account, which will show on the account status interface
- Display Name: To enter the display name of this account, which will show on other devices when making calls
- Register Name: Used to register to the Edge Controller. Must match the directory number entered in the ICX-Alphacom server
- User Name: This ID is identical to the "Register Name". Must match the directory number entered in the ICX-Alphacom server
- Password(Optionally): Password that is used as authentication during the registration process. Not applicable when connecting to ICX-Alphacom server
SIP Server 1
- Server IP: Enter the IP address of the ICX-Alphacom server
- Port: The SIP port used. Normally 5060.
- Registration Period: The registration will expire after registration period, the phone will re-register automatically within registration period.
Camera configuration
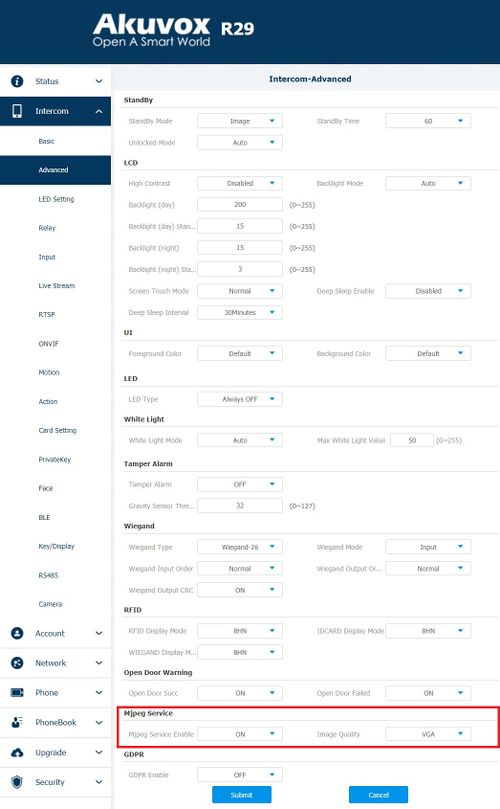
Configuration of the MJPG stream
- Log on to the Akuvox R29S (default username: admin, password: admin)
- Select Intercom > Advanced, and under Mjpeg Service set:
- Mjpeg Service Enable: ON
- Image Quality: Select the desired image quality
Configuration of the RTSP stream
- Log on to the Akuvox R29S (default username: admin, password: admin)
- Select Intercom > RTSP
- Under RTSP Basic set:
- RTSP Enable: Select Enabled to enable the RTSP stream/
- RTSP Authorization: Enable or disable authorization. If it is enabled, username and password must be included in the URL string
- RTSP User Name: Username used for RTSP Autorization
- RTSP User Password: Password used for RTSP Autorization
- RTSP Authentication Type: Select Basic or Digest type of authorization
- Under RTSP stream set:
- RTSP Video Codec: By default it is H.264, can be set to MJPEG
- Under H.264 Video Parameters set:
- Video Resolution: Select the video resolution for the first RTSP stream (rtsp://<IP address of Akuvox>/live/ch00_0)
- Video Framerate: Select the video framerate for the first RTSP stream
- Video Bitrate: Select the video bitrate for the first RTSP stream
- Video Resolution2: Select the video resolution for the second RTSP stream (rtsp://<IP address of Akuvox>/live/ch00_1)
- Video Framerate2: Select the video framerate for the first RTSP stream
- Video Bitrate2: Select the video bitrate for the first RTSP stream
Troubleshooting when no video
The ITSV-1 should show video from an Akuvox R29S station when a call is established, without having to do any configuration. However, if no video is present during a call, check the following:
ITSV-1 unit:
- Log in to the ITSV and navigate to Account > Account 1 > Call Settings, and verify that Start Video Automatically is enabled.
Akuvox R29S:
- Check that MJPG is enabled in Intercom > Advanced > Mjpeg Service
- Check that RTSP is enabled. Check if RTSP Authorization is enabled.
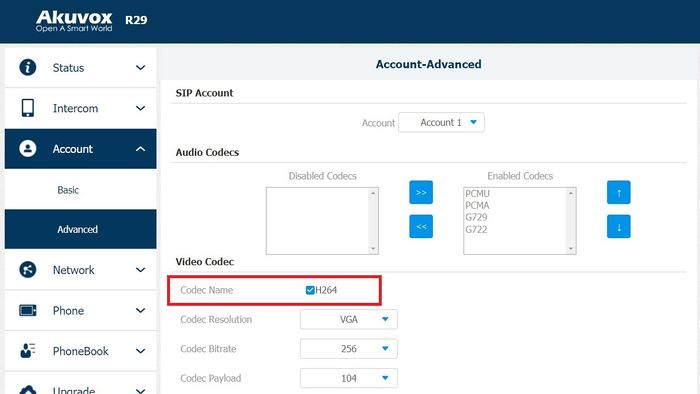
- Codec issue:
- Log in to the Akuvox R29S, and select Account > Advanced > Account 1
- Under the Video Code section, verify that the checkbox for H264 is checked
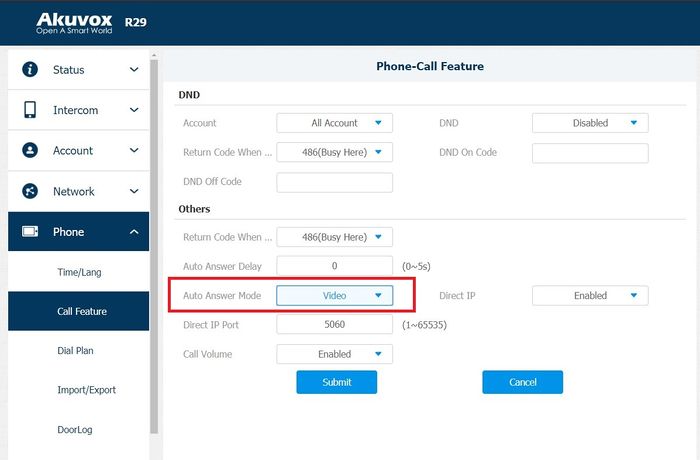
- Auto Answer Mode
- Log in to the Akuvox R29S, and select Phone > Call Feature
- Under Others in the Auto Answer mode check if Video is seleceted from the drop-down list
Factory reset
A factory reset can be made from the web interface and from the station menu.
Factory reset from web interface
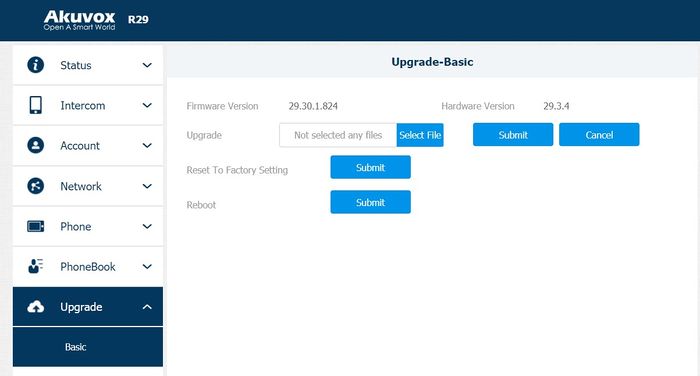
- Go to Upgrade > Basic
- Under Reset to Factory Setting click Submit
- Confirm the action
- The station will have DHCP enabled after Factory reset. To find out what is the IP address of the station go to Network Settings
- Press the Dial/Call button
- Enter the secret code for the settings, by default "9999", and press the Call button
- Enter the password for the Setting menu, by default "3888" and press OK
- Navigate to Restore button, press it and then press Confirm
- The station will have DHCP enabled after the Factory reset. To find out what is the IP address of the station, go to Network Settings
Configure station with display to receive video from Akuvox R29S
The video stream Akuvox R29S can be streamed to a station with a video display, like the ITSV-1. The video is streamed directly from the Akuvox R29S to the ITSV-1. The ICX-Alphacom server is not involved in the video stream.
ITSV-1
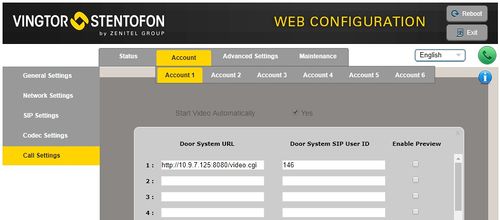
The directory number of the Akuvox R29S must be defined in the Camera List, together with the URL of the camera of the Akuvox R29S. When a call is received, the ITSV will lookup in this Camera List, and find the correct URL for the associated camera.
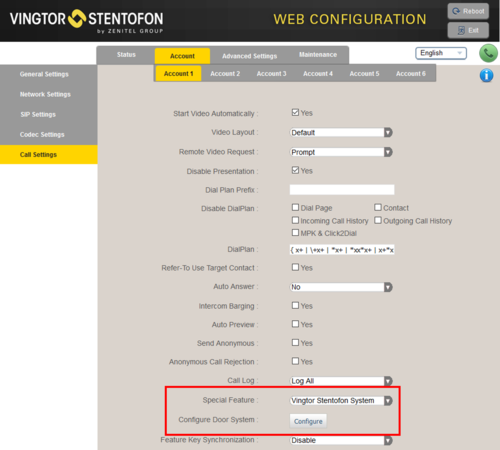
- Select Account > Account 1 > Call Settings
- In "Special Feature", select Vingtor Stentofon System
- In "Configure Door System" press the button Configure to open the Camera List
- In the Camera List, enter the camera URL and the directory number of the Video Door station:
With the Akuvox R29S, RSTP and MJPEG can be used for streaming:
- MJPEG over HTTP: http://<IP address of Akuvox>:8080/video.cgi (Example: http://10.9.7.125:8080/video.cgi)
- H264 over RTSP: rtsp://<IP address of Akuvox>/live/ch00_0 (Example: rtsp://10.9.7.125/live/ch00_0)


