AudioCodes MP114/118, v5.4 and higher
From Zenitel Wiki
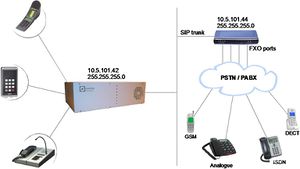
This article describes the setup of the AlphaCom E system and the AudioCodes MP-114/118 SIP Gateway, firmware version 5.4 and 5.6. The article covers the most common features used in an AlphaCom ↔ AudioCodes interconnection.
The configuration of AlphaCom E with SIP gateway includes the
following steps:
Using AlphaWeb
- Assign IP address to the AlphaCom Ethernet port
- Insert SIP Trunk licenses
- Firewall (filter) settings
Using AlphaPro
- Create a SIP Trunk Node
- Define the AlphaCom / SIP routing
- Create prefix numbers
- Update the exchange
Contents
- 1 AlphaCom Configurations
- 2 Audiocodes MP-114/118 Configuration
- 3 Far end disconnect (FED)
- 4 Message log
- 5 Miscellaneous features
AlphaCom Configurations
AlphaWeb Configurations
Assign IP adress to the AlphaCom E Ethernet port(s)
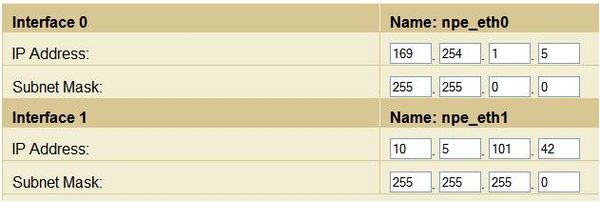
- Log on to AlphaWeb and enter a valid IP address on the Ethernet port.
In the example below, Ethernet port 1 is used. Consult your network administrator to obtain the IP address.
Insert SIP Trunk licenses
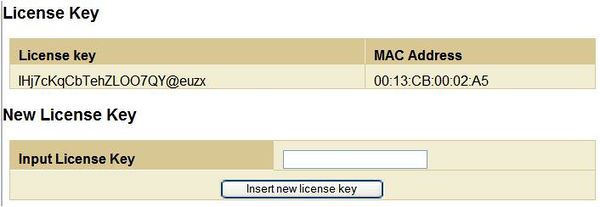
Log on to AlphaWeb and install the SIP Trunk license.
Firewall (filter) settings
Enable the SIP protocol and VoIP Audio on the desired Ethernet port (default enabled for Ethernet port1).
AlphaPro Configuration
Create a SIP Trunk Node
From the AlphaPro main menu, use the ‘+’ button next to the ‘Select Exchange’ dropdown list to create a new exchange. The exchange type must be set to ‘SIP Node’.
Set the parameters as follows:
The SIP Trunk IP address must be identical to the IP address of the SIP Gateway.
Note: If the AlphaCom is configured with a SIP Registrar node in addition to the SIP Trunk node, the SIP Registrar node must have a lower node number than the SIP Trunk node.
Define the AlphaCom / SIP routing
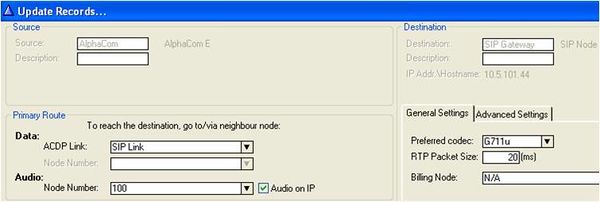
In Exchange & System > Net Routing use the Insert button to create a route between the AlphaCom and SIP Gateway. Set Preferred codec to G711u and RTP Packet Size to 20 ms.
Create Prefix number
Update the exchange
Audiocodes MP-114/118 Configuration
Configure Network Parameters
IP Configuration
SIP Parameters
Audio Codec
About Saving Changes
Backup and Restore
AlpphaCom to Telephone Network
Group Hunt
FXO Line Select
Telephone Network to Alpha Com
Selective Dialing
Automatic Dialing (Call to Switchboard)
Delayed Automatic Dialing
Caller ID
Far end disconnect (FED)
Call Termination options in the SIP Gateway
Detection of polarity reversal / current disconnect
Detection of Busy / Dial tones
Detection of Silence
Detection of Conversation
Message log
Miscellaneous features
Incomming Calls in Private
Door Opening Feature
SIP Gateway Configuration
AlphaCom configuration
M-Key Control from Telephone Network
Transmit '*' and '#' from AlphaCom
Voice Switching in Noisy Environment
Country Settings
Country codes
Feature Guide
Customizing the web interface logo
In a few easy steps its possible to change the logo that is seen in the top left corner in the Audiocodes web interface.

- Access the device's web interface.
- In the URL field, append the case-sensitive suffix ‘AdminPage’ to the IP address (e.g. http://10.1.229.17/AdminPage); the 'Admin' page appears.
- On the left panel, click 'Image Load to Device'.
- Click the Browse button, and then navigate to the folder in which the logo image file that you want to use is located.
- Click the Send File button; the image file uploads to the device. When loading is complete, the page is automatically refreshed and the uploaded logo image is displayed in the Web interface's title bar.
- If you want to modify the width of the image, in the 'Logo Width' field, enter the new width (in pixels) and then click the Set Logo Width button.
- Save the image by pressing the 'Burn' button located on the top menu bar in the mainpage.


