PrisCom Station Connections
From Zenitel Wiki
External connections
- All external connections are terminated in the plug-in terminal blocks P1, P2 and P3.
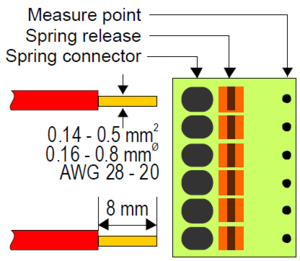
- The spring loaded terminals can accept cable dimensions from 0.14 to 0.5 mm2 (0.16 – 0.8 mmØ , AWG 28-20).
- Single treaded cables >0.2 mm2 (0.5 mmØ) can be pushed directly into the spring connectors without the use of tools. For smaller dimensions or multi threaded cables, the red spring release buttons must be pushed during insertion.
- Dismantle 8 mm of the cables before insertion.
Optional connections
JTAG
J1 is a station programming connector which is used during production only.
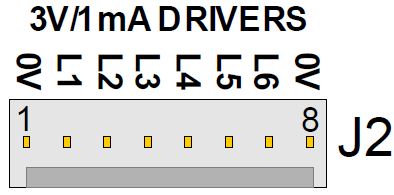
3V/1mA Drivers
An 8-pin IDC connector carrying the general purpose outputs L1 – L6 as 3V/1mA signals which may be used for connection to the STENTOFON MRBD relay card. For other purposes the ELCON 42080 plug should be used.
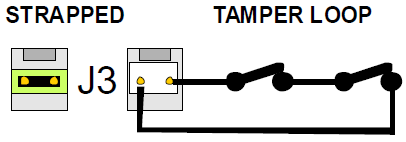
Tamper loop
A 2-pin IDC connector in series with the station tamper switch. The pins are shorted by a jumper as default. External NC tamper switches may be connected to this terminal by using an ELCON 42050 plug.
Optional key connector
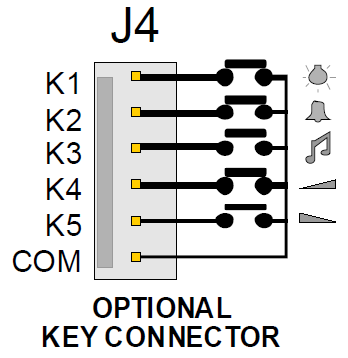
The J4 connector is normally not mounted in stations delivered with original front panel. If the station PCB is used with a custom made front panel, the buttons can be terminated to a 6-pin IDC connector.
- - Mount and solder a PCB pin header ELCON 42610 in the J4 space.
- - Use an ELCON 42060 plug to connect desired buttons. Max cable length is 150 mm.
- K1 - Cell Light
- K2 - Call Button
- K3 - Program Selector
- K4 - Volume Up
- K5 - Volume Down
- COM. - Common return wire
Call LED control
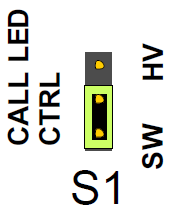
The jumper is used to select between hardware or software controlled station-on LED.
- HW - LED is always on when the microphone is powered. It is impossible to listen-in without LED indication.
- SW - LED on or off according to software programming (default). This is normally same function as the HW setting.
Intercom Line
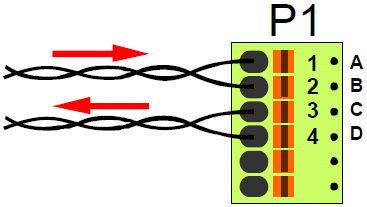
The cell stations are connected in a normal AlphaCom star wiring system using 2 pair twisted 0.5 or 0.6 mmØ (AWG 24) cable. The maximum cable length is as for display stations.
- P1 (1&2): A/B Pair - Audio and data from exchange
- P1 (3&4): C/D Pair - Audio and dialing tones from station
Local Power
A local power (other than the line power) is used for the signal and group lamps and the free general outputs. This power is also used for the LED segments in the display.
- - The local power is not needed if none of the general outputs are used.
- - A common 12 or 24 VDC power source is normally used for all stations in the same area.
- - It is recommended to connect the local power negative pole to ground.
- - The consumption per station is normally 0.5 – 2 A depending on type and number of connected lamps.
- - The voltage at the station board must not be less than 9V which means a maximum voltage drop of 15V at 24V supply and 3V at 12V.
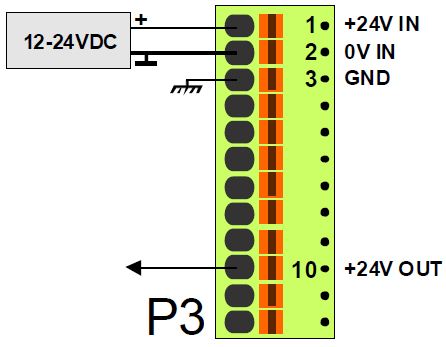
IMPORTANT NOTICE: P3/3 must be connected to local mains earth. Static discharges may cause noise and station malfunction!
- P3 (1) - 12-24 VDC IN Local power+
- P3 (2) - 0V IN Local power-
- P3 (3) - PROT.GND Protective earth for the station front
- P3 (10) - 12-24 VDC OUT Power output for local relays etc. P3 / 10
NOTE that this output is NOT fused!
Cell Light
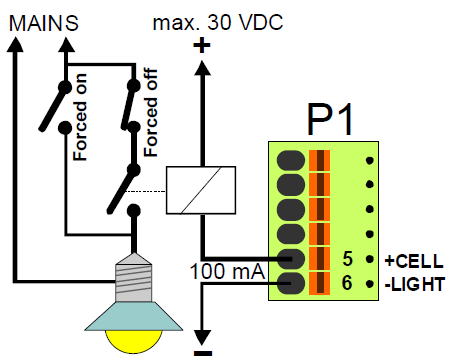
By pushing the light button on the cell station, the cell light will be toggled on and off. The light may also be controlled from the guard PC.
Relay coil terminal a Positive power
- P1 (5) - Relay coil terminal B
- P1 (6) - Negative power
Note: The relay MUST be connected between terminal P1/5 and the positive pole since the output is a transistor switch.
- - The relay may be an impulse toggle type if operated from the cell only or normal type if also operated from the guard.
- - The relay power is taken from a separate source, max. 30VDC or from the 12/24VDC power.
- - The relay coil current must not exceed 100mA.
- - The relay contacts must be rated for min. 1.5 x mains voltage and 2 x bulb current.
- A mechanical light switch may be mounted outside the cell in order to override the relay status.
- - Force the light OFF by a switch in series with the relay contact
- - Force the light ON by a switch in parallel with the relay contact.
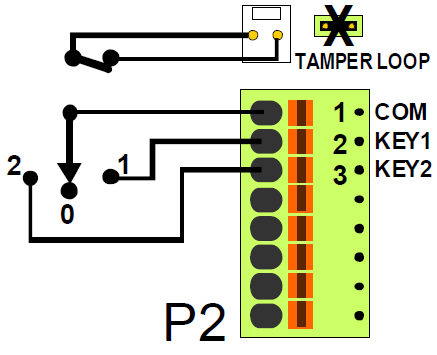
Key Switch
The key switch is acquired locally.
- Mount the key switch outside and close by the cell door.
- The switch may have two or three positions depending on desired function.
- The housing may be secured by a NC tamper switch.
- - Remove the tamper jumper and connect the switch to the jumper pins.
- P2 (1) - Key Switch Common
- P2 (2) - Key Switch Position 1 (Guard present/Alarm call prepared)
- P2 (3) - Key Switch Position 2 (Guard present/Timed alarm call)
Key Switch Position 0 Not terminated
Tamper switch: NC, used if needed TAMPER LOOP 1 / 2
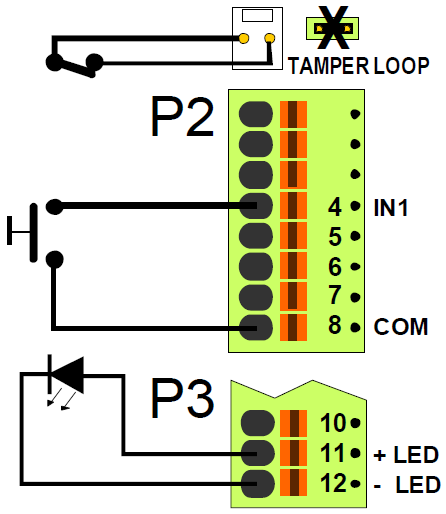
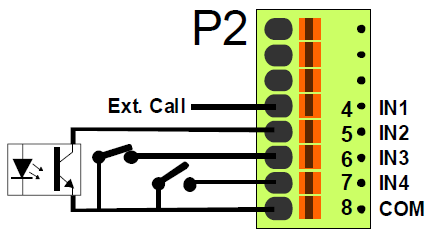
External Call Button
The call button is acquired locally.
- Flush mount the call button inside and close by the cell door easily reached by the guard for alarm call reasons. The button may also be mounted to serve handicaps or in toilets.
- The button may be equipped with a LED for call acknowledgement.
- - The LED current is 0.4 mA for night light and 4 mA during call.
- The housing may be secured by a NC tamper switch.
- - Remove the tamper jumper and connect the switch to the jumper pins.
- P2 (8) - Switch common
- P2 (4) - Switch live
- P3 (11) - LED anode
- P3 (12) - LED kathode
Tamper switch: NC, used if needed TAMPER LOOP 1 / 2
The terminal IN1 (P2 / 4) is programmed for external call by default. If an external call button is not used, the IN1 terminal may be programmed in the AlphaPro Event Handler for other purposes.
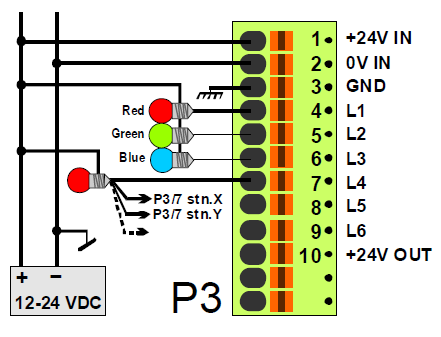
Signal Lamps
By default, the general purpose outputs L1, L2 and L3 are defined as signal lamp outputs and L4 is defined for group lamp.
- Each output is programmable in the Event Handler for other output purposes if the default lamp option is not used.
- Note that 0V is transistor switched and the positive pole is common. Each output can carry 1A max.
L1-L4 3V/1mA output signals are also present on the 8-pin connector J3 which may be used for connection to the STENTOFON MRBD relay card.
- P3 (1) - 12-24VDC IN Local power+
- P3 (2) - 0V IN Local power-
- P3 (3) - PROT.GND Protective earth for the station front
- P3 (4) - L1 Red call lamp
- P3 (5) - L2 Green guard present lamp
- P3 (6) - L3 Blue tamper alarm lamp
- P3 (7) - L4 Common group lamp
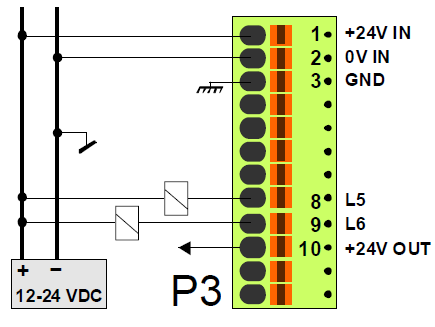
General Purpose Outputs
There are 2 undedicated outputs programmable for interface to external equipment.
- The L5 and L6 outputs are programmable in the Event Handler for output purposes such as lamps, TV sets, toilet flushing, etc.
- Note that 0V is transistor switched and the positive pole is common. The power IN on P3/1 or power OUT on P3/10 may be used. Each output can carry 1A max.
L5-L6 3V/1mA output signals are also present on the 8-pin connector J3 which may be used for connection to the STENTOFON MRBD relay card.
- P3 (1) - 12-24VDC IN Local power+
- P3 (2) - 0V IN Local power-
- P3 (8) - L5 Programmable
- P3 (9) - L2 Programmable
- P3 (10) - 12-24VDC OUT Power output for local relays etc.
General Purpose Inputs
There are 3 undedicated inputs programmable for interface to external equipment.
- Mechanical and electronic switches, relay contacts, NO or NC connecting to COMMON can be used.
- P2 (4) - IN1 External call button default
- P2 (5) - IN2 External switch 2 programmable
- P2 (6) - IN3 External switch 3 programmable
- P2 (7) - IN4 External switch 4 programmable
- P2 (8) - COM Common return wire


