OPC UA for AlphaCom - Installation
From Zenitel Wiki
Contents
- 1 Introduction
- 2 Scope
- 3 Prerequisites
- 4 Software package contents
- 5 Software installation
- 6 UA Local Discovery Server
- 7 UA Security
- 7.1 Introduction
- 7.2 Creating a Certificate for uaPLUS Server
- 7.3 Creating a certificate for clients
- 7.4 Creating a Certificate for DA3TestClientUaNet4
- 7.5 Creating a Certificate for AE-UATestClientNet4
- 7.6 Make Clients Trusted Applications for the Server
- 7.7 Make OPC UA Server trust LDS
- 7.8 Make LDS trust OPC UA Server
- 8 Installing the service
- 9 Related articles
Introduction
This document is an installation manual describing how to install the Vingtor-Stentofon OPC UA Server and all required additional software components. The Vingtor-Stentofon OPC UA Server makes it possible to control and monitor the Alphacom using the OPC UA protocol.
Scope
The article describes:
- The software packages required for the installation
- Installation of packages
- Configuration of the OPC UA Server, Local Discovery Server and test clients.
- Setup and use of the test OPC UA DA (data) and OPC UA AE (Alarm & Event) Clients
Prerequisites
Vingtor-Stentofon OPC UA Server is based on .NET version 4.6.2. This package can be freely downloaded from Microsoft.
Software package contents
The software packages consist of the Vingtor-Stentofon OPC UA package (VS-OPC UA). It installs:
- AE-UATestClientNet4.exe
- DA3TestClientUaNet4.exe
- UaClientConfigHelper.exe
- UaPLUS.Net4.exe
- UaServerConfigHelperNet4.exe
- AlphaOPCConfigurator.exe
- UA Local Discovery Server (OPC Foundation Home Page)
- srvman.exe
- Install_AlphaCom_OPC.bat
Software installation
Double-click on the msi-installation package and follow the instructions:
- VS-OPC UA for AlphaCom_Setup_vx.x.x.x.msi (x.x.x.x is the version number, always check the AlphaWiki download page for the latest version)
By default, the software is installed in the following directory: C:\Program Files (x86)\Vingtor Stentofon\VS-OPC UA for AlphaCom
Ensure that ALL executables in this directory run in Administrator Mode.
Right click on each executable and select 'Properties->Compatibility'. Set check mark in 'Run this program as an administrator'. This is necessary because the executable accesses restricted areas.
Install the Advosol OPC Core Components Redistributable. By default the installation package is located in the directory: C:\Program Files (x86)\Vingtor Stentofon\VS-OPC UA for AlphaCom\OPC Core Components For 64-bit operating systems its necessary to install both (x86 and x64) packages
UA Local Discovery Server
The Local Discovery Server (LDS) provides the necessary infrastructure to publicly expose the OPC UA Servers available on a given computer. The LDS is included in the installation package. The latest release can be downloaded from the following link: https://opcfoundation.org/developer-tools/developer-kits-unified-architecture/local-discovery-server-lds
- Navigate to C:\Program Files (x86)\Vingtor Stentofon\VS-OPC UA for AlphaCom
- Double-click on the installation package and follow the instructions:OPC UA Local Discovery Server x.x.x.exe
Check in the services dialog that OPC UA Local Discovery Server is running and will automatically start at system reboot.
- Open Search Windows and enter Services in the input field. Click on the search result Services
- Status: Running
- Startup Type: Automatic
in case these settings are not made, right click on the entry in the services dialog and select Properties. Make the appropriate selections under the TAB General and click OK.
UA Security
Introduction
The UA security is based on X509 Certificates.
Each UA server and client application requires a certificate with the Application URI of the application.
Self-signed certificates can be created with the uaPLUS UaServerConfigHelper utility. uaPLUS maintains certificates in the Windows Certificates Store.
The certificates are by default in the stores LocalMachine\UA Applications and LocalMachine\Trusted UA Applications
The stores are defined in the application UA configuration and can be changed if necessary.
The UaServerConfigHelper utility creates and imports certificates into the stores defined in the configuration.
With the server and client on the same machine the certificates are in the right place when created or imported with the Advosol UaServerConfigHelper and UaClientConfigHelper utilities.
With server and client on different machine the following steps are required:
- On the server machine create a certificate for the server. UaClientConfigHelper automatically exports created certificates into a .DER file in the utility directory.
- Copy the client certificate .DER file to the server machine and import it with the UaServerConfigHelper utility.
- Copy the server .DER certificate file to the client machine and import it. The location depends on the client application. For Advosol UA client applications the UaClientConfigHelper utility imports the certificate to the proper location.
uaPLUS stores untrusted certificates it receives from connecting clients in the store defined in the UA configuration settings for rejected certificates (default: LocalMachine\Rejected UA Certificates). Instead of importing the client certificate before the client connects, the rejected certificate can be copied after a failed connect. The UaServerConfigHelper utility has an option (MOVE button) to copy the certificate. Note: The certificates must be configured for the Windows store type.
The Windows Certificates manager can be used to check and maintain the certificates beyond the capabilities of the UaServerConfigHelper utility.
Creating a Certificate for uaPLUS Server
The UaServerConfigHelper utility is provided with the uaPLUS server toolkit. This utility should be used to edit the UA server configuration file whenever possible. The UaServerConfigHelper also supports the import, export and creation of the necessary certificates. Certificates need to be created with this tool to meet all UA requirements. The Edit UA Configuration dialog edits the UA configuration XML file for the selected application.
The uaPLUS.Net4.exe is the generic part of the OPC UA server. Creating a certificate for the server is carried out in the way described below.
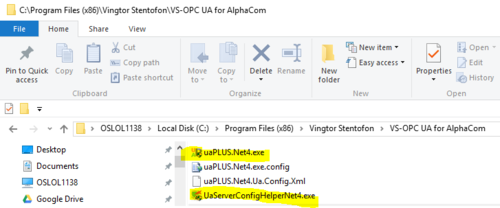
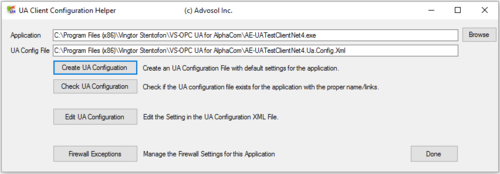
Drag the uaPLUS.Net4.exe over the UaServerConfigHelperNet4.exe. This gives a quick access to the server configuration:
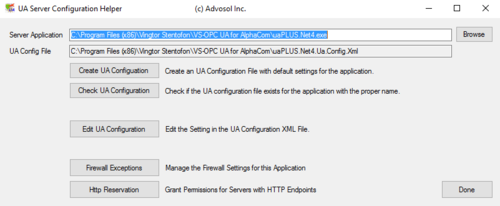
Press the Create UA Configuration button and accept any changes.
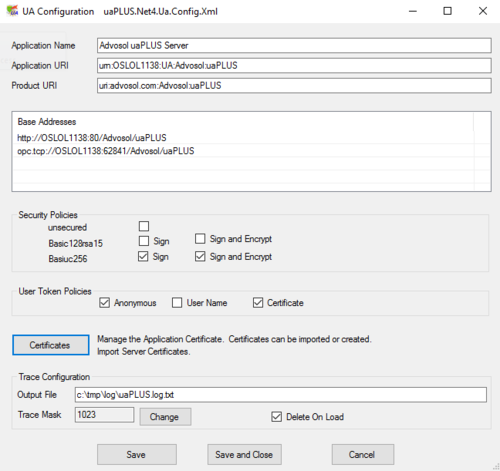
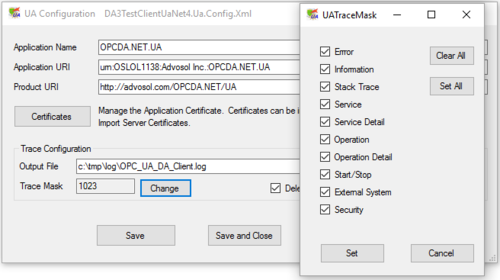
Press the Edit UA Configuration and check if it looks as shown below. 'User Name' is not supported in the current version of the server.
Note: The default directory for the trace log file is where the executables are installed:
C:\Program Files (x86)\Vingtor Stentofon\VS-OPC UA for AlphaCom. This is a restricted area. Therefore, the log file name specification should be prefixed with for instance C:\Tmp\Log\ as is shown in the picture above.
The Trace Mask can be changed by clicking the Change button. Enabling all options will set the trace mask to the value 1023 as shown above.
Click Save to save the changes.
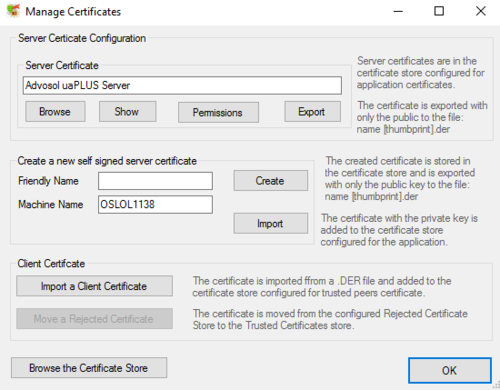
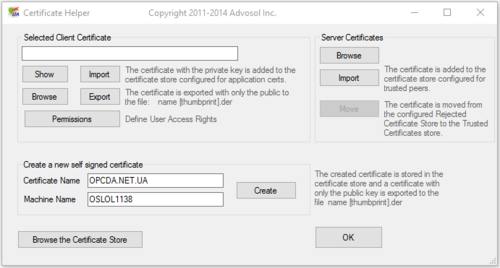
Click on Certificates
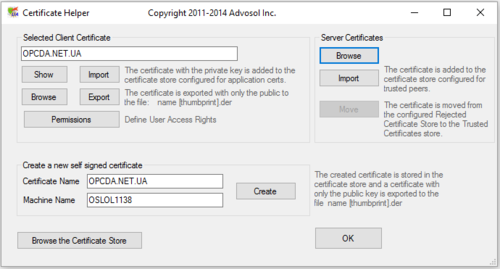
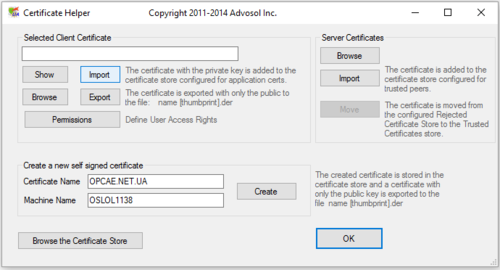
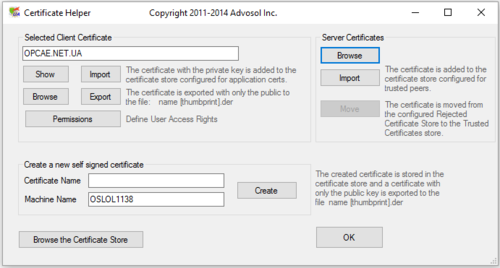
Click Create to create a certificate.
Click OK
Click Save and Close
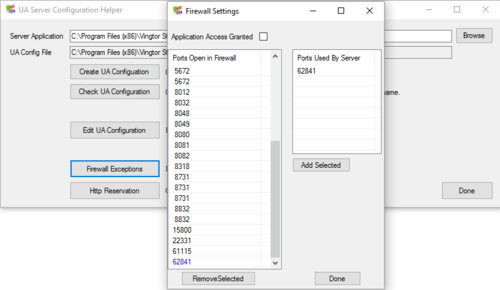
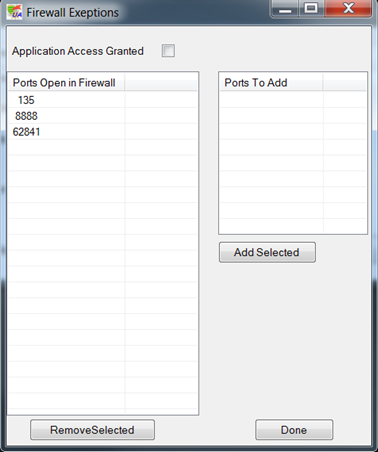
In the UA Server Configuration Helper main screen, click on Firewall Exceptions. Make certain that port 62841 is in the column Ports Open in Firewall.
Click Done
Click Done
Creating a certificate for clients
The paragraphs below describe how to create certificates for the test clients. In 'real' installations, it will also be required to create certificates for the clients which are installed on the specific site. The procedure to create those certificates may differ, please consult the with those clients provided documentation.
The UaClientConfigHelper utility is provided with the uaPLUS server toolkit.
This utility is only needed for the configuration of the provided test client applications, mainly the management of the needed certificates.
The main dialog manages the configuration files.
Creating a Certificate for DA3TestClientUaNet4
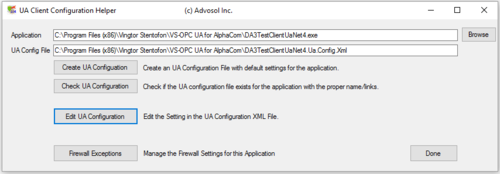
To create a certificate for the UA-DA test client drag the DA3TestClientUaNet4.exe over UaClientConfigHelperNet4.exe
Press the Create UA Configuration-button to overwrite the existing file.
Press the Edit UA Configuration-button.
Note: The default directory for the trace log file is where the executables are installed:
C:\Program Files (x86)\Vingtor Stentofon\VS-OPC UA for AlphaCom. This is a restricted area. Therefore, the log file name specification should be prefixed with for instance C:\Tmp\Log\ as is shown in the picture above.
The Trace Mask can be changed by clicking the Change button. Enabling all options will set the trace mask to the value 1023 as shown above.
Click Set, Save and Certificates.
Click Create
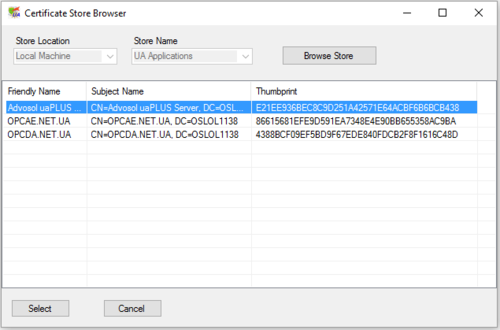
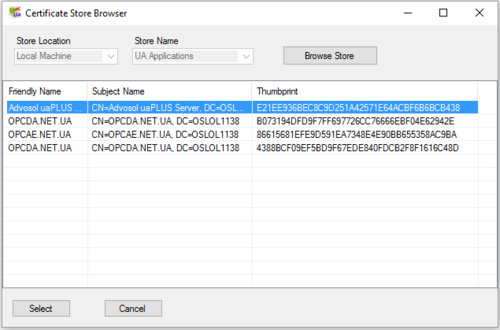
In the Server Certificates group box, click Browse and select the server certificate.
Click Select
Click OK
Click Save and Close
Click Firewall Exceptions
Check that port 62841 is open in the firewall.
Click Done
Click Done
Creating a Certificate for AE-UATestClientNet4
To create a certificate for the AE test client drag the AE-UATestClientNet4.exe over UaClientConfigHelperNet4.exe
Press the Create UA Configuration-button and to overwrite the existing file.
Press the Edit UA Configuration-button.
Note: The default directory for the trace log file is where the executables are installed:
C:\Program Files (x86)\Vingtor Stentofon\VS-OPC UA for AlphaCom. This is a restricted area. Therefore, the log file name specification should be prefixed with for instance C:\Tmp\Log\ as is shown in the picture above.
The Trace Mask can be changed by clicking the Change button. Enabling all options will set the trace mask to the value 1023 as shown above.
Click Set, Save and Certificates.
Click Create
In the Server Certificates group box, click Browse and select the server certificate.
Click Select
Click OK
Click Save and Close
Click Firewall Exceptions
Check that port 62841 is open in the firewall.
Click Done
Click Done
Make Clients Trusted Applications for the Server
Drag the uaPLUS.Net4.exe over the UaServerConfigHelperNet4.exe
Press the Edit UA Configuration
Click Certificates
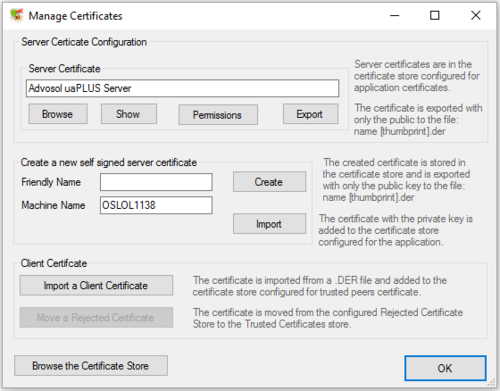
Click Import a Client Certificate
Select first the OPC UA DA Client certificate and subsequently the OPC UA AE client certificate
Click OK
Click Save and Close
Click Done
Make OPC UA Server trust LDS
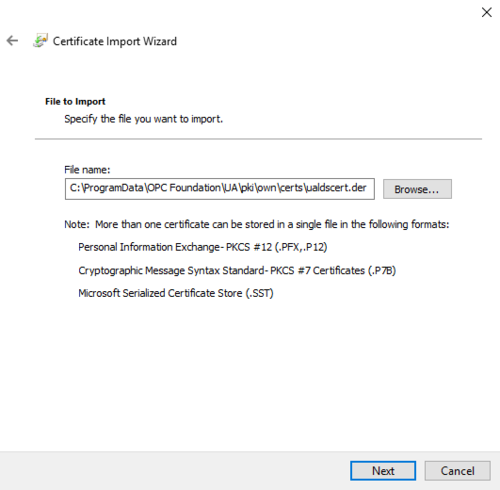
The LDS certificate is stored in this location C:\ProgramData\OPC Foundation\UA\pki\own\certs\ualdscert.der.
Open a Command Prompt as administrator
Type mmc and press the ENTER-key
On the File menu, click Add/Remove Snap In
In the Available snap-ins box, select Certificates
Click Add
In the Certificates snap-in dialog box, select Computer account
Click Next
Note: If you are not an administrator of the computer, you can manage certificates only for your user account. Select My User account or Service account in the step above instead.
In the Select Computer dialog box, click Finish
In the Add/Remove Snap-in dialog box, click OK
In the Console Root window, click Certificates (Local Computer) to view the certificate stores for the computer.
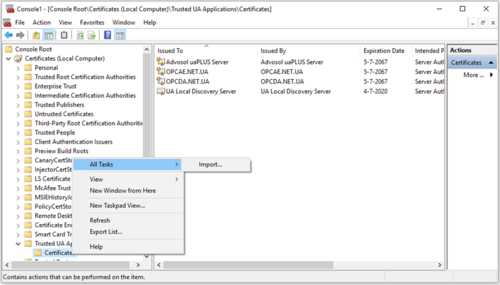
Navigate to Certificates/Trusted UA Applications/Certificates
Right click on Certifcates and select All Tasks/Import ...
The 'Certificate Import Wizard' will open. On the Welcome screen, click Next
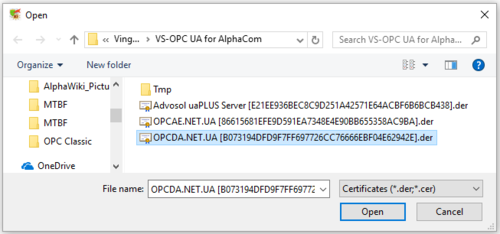
Browse to where the certificate is located (make certain to search for 'All files *.*') and click Next
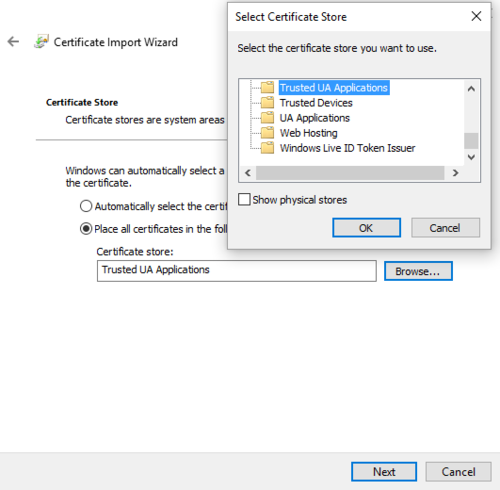
In the following step, browse to Trusted UA Applications and click Next
As the last step click Finish - the certificate will now be imported
Make LDS trust OPC UA Server
Open a Command Prompt as administrator
Type mmc and press the ENTER-key
On the File menu, click Add/Remove Snap In
In the Available snap-ins box, select Certificates
Click Add
In the Certificates snap-in dialog box, select Computer account
Click Next
Note: If you are not an administrator of the computer, you can manage certificates only for your user account. Select My User account or Service account in the step above instead.
In the Select Computer dialog box, click Finish
In the Add/Remove Snap-in dialog box, click OK
In the Console Root window, click Certificates (Local Computer) to view the certificate stores for the computer.
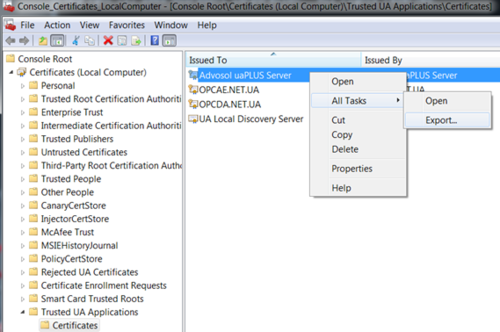
Navigate to Certificates/Trusted UA Applications/Certificates
Right-click on Advosol uaPLUS Server and select All tasks > Export...
The Certificate Export Wizard will open, click on Next
Select No, do not export the private key and click Next
Select DER encoded binary X.509 (.CER) and click Next
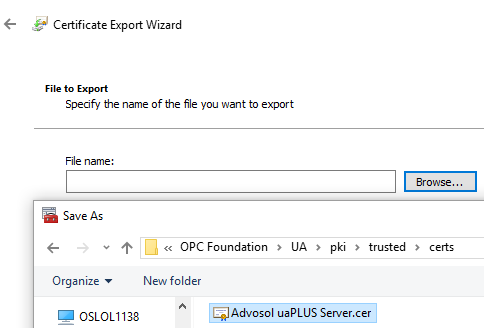
Browse to C:\ProgramData\OPC Foundation\UA\pki\trusted\certs; Enter the name of the certificate: Advosol uaPLUS Server.cer; click Save, click Next
As the last step click Finish - the certificate will now be exported
Installing the service
In File explorere, navigate to the installation directory C:\Program Files (x86)\Vingtor Stentofon\VS-OPC UA for AlphaCom
Go to File/Open Windows Powershell/Open Windows Powershell as administrator
Enter .\Install_AlphaCom_OPC.bat and press <Enter>


