OPC UA for AlphaCom - Installation
From Zenitel Wiki

Introduction
This document is an installation manual describing how to install the Vingtor-Stentofon OPC UA Server and all required additional software components.
The Vingtor-Stentofon OPC UA Server makes it possible to control and monitor the Alphacom using the OPC UA protocol.
The Vingtor-Stentofon OPC UA Server communicates OPC UA with OPC UA clients and Alphanet Data Protocol with the ICX-Alphacom.
Scope
The article describes:
- The software packages required for the installation
- Installation of packages
- Configuration of the OPC UA Server
- Setup and use of the test OPC UA expert test client
OPC UA clients
This article describes the setup of the OPC UA server and the test client from OPC UA expert. OPC UA clients from other suppliers may have different methods of installing and certificate handling than described in this article for the test clients. Please follow the instructions as supplied with these OPC UA clients. The process normally involves:
- Creating a certificate for the server
- Making the OPC UA Client trust the OPC UA Server by importing the server certificate
- Creating a certificate for the client
- Making the OPC UA Server trust the OPC UA Client by importing the client certificate
- Making the OPC UA Discovery Server and the OPC UA Server trust each other
Many clients on the market (including OPC UA Expert) have automated at least parts of this procedure.
Prerequisites
Vingtor-Stentofon OPC UA Server is based on .NET version 4.8. This package can be freely downloaded from Microsoft.
Software package contents
The software packages consist of the Vingtor-Stentofon OPC UA package (VS-OPC UA). It installs:
- AE-UATestClientNet4.exe
- DA3TestClientUaNet4.exe
- UaClientConfigHelper.exe
- UaPLUS.Net4.exe
- UaServerConfigHelperNet4.exe
- AlphaOPCConfigurator.exe
- UA Local Discovery Server (OPC Foundation Home Page)
- srvman.exe
- Install_AlphaCom_OPC.bat
Installation of the server
Install the VS-OPC UA package
Double-click on the msi-installation package and follow the instructions:
- VS-OPC UA for AlphaCom_Setup_vx.x.x.x.msi (x.x.x.x is the version number, always check the Zenitel Wiki download page for the latest version)
Install the OPC Core Components
By default the installation package is located in the directory: C:\Program Files (x86)\Vingtor Stentofon\VS-OPC UA for AlphaCom\OPC Core Components.
For 64-bit operating systems it is necessary to install both (x86 and x64) packages.
AlphaCom OPC UA Server Configuration
Configure VS-OPC UA Server
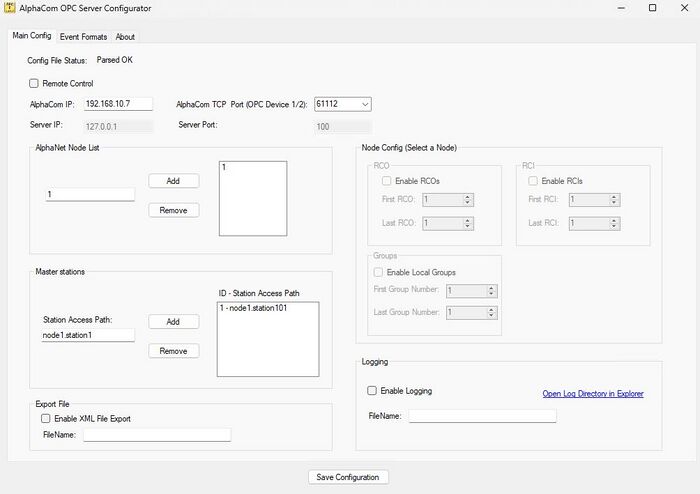
- Start the OPC Server Configuration Tool by starting AlphaOPCConfigurator.exe from C:\Program Files (x86)\Vingtor Stentofon\VS-OPC UA for AlphaCom.
In the Main Config tab:
- The OPCServerConfigurator utility tool makes it possible to configure whether the OPC-Server is directly or remotely connected to the AlphaCom.
- In case the OPC-Server connection to the ICX-AlphaCom is configured as a remote connection, the IP-address of the service provider is specified and which port that should be used. This service provider is name AlphaNetServiceProvider and is currently available in the VS-SDK for ICX-AlphaCom installation package. The AlphaNetServiceProvider is also available as a service, which can be installed via the package AlphaNetServiceProviderService_Setup. Configuration of the service is done via the AlphaNetServiceProvider GUI.
- Server IP : Enter the IP address of the service provider server.
- Server Port : Select the service provider port number
- In case the OPC-Server connection to the ICX-AlphaCom is configured as a direct connection, the ICX-AlphaCom IP-address is specified and which port that should be used.
- AlphaCom IP (must): Enter the IP address of the ICX-AlphaCom exchange
- AlphaCom Port (must): Select one of the 2 available ports 61112 or 61113. Make certain that the port is not in use by another entity, for instance another OPC server or an on the ICX-AlphaCom SDK based software package. If a redundant OPC server mode is used, both ports must be assigned, one to each OPC server.
- Port 61112 -> OPC Device 1 (ICX-AlphaCom Device number 199)
- Port 61113 -> OPC Device 2 (ICX-AlphaCom Device number 196)
- AlphaNet Node List (must): Add the ICX-AlphaCom node number with which the OPC Server is communicating (must). In case of AlphaNet, enter the node number of all ICX-AlphaCom nodes in the network.
- Master stations (applicable for OPC DA only): If the OPC client should control an intercom station (e.g. call setup and disconnection controlled from the OPC client), the "Operator station" must be defined in the 'Master Station List'. Use the format node{nn}.station{xxxx} where nn is the AlphaNet node number and xxxx is a station directory number, i.e. node1.station1101
- Node config (optional): If the OPC client should control RCO's or read RCI's in the AlphaCom, the relevant RCO's/RCI's must be defined:
- Select a node from the 'AlphaNet Node List'
- Tick Enable RCO's and select the range of RCO's that should be controlled via the OPC server.
- Tick Enable RCI's and select the range of RCI's that should be monitored via the OPC server.
- Tick Enable Local Groups and select the range of groups that should be controlled via the OPC server.
- The OPC server will now build "OPC items" for the RCO's/RCI's/Groups selected.

Configure the ICX-AlphaCom
AlphaCom software requirement: AMC 10.40 or higher. For Redundant OPC Mode: AMC 10.55 or higher.
- Filter settings: Enable TCP port 61112 in the filter settings in the web interface. If OPC Device 2 is used the port 61113 needs also to be enabled.
The OPC Server communicates with the ICX-AlphaCom over the TCP/IP protocol using this port.
- API license: Insert a license key for the OPC server. The API Server license is required for VS-OPC UA for ICX-AlphaCom to operate.
VS-OPC UA will also be operational during the free license period.
- Additional notes:
- Only physical positions were there is an ASLT board or ATLB board present will consume licenses.
- Stations which are deleted from the Directory & Features list in AlphaPro will not consume any license.
- IP stations take API license regardless if the station is registered or not.
- Individual stations can be disabled from OPC registration, and thus consume no license. This setting is done in AlphaPro. Select Users & Stations > User Preferences > "Disable reporting to OPC server".
- RCI: In AlphaPro the RCI table has to be programmed for each RCI entry to be monitored by the OPC Server. A $RCIC command has to be sent to the OPC Server(s).
Examples:- Send RCI1 ON to OPC Device 1 on node 3: "@03C7 $RCIC W1 U1"
- Send RCI2 OFF to OPC Device 1 (199) on node 3 and Device 2 (196) on node 11: "@03C7 $RCIC W2 U0;@0BC4 $RCIC W2 U0"
- RCO: The RCO state will be automatically sent to the connected OPC Server(s).
Starting the OPC UA Server
- Start the OPC Server by starting uaPLUS.Net4.exe from C:\Program Files (x86)\Vingtor Stentofon\VS-OPC UA for AlphaCom.
UA Security
Introduction
The security in OPC UA is for authentication and based on the exchange of X509 certificates between the applications. Each OPC UA Server application has one certificate and each OPC UA Client application has its own certificate. For a trusted connection these certificates are exchanged between the applications. For this exchange it does not matter if the applications are running on the same machine or on different ones across a network.

Alphacom OPC UA Server certificate
After installation of the server and the first run of the server the certificate is automatically generated. The certificate is placed in the certificate store for the current user. In most cases this will be the same as the user that will be the running the server. However if this is not the case the certificate can be moved to the certificate store for the local machine, which makes the certificate available for all users. The same export procedure can be used for exporting the certificate when the OPC UA client of the customer has a manual procedure for exchanging certificates.
Click on the windows start button and type cert and choose the option Manage user certifcates. Browse to UA Applications > Certifcates and select the certificate listed. Then right click on the certificate and choose export. Follow the steps in the export wizard and use all default settings. Save the file in a known location.

Click on the windows start button and type cert and choose the option Manage computer certificates. Browse to UA Applications and right click on UA Applications. Choose import and follow the steps of the import wizard. Use all default settings and the certificate file created in the previous step.

Setup and use of the test OPC UA expert test client
For testing we recommend using OPC UA expert testing client which can be downloaded here: https://www.unified-automation.com/products/development-tools/uaexpert.html
This test client has the exchange of the certificates almost fully automated.
Download the installation file and run the installation steps.
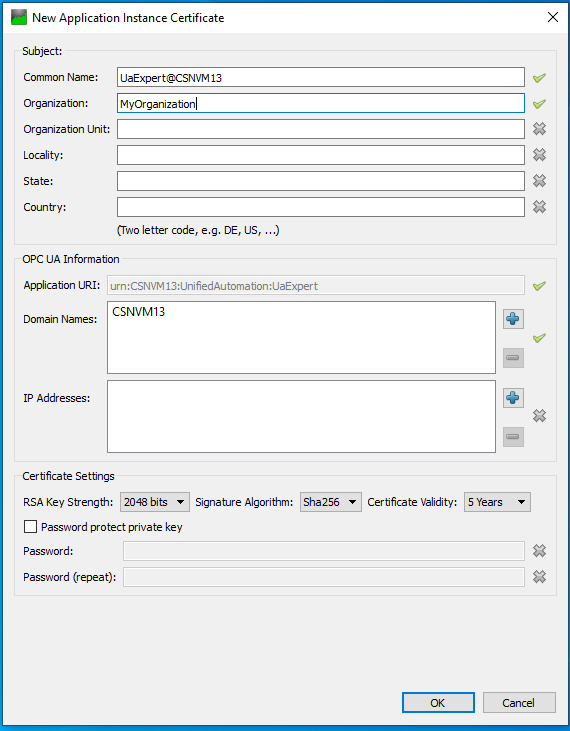
After the first time starting the OPC UA expert test client you will be prompted to create the certificate for the client.
The only mandatory field that is not automatically filled in is the organization name.

When the OPC UA test client is running you copy the URI of the Advosol OPC UA server.

Click on the blue plus symbol in OPC UA expert to add a server.

In the advanced tab paste the URI of the Advosol OPC UA server. In case you are on a different subnet and do not have DNS running you need to change the hostname part of the URI to the actual IP address. After filling in the information click OK to add the server.

Right click on the server name and choose connect.

On the first time connecting you will be prompted that you are connecting to a server of which the certificate is not trusted yet.
Click on Trust server Certificate and Continue

The window Address Space will now be populated with the data tree of your Alphacom.

Reading and writing values with OPC UA expert
When you want to read and write values with OPC UA expert you first drag and drop a tag from the Address Space into the Data Access View.

The tag will be automatically be read and updated cyclically. If you want to write a value you double click on the cell with the value and change it. After changing it the value will automatically be written to the OPC server.
If you want to change the cycle time of reading or writing You need to right click on the row that you want to change the timing on. Then under Subscription settings you can change the cycle on which the the value is published from the client to the server (writing values). And under Monitored Item Settings you can change the cycle on which the values are being sampled (reading values).


