RingMaster CB901
From Zenitel Wiki
The images and descriptions in this article are updated to cover interfacing between RingMaster CB901 and the AlphaCom XE Audio Server with AMC-IP software version 11.3.3.2 and AlphaPro 11.6.3.3.
SYSTEM BUILD-UP
General Description
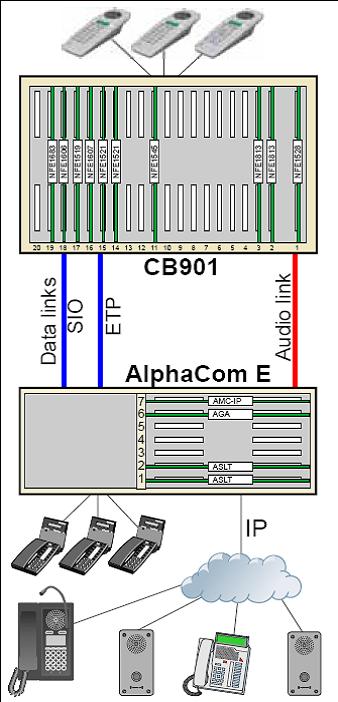
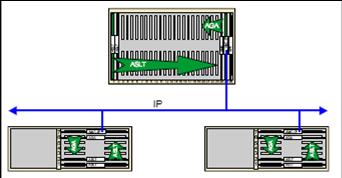
An existing Ring-Master CB901 system can be expanded by adding one or more STENTOFON AlphaCom XE exchanges. The two systems are interconnected via data and audio links. Stations and equipment in both systems will interact as part of the same system. The AlphaCom XE IP services can be accessed from the Ring-Master system.
Data
Data are transmitted via one or two serial RS232 links.
- One link (ETP, External Trunk Protocol) is used for station-to-station calls, Group Call, Call Request and Caller ID.
- An optional link (SIO, Serial Input Output) is used for other functions like Privacy information and Call Request camp on.
Audio
The audio interconnection between CB901 and AlphaCom XE is analogue.
- There are 6 conversation channels in a 12 pair twisted cable between each Interlink B board in CB901 and AGA board(s) in AlphaCom XE.
Audio switching control (Duplex)
There is no transfer of switching control signals between the CB901 and AlphaCom XE. The switching will take place individually in the Ring-Master station and in AlphaCom XE.
Programming
The CB901-AlphaCom XE interface features are programmed by use of:
- SVT for the CB901 part
- AlphaPro and AlphaWeb for the AlphaCom XE part and the Ring-Master Daemon
Basic System Features
All internal features in both systems will remain as they are.
The following features will be included in the interface between CB901 and AlphaCom XE:
- Station to station calling.
- Display information.
Call number of calling station or station ID - Simultaneous (global) All-Call and Group-Call.
One global call at the time in the RM /ACE system. - Call request and queuing from stations in CB901 to master stations(guards) in AlphaCom XE.
Calling stations will be camped on in one program distribution channel in CB901. - Pocket paging.
Automatic pocket paging in both systems. One individual serial ESPA 4.4.4. connection between AlphaCom XE and the pager system; and CB901 and the pager system.
The info in the pager display will identify the caller who has to be called back manually. - Privacy.
Stations in CB901 will be tested for privacy also when called from AlphaCom XE. The subscriber board must be modified according to section 6.2 - Remote door opening.
AlphaCom XE will generate a DTMF signal when a button is pressed in the AlphaCom station during conversation with the CB901 door station. This signal will be decoded by the remote output board DP997 inside the RM door station and used to activate the magnetic lock.
Software Description
Ring-Master CB901
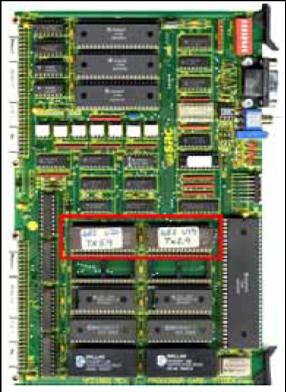
The ETP (External Trunk Protocol) communication software is included in revisions from TX5.7. The software in the Ring-Master system must be upgraded if the present software revision is TX5.6 or lower.
The upgrade includes changing of E-PROMs on all processor boards. It is not necessary to change the software in the DNC.
If the software revision is lower than TX5.0 (TX4.x or TX3.x) the processor board(s) must be changed.
Connector P2 must be present on the motherboard in board position 19 in order to get power to the serial links of the processor board NFE1683.
Old systems using the first processor boards NFE1515 and NFE1592 does not have connector P2 on the motherboard in position 19. The new processor board NFE1683 can then be installed in position 20 if there are long pins on the back for the PC port connections. If there are no connection pins at the back, the whole cabinet must be changed to type DP979.
Note: If the processor board is plugged into position 20 in an old rack, you must cut out a piece of the cabinet profile in order to get room for the battery RAM on the board.
Note: The same software must be installed in all nodes in a CB901 multistage system.
AlphaCom E (XE)
The software must be of revision 10.30 or higher. It is recommended to always have the latest version available.
This revision includes the following software routines:
- The software module (Daemon) which is linking the CB901 ETP format with the AlphaCom E main software.
- The WEB interface which is used to configure the AlphaCom for communication with CB901 (AlphaWeb)
The AlphaPro software must be of revision 10.28 or higher. This revision includes the following commands:
- Identification of CB901 stages as nodes in AlphaCom
- Identify the audio links
AlphaWeb Configuration Commands
The Ring-Master Daemon will use a number of tables to maintain the ETP function. These tables will be configurable through the AlphaWeb window.
The following tables are identified:
- Group Call
- Call Request (CAS) to stations in AlphaCom XE
- Program channel for call request camp-on in CB901.
- Privacy test of stations in CB901
- RMD system parameters
AlphaWeb System Monitoring and Logging
The AlphaCom XE can monitor and log real-time events. This can be viewed in the AlphaWeb.
Ring-Master Daemon System log
The Ring-Master Daemon (RMD) will report the following to the syslog server:
- RMD Up/Down
- AlphaNet Connected/Disconnected
- Serial Port Up/Down
Ring-Master Daemon System Monitoring
The Ring-Master Daemon will report the following to the syslog server:
- AGA/ETP trunks Up/Down
- AGA Trunk allocation failed (no more audio links available)
- Unknown/Erroneous commands from the Ring-Master system
Programming
Individual programming will be carried out in each system by using a locally connected data terminal (PC or laptop).
One system can not be programmed from the other system.
Number plan
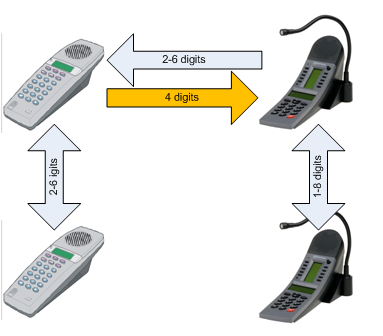
- The call number in AlphaCom XE must have 4 digits in order to call from CB901 to AlphaCom XE. This is limited by the ETP format.
- The number of call digits in AlphaCom XE is 1 - 8. Only 4-digit numbers can be reached from the RM side.
- The maximum number of call digits in CB901 is 6. All digits from 2 to 6 can be reached from both sides.
Programming Ring-Master CB901
Use a terminal emulating program such as ProCom plus or HyperTerminal. See section 4.2 for detailed procedure.
Purpose of programming
- Set the data of the serial port used for ETP communication with AlphaCom XE
- Set the data of the serial port used for remote dialing from AlphaCom XE (PC port) and status output to AlphaCom XE
- Program the feature code for the access to the numbers in the AlphaCom XE
If the feature code is one digit ‘F’, then the call number in AlphaCom XE will be ‘F A A A’. ‘AAA’ represent any digit - Identify the 6 hex positions where the NFE1545 audio interface board is connected. This is fixed to E0-E5.
- Identify the 2 hex positions (call numbers) that will be used for privacy test of the RM stations (ETP and SIO).
A modification must be carried out on the subscriber board in order to link two and two subscriber positions together. Se section 6.2
- Each modified subscriber board will offer 4 privacy links.
- Each CB901 stage must have one modified subscriber board for privacy test of the stations within the stage.
Programming AlphaCom XE
Use the STENTOFON AlphaPro PC program and AlphaWeb to perform programming. See section 4.3 for detailed programming procedure.
Purpose of programming
- Identify the CB901 stage(s) where the NFE1545 audio interface board(s) is(are) installed
- Program the 6 positions used by the AGA board(s)
- Specify optional station and system functions related to CB901
- Normal station
- Privacy test
- Call request and corresponding parameters
SYSTEM DESCRIPTION
Rack layouts
Ring-Master CB901
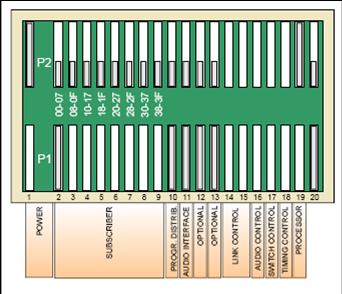
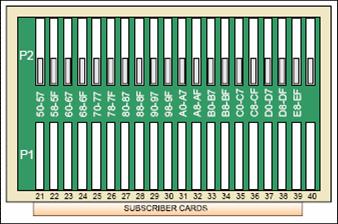
Most board types have their fixed position in the racks. Some positions may be left empty or accept different boards depending on performance and configuration. The table below is a typical set-up when integrated with AlphaCom XE.
The subscriber lines are available on P2 and the subscriber number address is in hexadecimal format.
| Pos | Type | Name | Note |
|---|---|---|---|
| Basic board rack | |||
| 1 | NFE 1528 | Power Board | |
| 2-9 | NFE 1813 | Subscriber Board | Supports: C - GC - AC - PD - D |
| 2-9 | NFE 1625 | Subscriber Board | Supports: C - GC - AC - PD |
| 2-9 | NFE 1525 | Subscriber Board | Supports: C - GC - AC |
| 10 | NFE 1626 | Audio Interface Board | For C - GC - AC - PD |
| 10 | NFE 1625 | Subscriber Board | If GC - AC - PD * |
| 11 | NFE 1545 | Audio Interface Board | Audio to AlphaCom, address E0-E5 |
| 12 | NFE 1545 | Audio Interface Board | If 12 audio links are needed |
| 12 | NFE 1692 | 2 Mbit Link Board | Used in 3-stage systems |
| 13 | NFE 1692 | 2 Mbit Link Board | Used in 2-, 3- and multistage systems |
| 14-15 | NFE 1521 | Link Control Board | |
| 16 | NFE 1607 | Audio Control Board | |
| 17 | NFE 1519 | Switch Control Board | |
| 18 | NFE 1606 | Timing Control Board | |
| 19 | NFE 1683 | Processor Board | |
| 20 | - | - | Not used |
| Subscriber board rack | |||
| 21-39 | NFE 1813 | Subscriber Board | Supports: C - GC - AC - PD - D |
| 21-39 | NFE 1625 | Subscriber Board | Supports: C - GC - AC - PD |
| 21-39 | NFE 1525 | Subscriber Board | Supports: C - GC - AC |
| 40 | - | - | Not used |
| C | = Call |
| GC | = Group Call |
| AC | = All Call |
| PD | = Program Distribution |
| D | = Display |
| * | = PD card is only required for Call Request. |
AlphaCom XE7
Except for the AMC-IP Computer Board in position 7, all board types can be inserted in any board position.
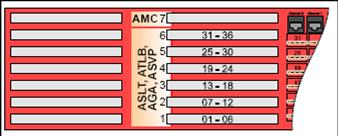
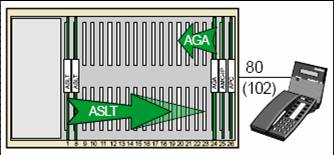
When interconnected to CB901, at least one AGA Audio Interface Board with 6 lines will be used. It is good practice to insert these boards from position 6 and downwards.
Normally there will be only ASLT Subscriber Boards for analogue stations in the rest of the positions.
The stations and the AGA audio lines are connected to plug-on screw terminals on the backplane. The physical line numbers are equal to the decimal station number.
IP stations do not need ASLT boards; they are connected to the IP bus.
AlphaCom XE20 and XE26
The AMC-IP Computer Board and the APC Program and Clock Board have dedicated positions in slot 25 and 26.
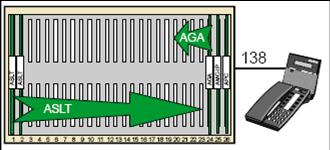
When interconnected to CB901, at least one AGA Audio Interface Board with 6 lines will be used. This board should be inserted in slot position 23.
If more AGA boards are used, it is good practice to insert these boards from position 23 and downwards even if they will function in any position.
Normally there will be only ASLT Subscriber Boards for analogue stations and/or ATLB boards for analogue telephones in the rest of the positions.
Note that board positions 2-7 are missing in AlphaCom XE20 exchanges.
The stations and the AGA audio lines are available on connection boards on the back of the rack. The physical line numbers are equal to the decimal station number.
IP stations do not need ASLT boards; they are connected to the IP bus.
- Note: Avoid using AGA in position 24, this position is for MultiModule and High Availability use only!
System Configuration
CB901
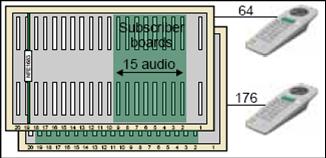
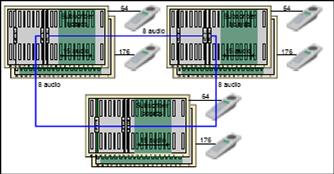
All CB901 system configurations can be interfaced to AlphaCom XE. One CB901 stage has one basic board rack with power, system boards and up to 8 subscriber boards for 64 lines. An additional subscriber board rack will extend the number of lines with up to 176.
Single stage
- 64 subscribers in a basic board rack
- Up to 240 subscribers with additional subscriber board rack
- 15 internal conversation links
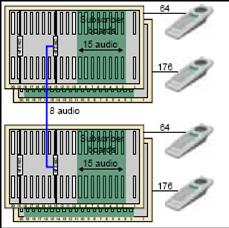
Double stage
- Up to 480 subscribers with subscriber board racks
- 15 internal conversation links in each 240 number node
- 8 conversation links between the nodes
- Node interconnection via 1 x 18 pairs twisted cable or 2 x optical multimode fiber cables
Triple stage
- Up to 720 subscribers with subscriber board racks
- 15 internal conversation links in each 240 number node
- 8 conversation links between each node
- Node interconnection via 3 x 18 pairs twisted cable or 3 x 1 pair optical multimode fibers
- Nodes are interconnected in a triangle configuration
Multistage
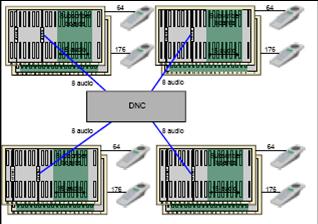
- Up to 30 x 240 (7200) subscribers
- 15 internal conversation links in each 240 number node
- Nodes are connected to a Digital Network Controller (DNC) in a star configuration via one pair optical multimode fiber cable
- 8 conversation links between each node and the DNC
- There are no subscribers connected to the DNC
AlphaCom XE
AlphaCom cabinets have a fixed position for the AMC-IP Computer Board and the APC Program and Clock Board (XE20 and XE26 only). All other boards including ASLT Line Boards and AGA Audio Interface Boards can be put in any free position.
It is strongly recommended to insert the ASLT boards starting from the lowest board position and the AGA boards from the highest.
XE7 – single module
- Up to 36 traditional stations + IP stations as required.
- 6 free positions for AGA or other boards.
- Each AGA board will reduce the number of traditional stations by 6 per board.
- 1 internal conversation link per ASLT line board.
XE20 – single module
- Up to 102 traditional stations + IP stations as required.
- 17 free positions for AGA or other boards.
- Each AGA board will reduce the number of traditional stations by 6 per board.
- 1 internal conversation link per ASLT line board.
XE26 – single module
- Up to 138 traditional stations + IP stations as required.
- 23 free positions for AGA or other boards.
- Each AGA board will reduce the number of traditional stations by 6 per board.
- 1 internal conversation link per ASLT line board.
Multi-modules
- Up to 4 modules (1 master + 1-3 slaves) can be interconnected to act as one exchange node with extended number of analogue subscriber lines.
- 4 x XE7 can have up to 144 subscribers
- 4 x XE20 can have up to 408 subscribers
- 4 x XE26 can have up to 552 subscribers
- The modules are normally interconnected via an IP network but connection using AE1 boards and E1/T1 signaling is also possible
- The number of audio channels depends on the purchased AlphaNet VoIP licenses, max. 30 per module
AlphaNet
- Up to 254 AlphaCom XE exchanges can be interconnected in one network
- The exchanges are interconnected via an IP network
- The total number of global directory numbers is limited to 8700
- The number of audio channels depends on the purchased AlphaNet VoIP licenses, max. 30
Interconnection
General
The AlphaCom XE and Ring-Master systems are interconnected via
- One or two RS232 serial ports
- One or several 4-wire, 0 dBm audio links.
The physical interfacing between the Ring-Master and AlphaCom XE exchanges depends on the configuration on both sides, but the general configuration is the same.
The following examples show the most typical situations. The AlphaCom shown is an XE7, but the general connection to XE20 and XE26 is the same.
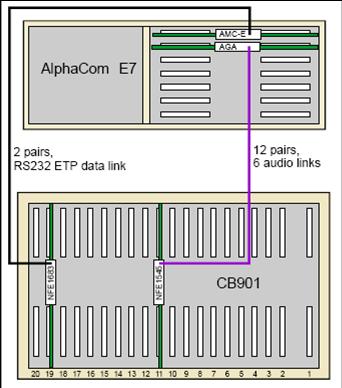
Single stage CB901 with ETP data link
- This configuration will give normal call, Group Call and 6 audio links.
- Privacy indication and Call Request is NOT supported.
- Display in RM stations is supported. (Subscriber boards NFE1813 only).
- Pocket Paging must be connected to AlphaCom XE.
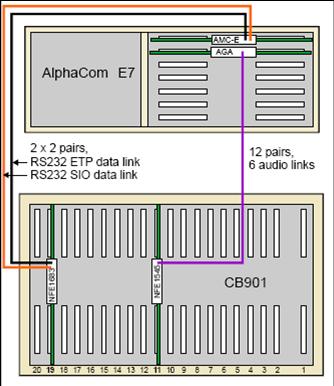
Single stage CB901 with ETP and SIO data links
- This configuration will give normal call, Group Call and 6 audio links.
- Privacy indication and Call Request is supported.
- Option 1: Display in RM stations is NOT supported.
- Option 2: One current loop port must be modified to RS232 in CB901
Dual stage CB901 with ETP data link
- This configuration will give normal call, Group Call and 12 audio links.
- Privacy indication and Call Request is NOT supported.
- Display in RM stations is supported. (Subscriber boards NFE1813 only).
- Pocket Paging can be connected to RM stage 2 or be connected to AlphaCom.
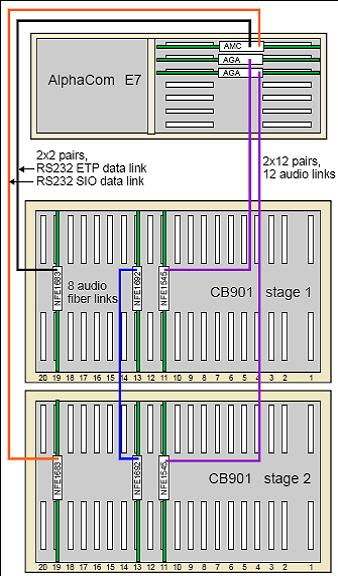
Dual stage CB901 with ETP and SIO data links
- This configuration will give normal call, Group Call and 12 audio links.
- Privacy indication and Call Request is supported.
- Display in RM stations is supported. (Subscriber boards NFE1813 only).
- Pocket Paging must be connected to AlphaCom XE.
Multi stage CB901
- The ETP and SIO data links are connected to the first two stages like in a two stage configuration.
- Each stage can supply 6 audio links by adding an AGA board in the AlphaCom exchange.
Processor board NFE1683 location
In order to connect the serial data links to the processor board NFE1683, there must be a P2 connector on the motherboard in board position 19.
Old systems using processor boards type NFE1515 or NFE1592 does not have this P2 connector. The new processor board NFE1683 can then be installed in position 20 if there are long pins on the back plane for the serial port connections.
If there are no connection pins for board connector 19 or 20 on the back plane, the whole cabinet must be changed to type DP979.
- Note: If the processor board is plugged into position 20 in an old rack, a piece of the cabinet profile must cut out in order to get room for the battery RAM on the board.
ETP data link
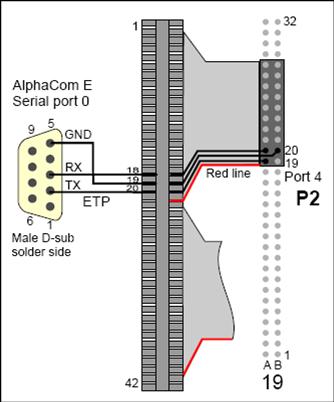
Use RS232 serial port 4 on the processor board NFE1683 in stage no.1 for the ETP data-link connection to AlphaCom XE. This link is controlling the RM station connections.
CB901, non EMC cabinet
- Insert the upper connectors from the CPU terminal block on board connector P2-19. Leave the upper 4 pair of pins unconnected.
- Connect 3 wires to the terminal block pos. 18, 19 and 20.
- Solder a male 9 pin D-sub plug to the other end of the cable for connection to port 0 in AlphaCom XE according to the table below.
| Signal | AlphaCom D-sub | Terminal block | Board no. 19 |
|---|---|---|---|
| TX | 2 | 20 | 19A |
| RX | 3 | 18 | 20A |
| GND | 5 | 19 | 20B |
Port 0 in AlphaCom XE20 and XE26 need an RJ45 – 9-pin D-sub Serial Cable Adapter type A100A08010.
CB901, EMC approved cabinet
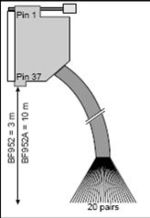
- Use the 3 m external RS232/Subscriber cable BF952.
- Connect the 37 pin D-sub connector to the processor board terminal on the cabinet rear (upper right).
- Select the RS232 port no. 4 wires at the cable end and solder to a male 9-pin D-sub plug.
| Signal | AlphaCom D-sub | Wire color | Wire pair | |
|---|---|---|---|---|
| RX | 3 | RED | 8 | |
| GND | 5 | GREEN | ||
| TX | 2 | RED | 9 | |
| - | NC | BROWN | ||
Complete connection table for BF952 is found in Appendix 7.1
SIO data link, non EMC cabinets
This port is used for optional functionality data like Privacy info and Call Request.
Single stage CB901 without display stations
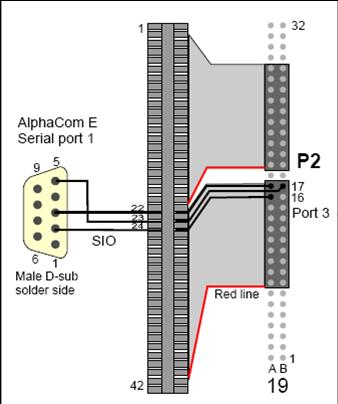
The SIO data link cable can be connected to serial port 3 since this port is not in use for display stations.
- Insert the lower connector from the CPU terminal block on board connector P2-19. Leave 1 pair of pins unconnected between the two connectors.
- Connect 3 wires to the terminal block pos. 22, 23 and 24.
- Solder a male 9 pin D-sub plug to the other end of the cable for connection to port 1 in AlphaCom XE according to the table below.
| Signal | AlphaCom D-sub | Terminal block | Board no.19 |
|---|---|---|---|
| TX | 2 | 24 | 16A |
| RX | 3 | 22 | 17A |
| GND | 5 | 23 | 17B |
Port 1 in all AlphaCom XE exchanges need an RJ45 – 9-pin D-sub Serial Cable Adapter type A100A08010.
Single stage CB901 with display stations
If the CB901 exchange has display stations, serial port 3 will be in use.
Use the serial 20mA current loop port no.1. The processor board NFE1683 must be modified and re-programmed to change the port to RS232. This modification involves 5 cuts and 6 straps. See section 6.1.1 for modification procedure.
- Insert the lower connector from the CPU terminal block on board connector P2-19 from pin 1 upwards.
- Connect 3 wires to the terminal block pos. 39, 40 and 41.
- Solder a male 9 pin D-sub plug to the other end of the cable for connection to port 1 in AlphaCom ZE according to the table below.
| Signal | AlphaCom D-sub | Terminal block | Board no.19 |
|---|---|---|---|
| TX | 2 | 40 | 1A |
| RX | 3 | 38 | 2A |
| GND | 5 | 39 | 2B |
Port 1 in all AlphaCom XE exchanges need an RJ45 – 9-pin D-sub Serial Cable Adapter type A100A08010.
Multi stage CB901
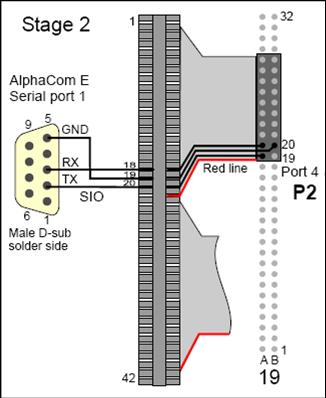
Use RS232 serial port 4 on the processor board NFE1683 in stage no.2 for the SIO data-link connection to AlphaCom XE.
- Insert the upper connector from the CPU terminal block on board connector P2-19 in stage 2. Leave the upper 4 pair of pins unconnected.
- Connect 3 wires to the terminal block pos. 18, 19 and 20.
- Solder a male 9 pin D-sub plug to the other end of the cable for connection to port 0 in AlphaCom XE according to the table below.
| Signal | AlphaCom D-sub | Terminal block | Board no.19 |
|---|---|---|---|
| TX | 2 | 20 | 19A |
| RX | 3 | 18 | 20A |
| GND | 5 | 19 | 20B |
Port 0 in AlphaCom XE20 and XE26 need an RJ45 – 9-pin D-sub Serial Cable Adapter type A100A08010.
SIO data link, EMC approved cabinet
Single stage CB901 without display stations
The SIO data link can be connected to serial port 3 since this port is not in use for display stations. If the rear side of the motherboard has green straps for display station modification, remove the two straps at 19A and 20A on card pos. 19.
- Use the 3 m external RS232/Subscriber cable BF952.
- Connect the 37 pin D-sub connector to the processor board terminal on the cabinet rear (upper right).
- Select the RS232 port no.3 wires at the cable end and solder to a male 9-pin D-sub plug.
| Signal | AlphaCom D-sub | Wire color | Wire pair | |
|---|---|---|---|---|
| RX | 3 | BLACK | 11 | |
| GND | 5 | BLUE | ||
| TX | 2 | BLACK | 12 | |
| - | NC | ORANGE | ||
Complete connection table for BF952 is found in Appendix 7.1
Single stage CB901 with display stations
If the CB901 exchange has display stations, serial port 3 will be in use.
Use the serial 20mA current loop port no.1. The processor board NFE1683 must be modified and re-programmed to change the port to RS232. This modification involves 5 cuts and 6 straps. See section 6.1.1 for modification procedure.
- Use the 3 m external RS232/Subscriber cable BF952.
- Connect the 37 pin D-sub connector to the processor board terminal on the cabinet rear (upper right).
- Select the RS232 port no.1 wires at the cable end and solder to a male 9-pin D-sub plug.
| Signal | AlphaCom D-sub | Wire color | Wire pair | |
|---|---|---|---|---|
| RX | 3 | YELLOW | 17 | |
| GND | 5 | ORANGE | ||
| TX | 2 | YELLOW | 18 | |
| - | NC | GREEN | ||
Multi stage CB901
Use RS232 serial port no.4 on the processor board NFE1683 in stage 2 for the SIO data-link connection to AlphaCom XE.
- Use the 3 m external RS232/Subscriber cable BF952.
- Connect the 37 pin D-sub connector to the processor board terminal on the stage 2 cabinet rear (upper right).
- Select the RS232 port no. 4 wires at the cable end and solder to a male 9-pin D-sub plug.
| Signal | AlphaCom D-sub | Wire color | Wire pair | |
|---|---|---|---|---|
| RX | 3 | RED | 8 | |
| GND | 5 | GREEN | ||
| TX | 2 | RED | 9 | |
| - | NC | BROWN | ||
Complete connection table for BF952 is found in Appendix 7.1
Data links, AlphaCom XE
AlphaCom XE7
In the AlphaCom XE7 serial port 0 is a 9-pin D-sub connector and port 1 is an RJ45 connector.
In order to connect the 9-pin D-sub plug (SIO signal) to the exchange, an RS232-RJ45 Interface Cable type A100A08010 must be used.
AlphaCom XE20 and XE26
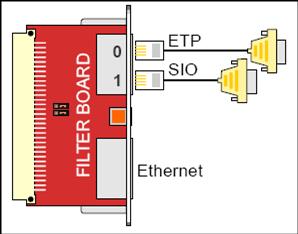
The AlphaCom XE20 and XE26 have a filter board with two RJ45 serial ports and two Ethernet RJ45 connectors.
The upper connector is serial port 0 for ETP signals, and the next is serial port 1 used for SIO signals.
In order to connect the 9-pin D-sub plugs to the exchange, an RS232-RJ45 Interface Cable type A100A08010 must be used.
RS232 – RJ45 Interface Cable
The internal connection in the A100A08010 interface cable is:
| RJ45 pin no. | D-sub pin no. | Signal |
|---|---|---|
| 3 | 2 | TX |
| 4+5 | 5 | GND |
| 6 | 3 | RX |
Audio interlinks, CB901 side
The NFE1545 Audio Interface Board shall be installed in board position no.11 in the CB901 basic board rack of stage 1.
The AGA Audio Interface Board can be installed in any free subscriber board position in AlphaCom XE. Pos. 20-23 is recommended in E26 to avoid modifications of the backplane.
Please see section 3.2.2 for available board slots, and the AlphaCom XE installation manual for further installation details.
The NFE1545 board has 8 interlinks, but since the corresponding AGA board in AlphaCom XE has 6, only the 6 first interlinks on the NFE1545 board will be used.
If more interlinks are required in a multi stage system, additional NFE1545 boards can be installed in the other stages. Use slot no.11 in all stages.
The number of AGA boards in the AlphaCom XE exchange is only limited by the number of subscriber board positions.
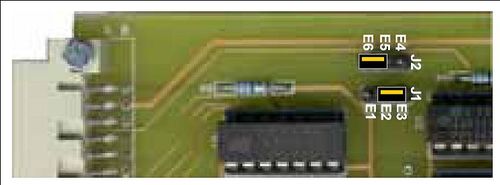
- The address programming jumpers on the NFE1545 board shall be put in positions E2-E3 and E5-E6. The hex addresses for the 6 board positions will then be from E0 to E5.
The lowest LED on the NFE1545 board will be ON. This is just an indication for the free hex address FF.
Audio links, non EMC cabinets
- Use a 12 pair twisted cable for the audio link between the CB901 and the AlphaCom XE exchange. The connections are made on the Krone terminal block.
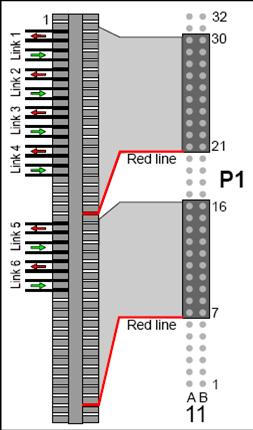
- The two 20 pin connectors are connected to P1 on the NFE1545 board (the lower connector on the motherboard).
- Leave two unconnected pair of pins above the upper connector
- Leave four unconnected pair of pins between the two connectors
| LINK | BOARD 11 P1 |
TERMINAL BLOCK |
ALPHACOM | ||
|---|---|---|---|---|---|
| No. | Direction | XE7 | XE20/26 | ||
| 1 | RM>ACE | 30 A-B | 2-3 | 31 a-b | 1 a-b |
| ACE>RM | 29 A-B | 4-5 | 31 c-d | 1 c-d | |
| 2 | RM>ACE | 28 A-B | 6-7 | 32 a-b | 2 a-b |
| ACE>RM | 27 A-B | 8-9 | 32 c-d | 2 c-d | |
| 3 | RM>ACE | 26 A-B | 10-11 | 33 a-b | 3 a-b |
| ACE>RM | 25 A-B | 12-13 | 33 c-d | 3 c-d | |
| 4 | RM>ACE | 24 A-B | 14-15 | 34 a-b | 4a-b |
| ACE>RM | 23 A-B | 16-17 | 34 c-d | 4c-d | |
| 5 | RM>ACE | 16 A-B | 22-23 | 35 a-b | 5a-b |
| ACE>RM | 15 A-B | 24-25 | 35 c-d | 5c-d | |
| 6 | RM>ACE | 14 A-B | 26-27 | 36 a-b | 6a-b |
| ACE>RM | 13 A-B | 28-29 | 36 c-d | 6c-d | |
Audio links, EMC approved cabinets
- The audio link between the CB901 and the AlphaCom exchanges are made by means of an external 3 meter open-end subscriber cable type BF952. Identify the D-sub connector on the exchange rear coming from the NFE1545 board in pos. no. 11.
See section Audio for complete interconnection cable table.
| LINK | CABLE | ALPHACOM | ||||||
|---|---|---|---|---|---|---|---|---|
| No. | Direction | Color w.1 | Color w.2 | Pair no. | XE7* | XE20/26* | ||
| 1 | AC>RM | White | Blue | 1 | 31 a-b | 1 a-b | ||
| RM>AC | White | Orange | 2 | 31 c-d | 1 c-d | |||
| 2 | AC>RM | White | Green | 3 | 32 a-b | 2 a-b | ||
| RM>AC | White | Brown | 4 | 32 c-d | 2 c-d | |||
| 5 | AC>RM | White | Grey | 5 | 33 a-b | 3 a-b | ||
| RM>AC | Red | Blue | 6 | 33 c-d | 3 c-d | |||
| 4 | AC>RM | Red | Orange | 7 | 34 a-b | 4 a-b | ||
| RM>AC | Red | Green | 8 | 34 c-d | 4 c-d | |||
| 5 | AC>RM | Black | Blue | 11 | 35 a-b | 5 a-b | ||
| RM>AC | Black | Orange | 12 | 35 c-d | 5 c-d | |||
| 6 | AC>RM | Black | Green | 13 | 36 a-b | 6 a-b | ||
| RM>AC | Black | Brown | 14 | 36 c-d | 6 c-d | |||
See section Audio interlinks, AlphaCom XE side for AlphaCom XE connection terminals.
Audio interlinks, AlphaCom XE
- Connect the 12-pair twisted cable from the non EMC CB901 cabinet to the AlphaCom XE terminals. Make a coding table for connection on both sides.
Or
- Connect the 20-pair cable from the EMC CB901 approved cabinet to the AlphaCom XE terminals. See table in section 3.3.7 for wire pair color coding
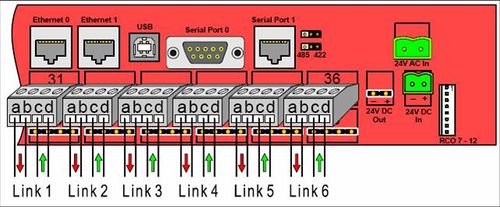
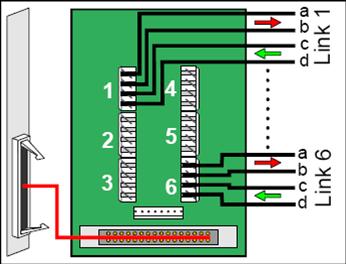
- The a and b wires are audio FROM AlphaCom XE
- The c and d wires are audio TO AlphaCom XE
These lines are balanced; the twisted pairs may be connected either way.
Audio links, AlphaCom XE7
Even if the AGA board can be placed in any subscriber board position, it is good practice to choose slot no. 6 (line no. 31-36).
The audio connection to CB901 is made by six 4-way plug-on screw terminals, one link per terminal.
AlphaCom XE20 and XE26
Use the same filter board with cable and connection board as the ASLT Subscriber Board.
The connection board has six 4-way push-on terminals marked 1-6 corresponding to the link numbers.
PROGRAMMING
The programming procedures in this chapter will only concentrate on the procedures concerning the interface between Ring-Master CB901 and AlphaCom XE. Further instructions are found in the system programming manuals.
Purpose of programming
Individual programming will be carried out in each system via a locally connected data terminal (laptop).
- Note: One system cannot be programmed from the other.
- Set the data of the serial port used for CB901
- Identify the 6 hex positions where the NFE1545 board is connected
- Identify the CB901 stage(s) where the interlink NFE1545 board(s) is(are) installed
- Specify the communication via the SIO port in CB901
- Remote dialing for connection of privacy test station positions
- Remote dialing for cancelling the privacy test connection
- Remote dialing for call request camp-on to a program channel in CB901.
- Remote dialing for program channel cancelling
- Receive event for privacy time-out
- Receive event for call button press (8 digit for identification of pager call)
- Set the data of the serial port used for AlphaCom
- Program the feature code for access to the numbers in AlphaCom XE. If the feature code is one digit (F), then a call to a number (AAA) in
AlphaCom E will be F A A A - Select the four numbers used for privacy test
Programming CB901
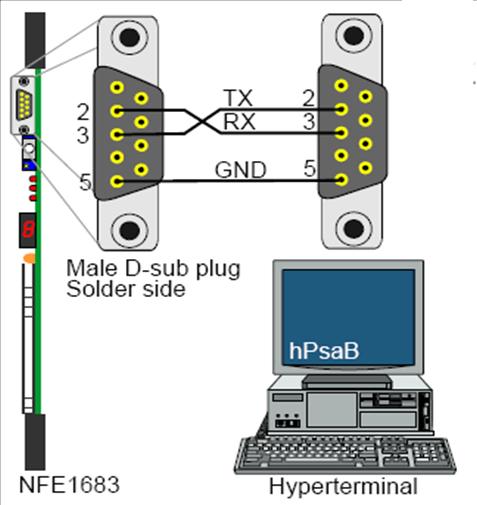
- Connect a PC to the D-sub in front of the RM CPU board NFE1683 via a crossed 3-wire D-sub cable.
- Define the PC as a hyperterminal, Baud rate = 9600/8/n/1
- Log in to the CB901 central by using the super-user command hPsaB
The super-user status is needed to adjust the two test timers later on in the process.
Ring-Master Configuration Commands
The CB901 system must be configured before the ETP feature can be executed. The configuration process is carried out through a number of SVT commands. See the SVT manual for details.
- Start by un-define the line equipment positions where the ETP trunks will be connected. This is done with the SLEU command:
SLEU E0-E5
- Continue to define which line equipment positions to be allocated as ETP trunk positions. This is done with the SETP command:
SETP 1 E0 <stage no>
SETP 2 E1 <stage no>
SETP 3 E2 <stage no>
SETP 4 E3 <stage no>
SETP 5 E4 <stage no>
SETP 6 E5 <stage no>
- Define which first digit(s) to be used as ETP call number(s). This is done via the two commands, SCDU and SFC.
In this example 7 is used as first digit in the call numbers in AlphaCom XE (ETP). - Un-define 7 as first call digit for normal calls:
SCDU 7
- Define 7 as feature code for ETP. The feature ID numbers reserved for ETP are from 81 until 89.
In this example we will only define ETP call digit for feature ID 87:
SFC 87 7
(87 is selected just to make it easier to remember the call number 7).
The call number series starting with 7 as first digit has been programmed to be associated with the ETP trunks.
All numbers starting with 7 will now be in the AlphaCom XE. The call numbers must have a total of 4 digits (7xxx).
- Define which of the Ring-Master call numbers shall be able to make ETP calls (calls into the AlphaCom XE system). Use the SFA command to give access to dial feature code 7 (feature ID 87):
SFA 1000-1999 87 +
All stations in the range of 1000-1999 can call in the example above.
Refer to the SVT programming manual for general configuration of the Ring-Master CB901 system.
Privacy test call numbers SIO
This position (call number) will be used by AlphaCom XE to call the stations in CB901. This must be programmed with privilege no.20, ‘Remote dial receive’.
The remote dialing in CB901 via the SIO port is automatically controlled by the RM Daemon in AlphaCom XE.
The disconnect event must programmed for both the SIO number C (A side, event 12) and the called number D (B side, event 64). Please see Privacy Test explanation in section RMD Privacy links and Subscriber board modification in Subscriber boards.
SPT <any selected call number (SIO)> 20 +
( 20 is ‘Remote dial receive’ )
SSE <any selected call number (SIO)> 12,64 +
- These events must now be programmed into all RM stages by the command Set Status Output:
SSO <event no.12> <stage no.> <output to PC port><stage where the PC port is used><stop>
Example
Stage 1:
SSO 12 1 C 1 U        Disconnect C (SIO)
SSO 64 1 C 1 U        Disconnect D
Stage 2:
SSO 12 2 C 2 U        Disconnect C (SIO)
SSO 64 2 C 2 U        Disconnect D
Stage N:
SSO 12 N C 2 U        Disconnect C (SIO)
SSO 64 N C 2 U        Disconnect D
These events are used to ensure complete cancellation of the audio link when a called Ring-Master station (D) presses the X button, or automatic reset at timeout.
- Program Group Call using the following commands:
SGCN: Program the call number for each group.
These numbers shall also be programmed into the RMD WEB interface in AlphaCom XE in order to set the relation between the internal groups in CB901 and the global group numbers in AlphaCom XE.
SGCM: Program the receivers in each group in CB901.
SPT: Privilege to manage Group Call and All Call
Adjust test timers no. 1 and 2
- First check the settings via the command LTT.
The value should be 70 (7 seconds) for both timers:
LTT
Time id <1,-,50/*> 1,2
| Time ID | Timer | Current time |
| 1 | ETP heartbeat timeout | 70 |
| 2 | Wait for ETP answer | 70 |
- Use the command STT to correct the values if they are different from 70.
CB901 communication serial port
As default there is only one serial port available in each CB901 stage for communication with AlphaCom. This is port 4, which is programmed to support Pocket Paging as default
This port must be re-programmed to support the ETP.
- Note: The setup procedures for a single stage CB901 and a multi stage CB901 are different
CB901 single stage
- Program port 4 to be ETP via the SD command
- Program the communication data for port 4 via the command STTY and select E for ETP.
- Specify the following:
Baud              : 9600
Bits              : 8
Parity            : N
Stop bits         : 1
CB901 Multi stage
- Use the command STTY, and select P for Pager.
- Specify the following:
Baud       : 9600
Bits       : 8
Parity     : N
Stop bits  : 1
- Use the command SD (Set Driver) to change port 4 from Pager to ETP.
- Use the command LTTY to verify that the ETP is now identified for port 4 with the data: 9600/8/N/1.
- Note: The data for port 4 cannot be changed when the driver is specified for ETP. In order to modify the data you must re-define port 4 as Pager port via the command SD.
Programming in AlphaCom XE
Configuration programs
The AlphaCom XE configuration is partly made from AlphaPro and partly from the embedded Web browser AlphaWeb.
The configuration includes the following steps:
AlphaPro:
- Create virtual Ring-Master node(s) which defines a data link between the AlphaCom XE node and the virtual Ring-Master node (RMD)
- Create AlphaCom XE <-> Ring-Master audio links
- Create RM call numbers as Global numbers
- Call Request
- Group Call
- Update the exchange
AlphaWeb:
- Insert license for the Ring-Master interface
- Configure the virtual Ring-Master node
AlphaPro configuration
AlphaPro is an off-line tool used to configure AlphaCom XE. All parameters can be entered without being connected to the exchange. Once all parameter are entered, AlphaPro can be connected to the exchange and the parameters can be sent. AlphaPro can also upload configuration information from an exchange.
See the AlphaCom XE technical manual “Alphacom XE Installation, Configuration & Operation” A100K10805 for further programming procedure.
Connect a PC to the exchange
Insert the HW dongle
- Insert the hardware dongle in the PC’s USB port.
- Leave the dongle in the PC during programming and transferring of data to the exchange.
Ethernet connection
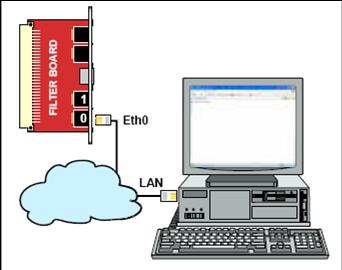
AlphaCom XE exchanges communicate with the AlphaPro PC over the IP network. Eth0 is the default management port unless the configuration has been changed.
When the AlphaPro communication icon is pressed, AlphaPro will prompt you for user name and password before login to the AlphaCom.
Create RM-ACE network
From the AlphaPro Main Menu:
- Press the ‘+’ button next to ‘Select Network’
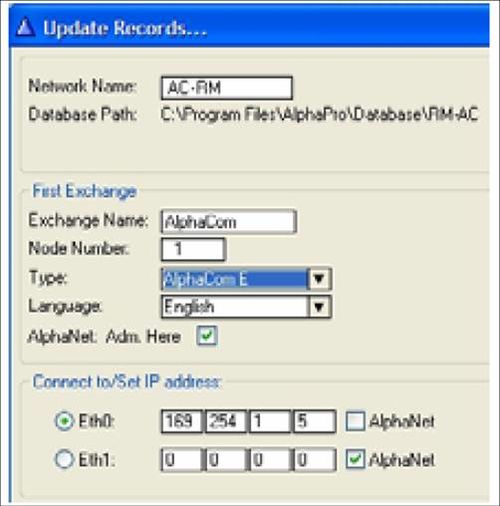
- Give the network a name, i.e. “AC-RM”
- Give the first exchange a name, i.e. “AlphaCom”
- The ‘Node Number’ shall be “1”
- Be sure the ‘AlphaNet Adm. Here’ check box is ticked
- The default IP address 169.254.1.5 is used when the AlphaWeb PC is connected directly to the AlphaCom XE node on the Eth0 port. If a remote PC is connected via a network for AlphaWeb programming, this address must be changed. Contact the IT administrator to get this address.
- Note: Make a note of this IP address as it must be entered manually in AlphaWeb!
- Click [OK] to confirm
The new network name will appear in the ‘Select Network’ pull-down list and the given exchange name is automatically put in the ‘Select Exchange’ pull-down list.
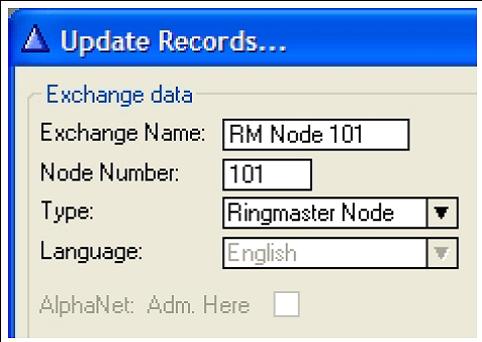
Create virtual Ring-Master node(s)
From the AlphaPro Main Menu:
- Press the ‘+’ button next to ‘Select Exchange’
- Type the name of the new RM node i.e. “RM Node 101”
- Type in the node no. i.e. “101”
- Select [Ringmaster Node] from the ‘Type’ list
- Leave the [Adm. Here] flag unchecked
- Note: The Ring-Master node must be assigned a higher node number than the AlphaCom node. Suggested node number is 101.
In Ring-Master systems consisting of two or more stages, you need to create more Ring-Master nodes in order to have more audio lines. Each NFE1545 / AGA board connection is considered one node.
Create the second Ring-Master node in the same way as the first, but with node number 102 and so on.
Define the data- and audio link
- Select [Exchange & System] in the Main Menu
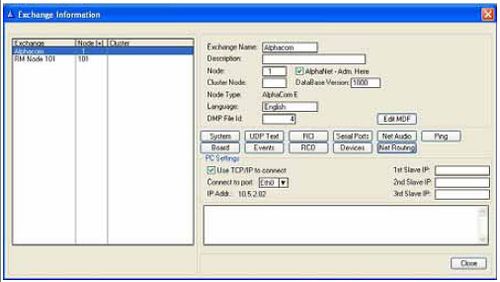
- Select [AlphaCom] in the ‘Exchange Information’ window
- Select [Net Routing]
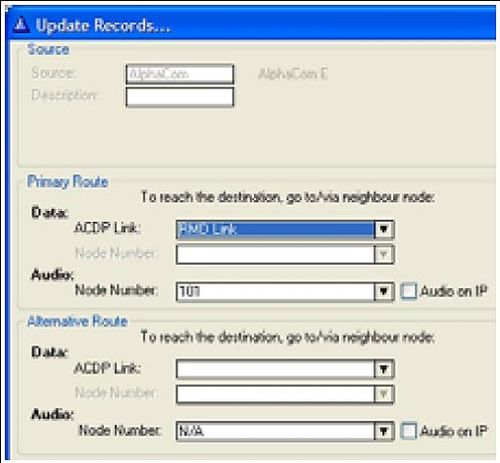
- Select [Insert]
- Select the new ‘RM node’ and click the [Select] button
- Select [RMD link] from the ‘Primary route’ Data ACDP link
- The audio should be on node number ‘101’
- Click [OK] to save the record
- Click the [Close] button to get back to the Main Menu
Create AlphaCom / Ring-Master audio links
- Select [Exchange & System] in the Main Menu
- Select [AlphaCom] in the ‘Exchange Information’ window
- Select [Net Audio]
- Select [Insert]
- Check that Ring-Master is the destination node and click on [Select]
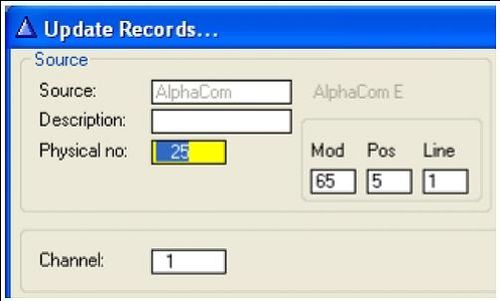
- Enter the AGA board physical link number and a channel number starting from ‘1’ on the first link, ‘2’ on the second link and so on
- Repeat this operation until all audio links are defined
Example: An XE7 has two AGA boards in pos. 5 and 6. The first physical link number is (4x6)+1=25 and the last link number is 36. - Click [OK] to save the record
- Click the [Close] button to get back to the Main Menu
Tone test
The AGA audio links are by default supervised by a test tone transmitted on the line at regular intervals.
As this test is not supported when interfacing to the Ring-Master system, the test must be disabled to prevent the links from being taken out of service.
- Select [Exchange & System]
- Click on [System]
- Select [Logs and Errors]
- Check that [Enable Tone Test] is NOT checked
- Set [Audio Test Period] to 65 535 (= Test OFF)
The audio links require further configuration from the RMD configuration page in AlphaWeb.
Create Ring-Master station numbers
All station numbers in the Ring-Master system which should be accessed from the AlphaCom XE must be programmed in the AlphaCom directory table (Directory & Features) with feature 083 (Global numbers) and ‘Node’ = Ring-Master node number (e.g. 101).
In the example below, the station number 1258 is defined as Global Number for AlphaNet, feature 083. The display text will be shown in the AlphaCom station when calling the RM station. This text should be coordinated with the RM systems caller ID text for that RM station.
Further configuration of the call numbers is required from the RMD configuration page in AlphaWeb.
- Click on [Directory & Features]
- Select feature 83 ‘Global Number for AlphaNet’ in the [Feature] pulldown list
- Type the RM node number (‘101’) in the [Node] field
- Type the RM call number in the [Directory Number] field
- Type in the text which will be visible in the display of the calling AC station in the [Display Text] field
- Click [OK]. The new global number will be updated in the table on the left
Repeat this procedure for each RM number to be defined in AlphaCom
AlphaCom station numbers
All station numbers in the AlphaCom XE which should be accessed from the Ring-Master system must be assigned a 4-digit directory number in AlphaCom (Users & Stations). First digit must be the feature code 7 as programmed in RM.
Note that there are a number of standard feature codes in the AlphaCom starting with digit 7, e.g. 70 (Station reset) and 71 (Call forwarding). These codes will mask any station numbers starting with the same digits. For example 70 will mask for all stations in the range 70xx, 71 will mask all stations in the range 71xx, and so on. When a station number is masked by a feature code it will not be possible to call the station. In this case the feature codes must be changed. It is recommended to put a one-digit in front of the standard number, i.e. change 70 to 070, 71 to 071 and so on.
Call Request group numbers
When the “CAS” function is wanted in the Ring-Master system, it must be converted to generate a Call Request to a group in AlphaCom XE. This “group” should include one or several guard station(s) to receive call request calls from RM as well as AC stations.
The directory no. of the group used for Call Request must be 4 digits and the first digit must be feature code 7 as programmed in RM.
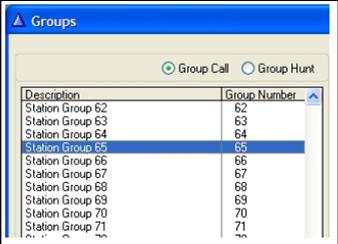
Since Ring-Master has 64 group-call groups numbered from 1 - 64, groups from 65 - 100 should be used in AlphaCom XE for Call Request.
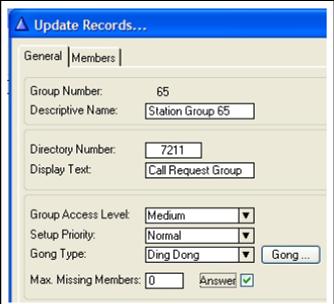
In the example below, the group 65 is used for call request and the directory number for this group is 7211.
- Select [Groups], then [Local Groups]
- Scroll down to group 65 and select [65]
- Click on [Change]
- Type the Call Request call number in the [Directory Number] field
- Type in the display text in the [Display Text] field
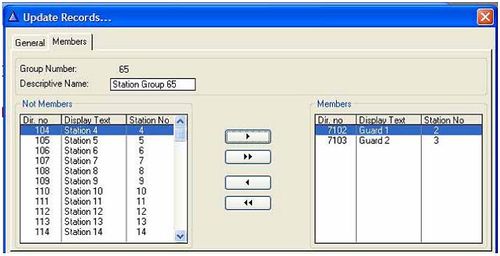
- Click on the [Members] field. This will be the guard stations (RM CAS operators)
- Select the guard stations to be included in the group from the ‘Not Member’ list, and transfer to the ‘Members’ list
- Click [OK]
Group Call numbers
In order to make Group Call in both RM and ACE simultaneously, the Global Group numbers must be specified. Follow the same routine as described for Call Request group numbers.
DTMF from AlphaCom XE to CB901, pulse operation
This is used for e.g. Door Opening Control Set the Door Open button
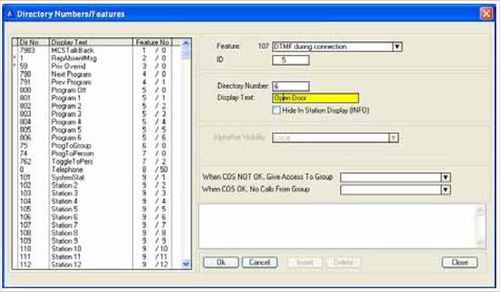
- Click on [Directory Numbers & Features] on the main menu.
- Click on [Insert]
- Select feature 107 ‘DTMF during connection’ from the [Feature] pulldown list.
- Type “5” in the ID field.
This is the DTMF ID to be used. (Any digit from 0-9 may be used) - Type “6” in the [Directory Number] field.
This is the button to be pressed during conversation
Note: A “Duplicate Directory Number” warning will appear. Answer “Yes”. It is then not possible to open doors with AlphaCom door stations.
- Type “Open Door” in the display text field
- Click [OK] and [Close]
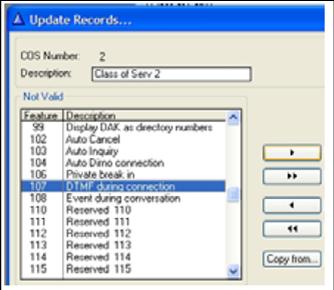
Create a new Class of Service
- Click on [Class of Service] on the main menu.
- Click on, for example [Class of Serv 2]
- Click on [Change]
- Click on [Copy From…] and choose ‘Default’
- Transfer all features which are included as default from the left to the right window
- Transfer, in addition, feature no. ‘107 DTMF During Connection’
- Click [OK] and [Close].
Set the Door Open station
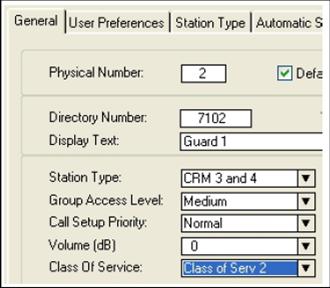
- Click on [Users & Stations] on the main menu.
- Click on the call number which shall be permitted to transmit DTMF for door opening in the stations list
- Select [Class of Service] for the selected call number to be ‘Class of Serv 2’
- Click [OK]
- Repeat for all stations permitted to open doors
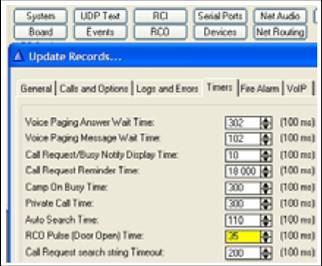
Adjust the DTMF pulse time
- Select [Exchange & System] from the main menu
- Click on [System]
- Select [Timers]
- Check that [RCO Pulse (Door Open) Time] is set to default 35 (3.5 sec.)
- Click [OK] and [Close]
DTMF from AlphaCom XE to CB901, continuous
This will transmit a DTMF signal as long as a station button is pressed.
- Click on [Directory & Features] on the main menu
- Select feature ‘107 DTMF During Connection’ from the [Feature] pull-down list.
- Click on [Insert]
- Type “255” in the ID field
This indicates that the digit specified below will enable the Continuous DTMF feature - Type “6” in the [Directory Number] field
This is the button to press during conversation to enable continuous DTMF transmission
- Note: A “Duplicate Directory Number” warning will appear. Answer “Yes”. It is then not possible to open doors with AlphaCom door stations.
- Type “Open Door” or actual initiated function in the display text field
- Click [OK] and [Close]
Any number key pressed after 6 will result in a continuous DTMF signal as long as the key is pressed. The DTMF signal will correspond to the depressed number key.
- Proceed with procedures as explained for [Class of Service] and [Users] above
Update the exchange
- Connect the PC to the AlphaCom XE exchange according to section Connect a PC to the exchange
- Log on to the exchange and update the configuration by pressing the [SendAll] button. When the transfer is finished, the AlphaCom XE must be reset by activating the [Reset] button in the communication window.
Configuration from AlphaWeb
Connect to AlphaWeb
- Connect the PC Ethernet port to the LAN port (Eth0) on the AMC-IP filter board.
- Use your web-browser to connect to the AlphaWeb. Enter http://169.254.1.5 (default address) in the address field1 Connection with the AMC is verified by the text: [Login] AlphaWeb
- Note: This IP address must be entered manually in AlphaWeb.
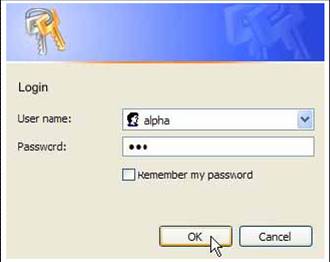
- Click on [Login]
User is prompted for user name and password
| Default user name: | alpha |
| Default password: | com |
This login will give reading rights only.
To be able to change the configuration, the user must log in as an administrator. The default login will then be:
| User name: | admin |
| Password: | alphaadmin |
See further details on AlphaWeb in the AlphaCom XE technical manual A100K10805.
Insert license for Ring-Master
Log on to AlphaWeb and install the license to enable the Ring-Master interface.
- Select [System Configuration] then [License Key]
- Input the RM license key string under [New License Key]
- Press the [Insert new license key] button
- Verify that the license has become active in the License Configuration field
Configuration of the virtual Ring-Master node
- Log on to AlphaWeb and select the [RM Configuration] page. The parameters for the Ring-Master node are configured from this page, such as:
- RMD general parameters
- Trunk lines
- Call numbers
- Group calls
- Privacy links
- Call Request groups
- Click on [External Systems] and then select [RingMaster]
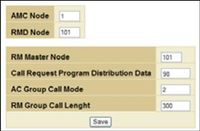
RMD General Parameters
- Select [General Parameters]
- Specify the AMC Node no.
- Specify the RMD Node no.
- Specify the RM Master Node where the ETP link is connected (Example: “101”)
- Specify the program distribution channel were the call request stations are camped on. Leave the default feature code “98” This is a global PD channel for all stages within node 101
- Specify the AC Group-Call mode
1 = No ‘gong’ in AC. 2 = ‘Gong’ in AC stations - Specify the Group Call length plus 5 - 10 seconds (more than the time set in CB901).
- Press [Save] to save the changes
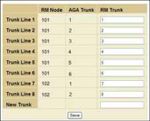
RMD Trunks
- Select [Trunks]
- Specify the numbers for the RM Trunks (NFE1545) and AGA trunks.
In this example there are 2 x AGA boards in AlphaCom XE.
AGA no.1 is connected with 6 trunks to the one NFE1545 in CB901 and these 6 trunks are identified as trunk 1 - 6 in RM node 101.
The two first positions on the second AGA board is connected to the two first positions on the other NFE1545 board and are identified as RM trunks 7-8 in RM node 102.
- Press [Save] to save the changes
RMD Call Number Configuration
- Select [Call Numbers]
- Select the RMD node to be configured
RM call numbers for the selected node are already programmed in the AC via AlphaPro and listed in the left column. The features for each station are specified in the following columns.
- Normal.
Station to station direct call with transfer of display information only
- Call Request.
The station shall make a call request (CAS) to an AC station. The station will be camped on to the globally programmed program distribution channel in CB901.
- Specify if the stations shall be tested for privacy after Call Accept
- Specify the time-out in minutes for queuing (Auto cancel if not accepted)
- Specify if the calling station shall be removed from the call request queue after time-out.
If the [Cancel] field is not marked, the calling stations ID will be present in the guard stations display as an indication on who has called.
- Privacy.
The station shall be tested for privacy. This requires that there are at east two subscriber positions linked together for indirect privacy testing via remote dialing. - Press [Save] to save the changes
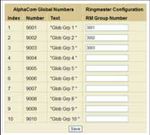
RMD Global Groups
Use global groups 1 - 64 in order to match the corresponding groups in CB901.
If more groups are required, the new groups must be specified via AlphaPro and SVT.
All Group Call numbers programmed in AlpaCom via AlphaPro are listed in the left column.
- Specify the corresponding RM Group Call number which is already programmed in CB901 via SVT
- Press [Save] to save the changes
RMD Privacy links
- Specify the loop connection between two subscriber positions in CB901 which will be used for the privacy test. All stations programmed to be tested for privacy will use the above specified link.
The number of specified links depends on the expected traffic. The calling AC station will receive a reject signal when no more “privacy test links” are available.
Privacy test link #1 is specified to be between B and C.
An AC station is calling the RM Station at D, which is specified to be privacy tested.
The RMD (Ring-Master Daemon) will make a connection between A and B via the ETP link, and one connection between C and D via remote dialing in the SIO port.
Position C has been programmed for “Remote Dialing Receive” via SVT.
If the RM station is in privacy, then the privacy tone will be transmitted to the calling AC station via the B-C link. The RMD in AC will select the first free link if more links are specified.
In a multi stage CB901 system there must be one privacy test subscriber board in each stage. The stations in each stage, which shall be tested for privacy, will use the privacy test positions in the local central.
See section Privacy test call numbers SIO on how to set Privacy test numbers and section 6.2 for Subscriber board modifications.
RMD Call Request Groups (CAS)
- Specify the ETP call number to the group in AC where the guard stations are connected. The guard stations are programmed as members in these groups via AlphaPro.
- Press [Save] to save the changes
- Note: A save should be performed for in RMD menu, even if there is no programming done in that RMD menu.
- Note: The AlphaCom exchange must be reset after any change in the RMD configuration pages.
AUDIO LEVEL ADJUSTMENT
Audio switching control
There is no transfer of switching control signals between the AlphaCom and CB901. The audio switching is controlled locally in each system in both simplex and duplex.
Adjustment procedure
The audio transmit level in AlphaCom XE is fixed and cannot be adjusted. The receive level is adjusted by potentiometers on the AGA board.
The following procedure describes how to adjust the audio level between the audio interface board NFE1545 in the CB901 exchange and the AGA board in the AlphaCom XE exchange.
The NFE1545 board has 8 audio channels, but only the first 6 are used when communicating with the AGA board.
A DTMF signal generated in AlphaCom XE will be used as reference.
The adjustment has to be carried out on all new installations as a part of the commissioning procedure.
The AlphaCom XE exchange should be installed in the same room as the CB901 node where the audio interface board NFE1545 is located in order to simplify the adjustment.
AlphaCom XE level adjustment
Re-define the function of 6 audio ports in the AGA board using AlphaPro in order to perform a loop test. This test uses a tone generated internally in the AGA board. The input sensitivity of each AGA audio channel can now be adjusted by means of potentiometers on the AGA board.
The output level is fixed and cannot be adjusted.
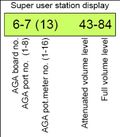
Information in the display of the AlphaCom “super user” station (the first line point in AlphaCom XE) will be used as a reference for correct adjustment of the input level potentiometers.
When all channels are adjusted, the AlphaPro program must be used in order to set the audio channels back to “default”.
- Note: This adjustment must be carried out on all new installations.
- Note: The cable between the AGA board and the NFE1545 board must be disconnected during the adjustment.
- In AlphaPro select [Exchange & System].
- Select [Board]
- Click on the board number for the AGA board you want to adjust.
- The AGA board no. is given by the board location in the cabinet.
- In ACE7, start counting from the lower part of the cabinet.
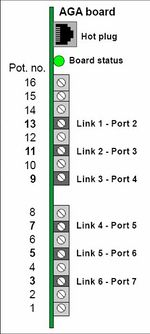
- The six ports from 2 until 7 on each installed AGA board are used.
- Start by selecting [port 2] for the installed AGA board to adjust the input from link 1 until 6.
- Select [Change]
- In the field [Port use], select [5 Gain adjust (Group call)] and press [OK]
- Repeat the procedure until all 6 AGA channels are changed (port 3, port 4, etc.)
Adjusting the audio potentiometers 3, 5, 7, 9, 11 and 13.
- Dial 7872 from the Super User station and monitor the information in the stations display.
- Station key 7: Scroll DOWN
- Station key 9: Scroll UP
- Adjust the potentiometer indicated in the display until “Full volume level” and “Attenuated volume level” is the same value.
- After the adjustment is finished the [Port use] must be set to [Default] again via AlphaPro.
- Note: During this test the output links are programmed as inputs and pot. meters 4, 6, 8, 10 and 12 will adjust the input level for thesereversed links.
This function is not used when interfaced to CB901, and you can disregard the adjustment of these pot.meters. This function is used when the AGA board is operating as an audio program (music) interface with only inputs.
- Note: During this test the output links are programmed as inputs and pot. meters 4, 6, 8, 10 and 12 will adjust the input level for thesereversed links.
Ring-Master level adjustment
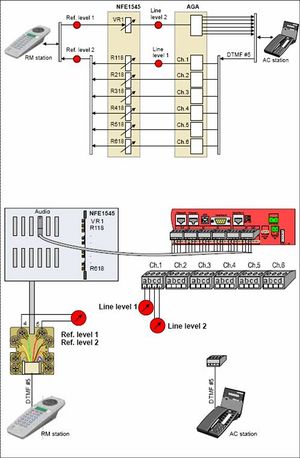
The amplification in each channel on the audio interface board NFE1545 must be adjusted with the potentiometers R118-R618. VR1 is a common potentiometer for output adjustment of all 6 channels.
The DTMF audio reference signal is generated in AlphaCom XE. See section 4.4.12 for instruction on how to program AlphaCom to transmit DTMF.
Select one Ring-Master and one AlphaCom master station situated close to the test site to perform the adjustment.
Use oscilloscope or electronic multi-meter to read the values.
Adjustment procedure, audio from AlphaCom XE to Ring-Master
- Connect the instrument to the RM station audio line, screw terminals 4 and 5 in the RJ45 wall socket.
- Make a call from the RM station to the AC station.
- Press and hold the M key (microphone mute) in the RM station
- Press the digit 5 key while the M key is depressed.
- Check the signal level on the audio-pair from the RM station.
- Note this value as the RM reference signal (Ref.level 1).
- Make a call from the AC station to the RM station.
- The selected audio channel is identified by the LED’s in front of NFE1545.
- Press the digit 6 key in the AC station.
This will result in a 5 sec. DTMF #5 pulse transmitted to the RM station. - Adjust the actual channel potentiometer (R118-618) until you read the same line level (Ref.level 2) as noted for Ref.level 1.
- It may be needed to repeat the reading by pressing digit 6 again. The channel will not change as long as the station is not reset.
- Make a new call from the AC station to the RM station.
The next channel will automatically be selected.
- Repeat the adjustment (Ref.level 2 = Ref.level 1) for all 6 channels.
Adjustment procedure, audio from Ring-Master to AlphaCom XE
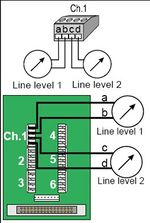
- Connect the instrument to the a-b wire on the Channel 1 line between the AGA and NFE1545 boards on the AlphaCom XE side.
- Make calls from AC to RM until Ch. 1 is selected.
- Press the digit 6 key in the AC station and measure the DTMF #5 pulse level (Line level 1).
- Move the measuring instrument to the c-d wire on the Channel 1 line between the AGA and NFE1545 boards on the AlphaCom side.
- Make a call from the RM station to the AC station.
- Press the M (mute) and digit 5 key on the RM station, thereby transmitting DTMF #5 to the AC station.
- Adjust VR1 on the NFE1545 board until Line level 2 is the same as Line level 1.
This is a common adjustment of the audio level from RM to AC for all six audio channels.
MODIFICATIONS IN THE CB901 EXCHANGE
A hardware modification must be carried out on one subscriber board and on the processor board, depending on system configuration and feature programming.
Processor board
The board may need a modification in order to convert one current loop port to RS232 as two serial ports are needed for interconnection to AlphaCom XE.
- The ETP port is used for normal dialing and display information
- The SIO port is used for remote dialing
Modification IS NOT necessary in:
- Single stage exchange with no display stations. The central is delivered before 1995 and has not been modified to use display stations. See section 3.3.4
- Multi stage exchange with or without display stations. If the system is using display stations, the serial port 4 in stage 1 and 2 will be used for interface.
Modification IS necessary in:
- Single stage with display stations.
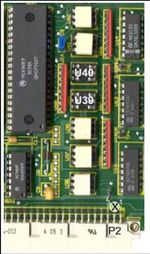
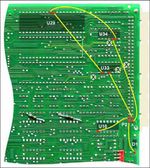
Modification procedure, NFE1683
Modify data port no.1 from current loop to RS232.
Remove
- IC U39
- IC U40
Cut one track on the PCB component side
- Cut connection between pin 1B and 3B on plug P2
Cut 4 tracks on the PCB solder side
- Connection to U34 pin 2
- Connection to U34 pin 3
- Connection to U32 pin 4
- Connection to U32 pin 6
Mount 6 straps on the PCB solder side
- Between U34 pin 3 and connector P2 pinA1
- Between U34 pin 2 and U29 pin 30
- Between U32 pin 4 and connector P2 pin A2
- Between U32 pin 6 and U29 pin 31
- Between P2 pin B2 and U16 pin 7 (-5 VDC)
- Between P2 pin B1 and D1 cat. (+5 VDC)
Subscriber boards
Two and two subscriber positions must be looped in order to create 4 privacy test links for the RM-ACE interface. This must be done on one subscriber board in each CB901 node in a RM system. If 4 privacy links are not sufficient, a second subscriber board must be modified in each central.
Positions 1-2, 3-4, 5-6 and 7-8 will be strapped.
The board can be plugged into any valid subscriber board position in the central, and the corresponding HEX address for each position must be programmed with individual call numbers.
- ETP numbers are programmed for positions 1, 3, 5 and 7
- SIO numbers are programmed for positions 2, 4, 6 and 8
Each ETP number is linked to one corresponding SIO number.
Stations can not be connected to these modified subscriber boards.
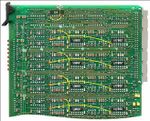
Modification procedure, NFE1813
Cut one track on the PCB solder side
- Cut connection between pin 2 and 3 on U4
Mount 9 straps on the PCB solder side
- U4 pin 2 and U4 pin 7
- U102 pin 7 and common point for R222/R223/C223
- U202 pin 7 and common point for R122/R123/C123
- U302 pin 7 and common point for R422/R423/C423
- U402 pin 7 and common point for R322/R323/C323
- U502 pin 7 and common point for R622/R623/C623
- U602 pin 7 and common point for R522/R523/C523
- U702 pin 7 and common point for R822/R823/C823
- U802 pin 7 and common point for R722/R723/C723
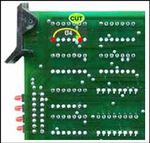
Modification procedure, NFE1625
PCB solder side
- Cut the track between pin 2 and 3 on U4
- Mount one strap between U4 pin 2 and U4 pin 7
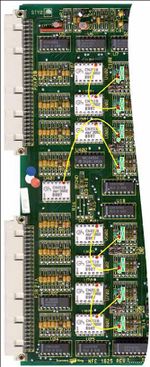
PCB component side
There are 8 identical circuits that need a modification.
- Remove 8 capacitors: C110, 210, 310, 410, 510, 610, 710 and 810.
- Unsolder the lower leg on 8 capacitors: C109, 209, 309, 409, 509, 609, 709 and 809.
- Solder a strap between the free leg on the Cx09 capacitors and pin 9 on the Ux02 ICs in the following way:
- C109 to U202 - C209 to U102 - C309 to U402 - C409 to U302 - C509 to U602 - C609 to U502 - C709 to U802 - C809 to U702
APPENDIX
Equipment List
The following equipment is required for the interconnection between CB901 and AlphaCom XE.
Ring-Master CB901
Basic board rack DP979 (Not EMC)
| 1 x NFE1545 | Interlink B board including 8 audio lines. 6 lines will be used for audio communication with the AGA board in AlphaCom XE |
| 2 x BF927 | Interconnection cables for audio and serial data. |
OR
Basic board rack DP991 (EMC approved)
| 1 x NFE1545 | Interlink B board including 8 audio lines. 6 lines will be used for audio communication with the AGA board in AlphaCom XE |
| 1 x BF950 | Internal cable for audio from NFE1545 |
| 1 x BF957 | Internal RS232 cable |
| 2 x BF951 | EMC filter |
| 2 x BF952 | 3 m external cable for audio and serial data |
STENTOFON AlphaCom XE
AlphaCom XE7
| 1 x 1009608100 | XE7 package including 1 x ASLT line boards |
| 1 x 2030010270 | Mains transformer |
| 1 x 1009501100 | Connection kit ASLT/AGA |
| 1 x 1009303001 | AGA board for 6 audio channels |
| 1 x A100A08010 | RJ45 – 9-pin D-sub Serial Cable Adapter |
OR
AlphaCom XE20
| 1 x 1009621000 | XE20 exchange including 2 x ASLT line boards |
| 1 x 1009303001 | AGA board for 6 audio channels |
| 1 x 1009501021 | Filter board with 5 m connection cable |
OR
AlphaCom XE26
| 1 x 1009627000 | XE26 exchange including 2 x ASLT line boards |
| 1 x 1009303001 | AGA board for 6 audio channels |
| 1 x 1009501021 | Filter board with 5 m connection cable |
AND
License
| 1 x 1009649001 | License key; will enable the communication between CB901 and AlphaCom XE |
Interconnection cable, EMC cabinet
The cable is a 20-pair twisted telephone cable with a 37-pin D-sub connector in one end and loose wires in the other.
Two types are available:
| BF952 | External RS232/Subscriber cable, 3 m |
| BF952A | External RS232/Subscriber cable, 10 m |
Data
This cable is used to transfer data between CB901 EMC board racks and AlphaCom XE exchanges. See actual interconnection in section ETP data link and SIO data link, EMC approved cabinet
Port #1 is converted to RS232 for SIO data if display stations are used, see section Processor board
The IEC color coding standard is used for wire pair identification.
| PAIR no |
COLOR A-wire |
D-sub PIN no. |
DATA signal |
COLOR B-wire |
D-sub PIN no. |
DATA signal |
FUNCTION | ||
|---|---|---|---|---|---|---|---|---|---|
| 1 | WHITE | 1 | RTS | BLUE | 20 | CTS | PORT #5 Service terminal RS232 (SVT) Fixed | ||
| 2 | WHITE | 2 | RX | ORANGE | 21 | GND | |||
| 3 | WHITE | 3 | TX | GREEN | 22 | DTR | |||
| 4 | WHITE | 4 | RTS | BROWN | 23 | CTS | PORT #6 Printer RS232 Fixed | ||
| 5 | WHITE | 5 | RX | GREY | 24 | GND | |||
| 6 | RED | 6 | TX | BLUE | 25 | DTR | |||
| 7 | RED | 7 | RTS | ORANGE | 26 | CTS | PORT #4 Radio paging RS232 | ||
| 8 | RED | 8 | RX | GREEN | 27 | GND | |||
| 9 | RED | 9 | TX | BROWN | 28 | DTR | |||
| 10 | RED | 10 | RTS | GREY | 29 | CTS | PORT #3 Display driver | ||
| 11 | BLACK | 11 | RX | BLUE | 30 | GND | |||
| 12 | BLACK | 12 | TX | ORANGE | 31 | DTR | |||
| 13 | BLACK | 13 | RX+ | GREEN | 32 | RX- | Serial input 20 mA current loop | ||
| 14 | BLACK | 14 | TX+ | BROWN | 33 | TX- | Serial output 20 mA current loop | ||
| 15 | BLACK | 15 | RX+ | GREY | 34 | RX- | PORT #2 20 mA current loop | ||
| 16 | YELLOW | 16 | TX+ | BLUE | 35 | TX | |||
| 17 | YELLOW | 17 | RX+ | ORANGE | 36 | RX- | PORT #1 20 mA current loop | ||
| 18 | YELLOW | 18 | TX+ | GREEN | 37 | TX | |||
| 19 | YELLOW | 19 | BROWN | NC | |||||
| 20 | YELLOW | NC | GREY | NC | |||||
Audio
This cable is used to transfer 6 audio channels between CB901EMC board racks and AlphaCom XE exchanges. See actual interconnection in section Audio interlinks, CB901 side
The IEC color coding standard is used for wire pair identification.
| PAIR no |
COLOR A-wire |
D-sub PIN no. |
COLOR B-wire |
D-sub PIN no. |
CABLE FUNCTION | |||
|---|---|---|---|---|---|---|---|---|
| 1 | WHITE | 1 | BLUE | 20 | Out | LINK #1 | ||
| 2 | WHITE | 2 | ORANGE | 21 | In | |||
| 3 | WHITE | 3 | GREEN | 22 | Out | LINK #2 | ||
| 4 | WHITE | 4 | BROWN | 23 | In | |||
| 5 | WHITE | 5 | GREY | 24 | Out | LINK #3 | ||
| 6 | RED | 6 | BLUE | 25 | In | |||
| 7 | RED | 7 | ORANGE | 26 | Out | LINK #4 | ||
| 8 | RED | 8 | GREEN | 27 | In | |||
| 9 | RED | 9 | BROWN | 28 | NC | |||
| 10 | RED | 10 | GREY | 29 | NC | |||
| 11 | BLACK | 11 | BLUE | 30 | Out | LINK #5 | ||
| 12 | BLACK | 12 | ORANGE | 31 | In | |||
| 13 | BLACK | 13 | GREEN | 32 | Out | LINK #6 | ||
| 14 | BLACK | 14 | BROWN | 33 | In | |||
| 15 | BLACK | 15 | GREY | 34 | NC | |||
| 16 | YELLOW | 16 | BLUE | 35 | NC | |||
| 17 | YELLOW | 17 | ORANGE | 36 | NC | |||
| 18 | YELLOW | 18 | GREEN | 37 | NC | |||
| 19 | YELLOW | 19 | BROWN | NC | NC | |||
| 20 | YELLOW | NC | GREY | NC | NC | |||
Interconnection, non EMC cabinet
Data from the CPU board
Port #1 is converted to RS232 for SIO data if display stations are used, see section Processor board
| CPU pin no. |
BLOCK no display |
BLOCK display |
Data signal |
CPU pin no. |
BLOCK no display |
BLOCK display |
DATA signal |
FUNCTION |
|---|---|---|---|---|---|---|---|---|
| 27A | 4 | 4 | RTS | 27B | 5 | 5 | CTS | PORT #5 Service terminal RS232 (SVT) Fixed |
| 26A | 6 | 6 | RX | 26B | 7 | 7 | GND | |
| 25A | 8 | 8 | TX | 25B | 9 | 9 | DTR | |
| 24A | 10 | 10 | RTS | 24B | 11 | 11 | CTS | PORT #6 Printer RS232 Fixed |
| 23A | 12 | 12 | RX | 23B | 13 | 13 | GND | |
| 22A | 14 | 14 | TX | 22B | 15 | 15 | DTR | |
| 21A | 16 | 16 | RTS | 21B | 17 | 17 | CTS | PORT #4 Radio paging RS232 (ETP) |
| 20A | 18 | 18 | RX | 20B | 19 | 19 | GND | |
| 19A | 20 | 20 | TX | 19B | 21 | 21 | DTR | |
| 18A | NC | NC | RTS | 18B | NC | NC | CTS | PORT #3 Display driver (SIO) |
| 17A | 22 | NC | RX | 17B | 23 | NC | GND | |
| 16A | 24 | NC | TX | 16B | 23 | NC | DTR | |
| 7A-15A | - | 7B-15B | - | NC | ||||
| 6A | NC | 30 | RX+ | 6B | NC | 31 | RX- | Serial input 20 mA current loop |
| 5A | NC | 32 | TX+ | 5B | NC | 33 | TX- | Serial output 20 mA current loop |
| 4A | NC | 34 | RX+ | 4B | NC | 35 | RX- | PORT #2 20 mA current loop |
| 3A | NC | 36 | TX+ | 3B | NC | 37 | TX- | |
| 2A | NC | 38 | RX+ | 2B | NC | 39 | RX- | PORT #1 20 mA current loop (RS232/SIO) |
| 1A | NC | 40 | TX+ | 1B | NC | 41 | TX- |
Audio from the Audio Interface board
See also section Audio interlinks, CB901 side
| BOARD11 P1 |
TERMINAL BLOCK |
BOARD11 P1 |
TERMINAL BLOCK |
CABLE | |
|---|---|---|---|---|---|
| DIRECTION | LINK | ||||
| 31A-32A | NC | 31B-32B | NC | ||
| 30A | 2 | 30B | 3 | Out | LINK #1 |
| 29A | 4 | 29B | 5 | In | |
| 28A | 6 | 28B | 7 | Out | LINK #2 |
| 27A | 8 | 27B | 9 | In | |
| 26A | 10 | 26B | 11 | Out | LINK #3 |
| 25A | 12 | 25B | 13 | In | |
| 24A | 14 | 24B | 15 | Out | LINK #4 |
| 23A | 16 | 23B | 17 | In | |
| 21A-22A | 18-20 | 21B-22B | 19-21 | - | NC |
| 17A-20A | NC | 17B-22B | NC | - | - |
| 16A | 22 | 16B | 23 | Out | LINK #5 |
| 15A | 24 | 15B | 25 | In | |
| 14A | 26 | 14B | 27 | Out | LINK #6 |
| 13A | 28 | 13B | 29 | In | |
| 7A-12A | 30-40 | 7B-12B | 31-41 | - | NC |
| 1A-6A | NC | 1B-6B | NC | - | - |

