WK20 - Applications
From Zenitel Wiki
Amplified Calling Tone with answer in station
Feature Description
The audio signal of incoming calls can be amplified as an extra indication of the call. The feature require a station and a separate speaker for distribution of the amplified calling tone. It is not possible to answer the call through the separate speaker.
Operation
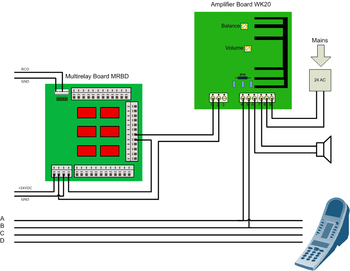
As a call is made to the station, the corresponding RCO triggers a relay which controls the amplifier, and makes it turn on. This is repeated for every calling tone if the station is in PRIVATE position.
Equipment List
- Power Amplifier WK1000614100
- 20-63Ohm loudspeaker
- 24VAC transformer
- Multi Relay Board MRBD 1009970200
- Station
Installation
Wire the components as shown on figure 1.1.
Resistor R10 needs to be removed.
Programming
Amplified Calling without answer
Amplifier constantly on
Feature Description
The feature enables amplified calling through a loudspeaker without having a station connected.
Calling is done by dialling the directory number of the loudspeaker. Speak after hearing the calling tone. Answer is not possible. Cancel the call with the C-key.
Equipment List
- Resistor 2.2kOhm
- Diode 1N4148
- Amplifier Board WK20 1000614100
- 20-63Ohm loudspeaker
- 24VAC transformer
Installation
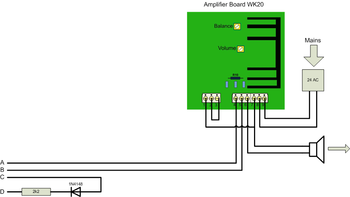
- Connect a resistor (2.2kOhm) in series with a diode (1N4148) between the c/d wires on a suitable place for the intended physical number.
- Mount the Amplifier Board WK20 in a suitable position near the loudspeaker.
- Strap point 1-7 and 2-3 on the Amplifier Board WK20
- Mount the locar power supply and connet it to the Amplifier Board WK20 point 8-9
- Run the wires according to figure 2.1
Programming
No additional programming necessary.
Amplifier switched with the M-key
Feature Description
The feature enables amplified calling through a loudspeaker without having a station connected.
Calling is done by dialling the directory number of the loudspeaker. Press the M-key to speak. Answer is no possible. Cancel the call with the C-key.
Equipment List
- Resistor 2.2kOhm
- Diode 1N4148
- Amplifier Board WK20 1000614100
- 20-63Ohm loudspeaker
- 24VAC transformer
- Multirelay Board MRBD 1009970200
- Power Distribution Board PDB 1009970100 (This Board is only required in an E26 installation. E7 and E20 has +24VDC outputs.)
Installation
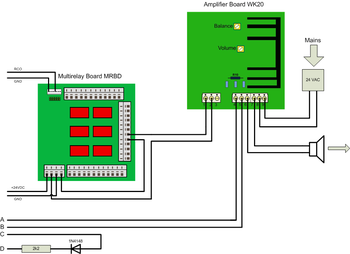
- Connect a resistor (2.2kOhm) in series with a diode (1N4148) between the c/d wires on a suitable place for the intended physical number.
- Mount the Amplifier Board WK20 and 24VAC transformer in a suitable position near the loudspeaker.
- Mount the Multirelay Board in close proximity to the exchange
- The PDB board mounts on the back of the E26, and feeds the MRBD with +24VDC. (In case of an E7 or E20 exchange, +24VDC can be taken directly from a dedicated output.)
- Run the wires according to figure 3.1
Programming
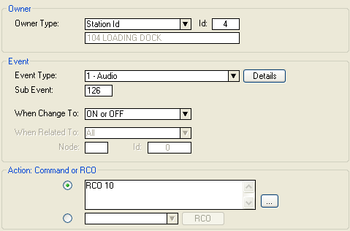
The amplifier can be switched on and off by an RCO command in the Event Handler.
How to configure the relay operation:
- In Users & Stations select the loudspeaker directory number in the list box, and press the button 'Events'. 'Insert' a new event with the following attributes:
| Event Owner: | The loudspeaker directory number |
| Event type: | 1 - Audio |
| Subevent: | 126 (Press 'Details' to select which types of audio. 126 means all types of audio) |
| When change to: | ON or OFF |
| When related to: | (not used) |
| Action: | RCO 10 |
RCO 10 is used as an example. Use the RCO number you have assigned to the loudspeaker physical connection.
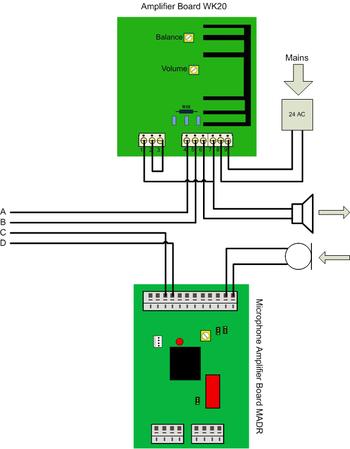
Amplified Calling with answer in separate microphone
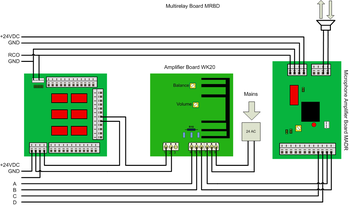
Amplifier constantly on
Feature Description
The feature enables amplified calling through a loudspeaker without having a station connected.
Calling is done by dialling the directory number of the loudspeaker. Speak after hearing the calling tone. Answer is possible through the microphone. Cancel the call with the C-key.
Eqipment List
- Amplifier Board WK20 1000614100
- 20-63Ohm loudspeaker
- 24VAC transformer
- Microphone Amplifier Board Dynamic with Relay MADR 1009960100
- Dynamic microphone
Installation
- Mount the Amplifier Board WK20 and 24VAC transformer in a suitable position near the loudspeaker.
- Mount the Microphone Amplifier Board MADR in a suitable position near the microphone.
- Run the wires according to figure 4.1
Programming
No additional programming necessary.
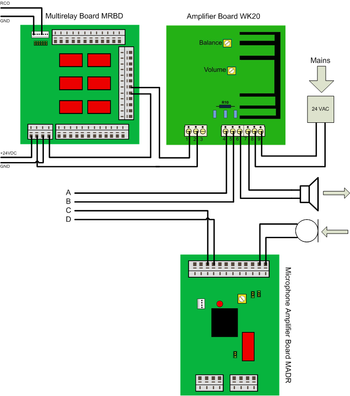
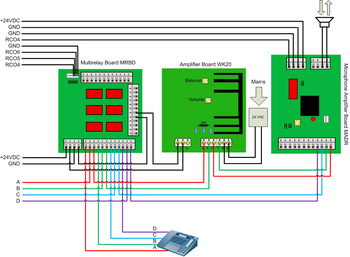
Amplifier switched with the M-key
Feature Description
The feature enables amplified calling through a loudspeaker without having a station connected.
Calling is done by dialling the directory number of the loudspeaker. Press the M-key to speak. Answer is possible through the microphone. Cancel the call with the C-key.
Equipment List
- Amplifier Board WK20 1000614100
- 20-63Ohm loudspeaker
- 24VAC transformer
- Microphone Amplifier Board Dynamic with Relay MADR 1009960100
- Dynamic microphone
- Multirelay Board MRBD 1009970200
- Power Distribution Board PDB 1009970100 (This Board is only required in an E26 installation. E7 and E20 has +24VDC outputs.)
Installation
- Mount the Amplifier Board WK20 and 24VAC transformer in a suitable position near the loudspeaker.
- Mount the Microphone Amplifier Board MADR in a suitable position near the microphone.
- Mount the Multirelay Board in close proximity to the exchange.
- The PDB board mounts on the back of the E26, and feeds the MRBD with +24VDC. (In case of an E7 or E20 exchange, +24VDC can be taken directly from a dedicated output.)
- Run the wires according to figure 5.1
Programming
The amplifier can be switched on and off by an RCO command in the Event Handler.
How to configure the relay operation:
- In Users & Stations select the loudspeaker directory number in the list box, and press the button 'Events'. 'Insert' a new event with the following attributes:
| Event Owner: | The loudspeaker directory number |
| Event type: | 1 - Audio |
| Subevent: | 126 (Press 'Details' to select which types of audio. 126 means all types of audio) |
| When change to: | ON or OFF |
| When related to: | (not used) |
| Action: | RCO 10 |
RCO 10 is used as an example. Use the RCO number you have assigned to the loudspeaker physical connection.
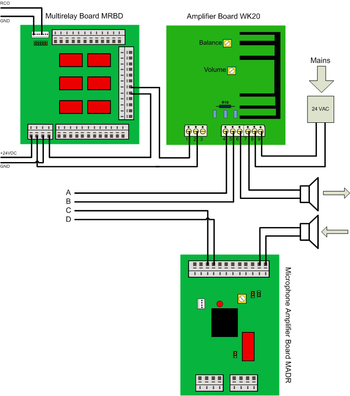
Amplified Calling with answer in separate loudspeaker
Amplifier switched with the M-key
Feature Description
The feature enables amplified calling through a loudspeaker without having a station connected.
Calling is done by dialling the directory number of the loudspeaker. Press the M-key to speak. Answer is possible through an extra loudspeaker. Cancel the call with the C-key.
Equipment List
- Amplifier Board WK20 1000614100
- 20-63Ohm loudspeaker
- 24VAC transformer
- Microphone Amplifier Board Dynamic with Relay MADR 1009960100
- Dynamic loudspeaker
- Multirelay Board MRBD 1009970200
- Power Distribution Board PDB 1009970100 (This Board is only required in an E26 installation. E7 and E20 has +24VDC outputs.)
Installation
- Mount the Amplifier Board WK20 and 24VAC transformer in a suitable position near the loudspeaker.
- Mount the Microphone Amplifier Board MADR in a suitable position near the dynamic loudspeaker.
- Mount the Multirelay Board in close proximity to the exchange.
- The PDB board mounts on the back of the E26, and feeds the MRBD with +24VDC. (In case of an E7 or E20 exchange, +24VDC can be taken directly from a dedicated output.)
- Run the wires according to figure 5.1
Programming
The amplifier can be switched on and off by an RCO command in the Event Handler.
How to configure the relay operation:
- In Users & Stations select the loudspeaker directory number in the list box, and press the button 'Events'. 'Insert' a new event with the following attributes:
| Event Owner: | The loudspeaker directory number |
| Event type: | 1 - Audio |
| Subevent: | 126 (Press 'Details' to select which types of audio. 126 means all types of audio) |
| When change to: | ON or OFF |
| When related to: | (not used) |
| Action: | RCO 10 |
RCO 10 is used as an example. Use the RCO number you have assigned to the loudspeaker physical connection.
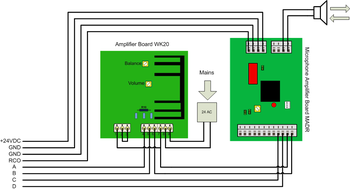
Amplified Calling with answer in called loudspeaker
Voice direction switched with M-key
Feature Description
The feature enables amplified calling through a loudspeaker without having a station connected.
Calling is done by dialling the directory number of the loudspeaker. Press the M-key to speak. Answer is possible through the called loudspeaker. Cancel the call with the C-key.
Equipment List
- Amplifier Board WK20 1000614100
- 24VAC transformer
- Microphone Amplifier Board Dynamic with Relay MADR 1009960100
- 20-63Ohm loudspeaker
- Power Distribution Board PDB 1009970100 (This Board is only required in an E26 installation. E7 and E20 has +24VDC outputs.)
Installation
- Mount the Amplifier Board WK20 and 24VAC transformer in a suitable position near the loudspeaker.
- Mount the Microphone Amplifier Board MADR in a suitable position near the loudspeaker.
- The PDB board mounts on the back of the E26, and feeds the MRBD with +24VDC. (In case of an E7 or E20 exchange, +24VDC can be taken directly from a dedicated output.)
- Run the wires according to figure 7.1
Programming
The voice direction can be switched by an RCO command in the Event Handler.
How to configure the relay operation:
- In Users & Stations select the loudspeaker directory number in the list box, and press the button 'Events'. 'Insert' a new event with the following attributes:
| Event Owner: | The loudspeaker directory number |
| Event type: | 1 - Audio |
| Subevent: | 126 (Press 'Details' to select which types of audio. 126 means all types of audio) |
| When change to: | ON or OFF |
| When related to: | (not used) |
| Action: | RCO 10 |
RCO 10 is used as an example. Use the RCO number you have assigned to the loudspeaker physical connection.
Amplifier and voice direction switched with the M-key
Feature Description
The feature enables amplified calling through a loudspeaker without having a station connected.
Calling is done by dialling the directory number of the loudspeaker. Press the M-key to speak. Answer is possible through the called loudspeaker. Cancel the call with the C-key.
Equipment List
Installation
Programming
Amplified Calling with answer in separate loudspeaker in conjunction with a station
Amplifier switched with the M-key
2-55

