ENA2060 Amplifier - Basic configuration
From Zenitel Wiki
This article describes the basic configuration on how to get started with the ENA2060 Amplifier.
For a detailed configuration guide, see the article ENA Amplifier Configuration (SIP).
Configure the amplifier
Configuration of the amplifier can be done manually via the amplifier’s web interface or automatically with DHCP provisioning via a TFTP server.
After making sure that the amplifier is connected to the same LAN and logical subnet as your PC, follow the procedure described below.
When the amplifier is connected to the network, the IP address is automatically obtained in one of two ways:
- An IP address is obtained from a DHCP server if there is one.
- If there is no DHCP server, an IP address in the range 169.254.x.x will be assigned.
To be able to hear the amplifier announce its IP address:
- Either connect a 100 V speaker to Channel 1 on the 100V Audio Line or connect a 50-ohm speaker (or headset) to channel output 1 (pins 14 and 15) on the Multi-Connector
- Ensure that the amplifier is not registered to any SIP server
- After powering up the amplifier, short input 1 between pins 7 and 13 on the Multi-Connector
- The connected speaker will now announce the amplifier’s IP address
Main Settings
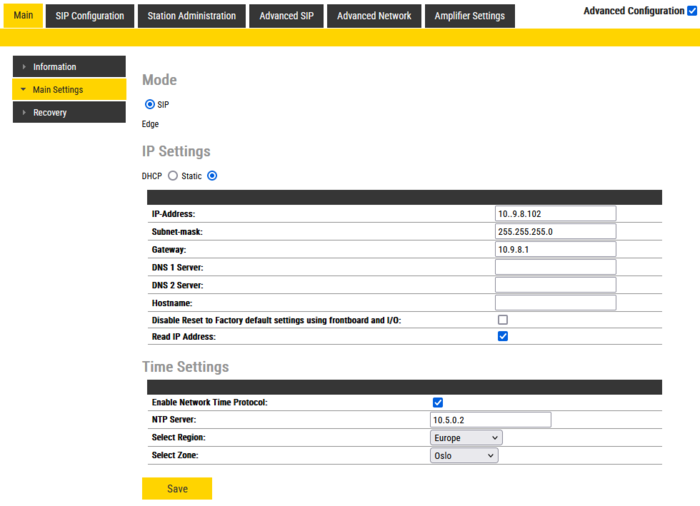
Configure the network settings and the time settings:
- Open a web browser and enter the amplifier’s IP address
- Log in with username: admin and password: alphaadmin
- Select Main > Main Settings
- IP Settings: Enter IP address, Subnet mask and Gateway as minimum.
- Time Settings: Enable NTP and enter NTP server IP address. Select Region and Zone.
SIP Settings
The amplifier support up to three SIP accounts; Channel 1, Channel 2 and Input Channel.
See the article ENA Amplifier Configuration (SIP) on how to configure the SIP accounts.

