Difference between revisions of "IP Station Image upgrade"
From Zenitel Wiki
m (Image upgrade (IP Station) moved to IP Station Image upgrade) |
|
(No difference)
| |
Revision as of 01:17, 5 December 2007
Contents
Introduction
This is a guide on how to carry out a full image upgrade of STENTOFON IP stations.
There are two ways of doing a full image upgrade, locally on each station using its web server, or a distributed upgrade initiated from AlphaWeb. See also section 5.2.
Equipment needed
The following equipment is needed to do a full image upgrade of the STENTOFON IP Station:
- A PC running a tftp-server and a web browser tftpd32.exe is provided by Zenitel
- The IP station to be upgraded
- A software upgrade package for IP stations provided by Zenitel.
Software package
The software package from Zenitel will contain the following files:
- A IP Station image file,
A100G80222.xxxx.bin (xxxx = version)
- A text file containing a checksum for the image file,
A10080222.xxxx.txt.
- A text file named tftp_test.txt, used to check the tftp-connection during the upgrade
In addition to this, Zenitel can provide a TFTP server application, tftpd32, or the application can be downloaded from: http://tftpd32.jounin.net.
Local Upgrade
To do a local image upgrade on one IP Station, do the following:
- Install and configure the tftp-server application tftp32 as described in section 12.3.1
- Unpack the .bin and .txt files from the image upgrade package provided by Zenitel into the defined base-directory for tftpd32. (For installation and use of tftp32.xxx, see 12.3.1)
- Start tftpd32.xxx by clicking on the tftpd32.xxx.exe file. If there is a firewall blocking tftpd32.xxx, unblock it to open the tftp-port in the firewall
- Open a web browser on the PC and enter the IP Stations IP address in the address field
- Log on to the station web server and choose System Upgrade -> Full Upgrade from the menu
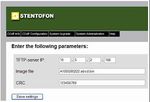
- Enter the TFTP server IP address (the IP-address of the PC running tftpd32.xxx). The IP address is displayed in the tftpd32-window on the PC
- Enter the filename for the IP Station image which is: A100G80222.xxxx.bin where xxxx is the software version
- Open the corresponding A100G80222.xxxx.txt file to find the checksum for the image. Copy and Enter this value into the CRC field in the web server
- Press Save Settings.
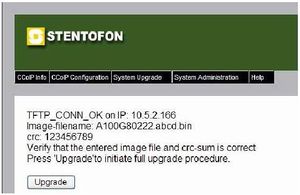
A TFTP connection check will now be performed by the program. If the connection is OK, a status window will show the applied parameters and an Upgrade button is displayed.
- Verify that the image filename and checksum is correct,
then press Upgrade to initiate a full image upgrade.
After about 3 minutes, the station will come up with the same IP address and configuration as before
- To verify that the image has been updated, go to the Station
Info page on the web server and check the current software version.
TFTPD32 Application
tftpd32 is a Windows based application, which can be used to run a TFTP server on a Windows PC. The program can be downloaded from http://tftpd32.jounin.net, but will also be provided by Zenitel together with the software package.
Installing and configuring tftpd32
- Unzip the tftpd32.xxx.zip file.
(e.g. to C: \tftpd32\)
- Run the .exe file.
The program is run by selecting the extracted .exe file, no installation is needed
- Create a folder called “tftpboot”
(e.g. c:\tftpd32\tftpd32.xxx\tftpboot) and set this folder as ‘Base directory’ in tftpd32 (use the Settings button).
- Turn off the DHCP Server under Global Settings
This server part of the tftp32 application may interfere with other DHCP servers in the network
- The TFTP Server program must be running during the Image
upgrade process.


