Difference between revisions of "LED control (VS-Operator)"
From Zenitel Wiki
| (6 intermediate revisions by the same user not shown) | |||
| Line 10: | Line 10: | ||
* '''Button DAK''' = the DAK key number (1-100) | * '''Button DAK''' = the DAK key number (1-100) | ||
| − | [[ | + | <table style="max-width:80%; border-style: double; border-color: #c7c7c7;"> |
| − | < | + | <tr style="rowspan:2;"> |
| + | <td style="display: block; vertical-align: bottom;">[[Image:DAK Matrix LED.png|700px]]</td> | ||
| + | </tr> | ||
| + | <tr> | ||
| + | <td style='background-color:#efefef;'>Configuring buttons as DAK keys</td> | ||
| + | </tr> | ||
| + | </table> | ||
| + | |||
=== Define Filter Sets === | === Define Filter Sets === | ||
====Define a Filter Set called "OperatorFilter"==== | ====Define a Filter Set called "OperatorFilter"==== | ||
| − | + | * In VS-Operator, System Configuration, select '''Filter sets''' (1) > '''Add''' (2) > '''Station''', and enter the name ''OperatorFilter'' (3). | |
| − | * In | ||
* Select '''On Connect''' (4), and check "Script" (5). | * Select '''On Connect''' (4), and check "Script" (5). | ||
* Add the following script (6): | * Add the following script (6): | ||
| − | {{ | + | {{Code3| |
App.SetButtonLEDState("%DIRB", LEDKind.Left, LEDState.On, Color.Green, Color.Transparent); | App.SetButtonLEDState("%DIRB", LEDKind.Left, LEDState.On, Color.Green, Color.Transparent); | ||
App.SetButtonLEDState("%DIRA", LEDKind.Left, LEDState.On, Color.Green, Color.Transparent); | App.SetButtonLEDState("%DIRA", LEDKind.Left, LEDState.On, Color.Green, Color.Transparent); | ||
| Line 25: | Line 31: | ||
* Select '''Test''' (7), then '''OK''' (8) to save. (Note that if pressing "OK" without having done "Test" first, the script will not be saved!). | * Select '''Test''' (7), then '''OK''' (8) to save. (Note that if pressing "OK" without having done "Test" first, the script will not be saved!). | ||
| − | [[ | + | <table style="max-width:80%; border-style: double; border-color: #c7c7c7;"> |
| − | < | + | <tr style="rowspan:2;"> |
| + | <td style="display: block; vertical-align: bottom;">[[Image:AV OperatorFilter.png|700px]]</td> | ||
| + | </tr> | ||
| + | <tr> | ||
| + | <td style='background-color:#efefef;'>Creating the "OperatorFilter" - OnConnect script</td> | ||
| + | </tr> | ||
| + | </table> | ||
* Select '''On Disconnect''' (1), and check "Script" (2). | * Select '''On Disconnect''' (1), and check "Script" (2). | ||
* Add the following script (3): | * Add the following script (3): | ||
| − | {{ | + | {{Code3| |
App.SetButtonLEDState("%DIRB", LEDKind.Left, LEDState.Off, Color.Transparent, Color.Transparent); | App.SetButtonLEDState("%DIRB", LEDKind.Left, LEDState.Off, Color.Transparent, Color.Transparent); | ||
App.SetButtonLEDState("%DIRA", LEDKind.Left, LEDState.Off, Color.Transparent, Color.Transparent); | App.SetButtonLEDState("%DIRA", LEDKind.Left, LEDState.Off, Color.Transparent, Color.Transparent); | ||
| Line 36: | Line 48: | ||
* Select '''Test''' (4), then '''OK''' (5) to save. (Note that if pressing "OK" without having done "Test" first, the script will not be saved!). | * Select '''Test''' (4), then '''OK''' (5) to save. (Note that if pressing "OK" without having done "Test" first, the script will not be saved!). | ||
| − | [[ | + | <table style="max-width:80%; border-style: double; border-color: #c7c7c7;"> |
| − | < | + | <tr style="rowspan:2;"> |
| + | <td style="display: block; vertical-align: bottom;">[[Image:AV OperatorFilterDisconn.png|700px]]</td> | ||
| + | </tr> | ||
| + | <tr> | ||
| + | <td style='background-color:#efefef;'>Creating the "OperatorFilter" - OnDisconnect script</td> | ||
| + | </tr> | ||
| + | </table> | ||
====Define a Filter Set called "RemoteFilter"==== | ====Define a Filter Set called "RemoteFilter"==== | ||
| − | + | * In VS-Operator, System Configuration, select '''Filter sets''' (1) > '''Add''' (2) > '''Station''', and enter the name ''RemoteFilter'' (3). | |
| − | * In | ||
* Select '''On Call Request Add''' (4), and check "Script" (5). | * Select '''On Call Request Add''' (4), and check "Script" (5). | ||
* Add the following script (6): | * Add the following script (6): | ||
| − | {{ | + | {{Code3| |
App.SetButtonLEDState("%DIRA", LEDKind.Right, LEDState.Fast, Color.Red, Color.White); | App.SetButtonLEDState("%DIRA", LEDKind.Right, LEDState.Fast, Color.Red, Color.White); | ||
}} | }} | ||
* Select '''Test''' (7), then '''OK''' (8) to save. (Note that if pressing "OK" without having done "Test" first, the script will not be saved!). | * Select '''Test''' (7), then '''OK''' (8) to save. (Note that if pressing "OK" without having done "Test" first, the script will not be saved!). | ||
| − | [[ | + | <table style="max-width:80%; border-style: double; border-color: #c7c7c7;"> |
| − | < | + | <tr style="rowspan:2;"> |
| + | <td style="display: block; vertical-align: bottom;">[[Image:AV RemoteFilterCRAdd.png|700px]]</td> | ||
| + | </tr> | ||
| + | <tr> | ||
| + | <td style='background-color:#efefef;'>Creating the "RemoteFilter" - On Call Request Add script</td> | ||
| + | </tr> | ||
| + | </table> | ||
* Select '''On Call Request Remove''' (1), and check "Script" (2). | * Select '''On Call Request Remove''' (1), and check "Script" (2). | ||
* Add the following script (3): | * Add the following script (3): | ||
| − | {{ | + | {{Code3| |
App.SetButtonLEDState("%DIRA", LEDKind.Right, LEDState.Off, Color.Transparent, Color.Transparent); | App.SetButtonLEDState("%DIRA", LEDKind.Right, LEDState.Off, Color.Transparent, Color.Transparent); | ||
}} | }} | ||
* Select '''Test''' (4), then '''OK''' (5) to save. (Note that if pressing "OK" without having done "Test" first, the script will not be saved!). | * Select '''Test''' (4), then '''OK''' (5) to save. (Note that if pressing "OK" without having done "Test" first, the script will not be saved!). | ||
| − | [[ | + | <table style="max-width:80%; border-style: double; border-color: #c7c7c7;"> |
| − | < | + | <tr style="rowspan:2;"> |
| + | <td style="display: block; vertical-align: bottom;">[[Image:AV RemoteFilterCRRemove.png|700px]]</td> | ||
| + | </tr> | ||
| + | <tr> | ||
| + | <td style='background-color:#efefef;'>Creating the "RemoteFilter" - On Call Request Remove script</td> | ||
| + | </tr> | ||
| + | </table> | ||
=== Assign the Filter Set to stations === | === Assign the Filter Set to stations === | ||
| + | Select the '''Devices''' menu, select the VS-Operator associated station, and assign it to "OperatorFilter". | ||
| − | + | <table style="max-width:80%; border-style: double; border-color: #c7c7c7;"> | |
| − | + | <tr style="rowspan:2;"> | |
| − | [[ | + | <td style="display: block; vertical-align: bottom;">[[Image:AV AddFilterOp.png|700px]]</td> |
| − | < | + | </tr> |
| + | <tr> | ||
| + | <td style='background-color:#efefef;'>Assign the Operator station to the "OperatorFilter"</td> | ||
| + | </tr> | ||
| + | </table> | ||
Select the '''Devices''' menu, select the calling substation, and assign it to "RemoteFilter". | Select the '''Devices''' menu, select the calling substation, and assign it to "RemoteFilter". | ||
| − | [[ | + | <table style="max-width:80%; border-style: double; border-color: #c7c7c7;"> |
| − | < | + | <tr style="rowspan:2;"> |
| + | <td style="display: block; vertical-align: bottom;">[[Image:AV AddFilterSub.png|700px]]</td> | ||
| + | </tr> | ||
| + | <tr> | ||
| + | <td style='background-color:#efefef;'>Assign the substation to the "RemoteFilter"</td> | ||
| + | </tr> | ||
| + | </table> | ||
Latest revision as of 10:54, 29 June 2023
This article shows how to configure the "LEDs" in the Button Matrix in VS-Operator. By this configuration the LED behavior will be flashing Red at Call Request, and steady green during Conversation.
Configuration is required in the VS-Operator Client only. No configuration is required in AlphaCom.
Contents
Configure DAK buttons
In the Button matrixes menu, define the button like this:
- Button kind = DAK
- Button ID = The directory number programmed on the actual DAK key in AlphaCom
- Button DAK = the DAK key number (1-100)
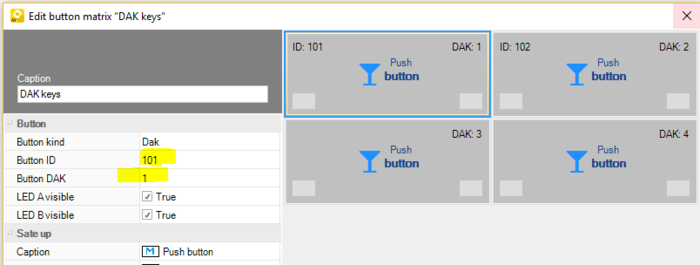 |
| Configuring buttons as DAK keys |
Define Filter Sets
Define a Filter Set called "OperatorFilter"
- In VS-Operator, System Configuration, select Filter sets (1) > Add (2) > Station, and enter the name OperatorFilter (3).
- Select On Connect (4), and check "Script" (5).
- Add the following script (6):
App.SetButtonLEDState("%DIRB", LEDKind.Left, LEDState.On, Color.Green, Color.Transparent);
App.SetButtonLEDState("%DIRA", LEDKind.Left, LEDState.On, Color.Green, Color.Transparent);
- Select Test (7), then OK (8) to save. (Note that if pressing "OK" without having done "Test" first, the script will not be saved!).
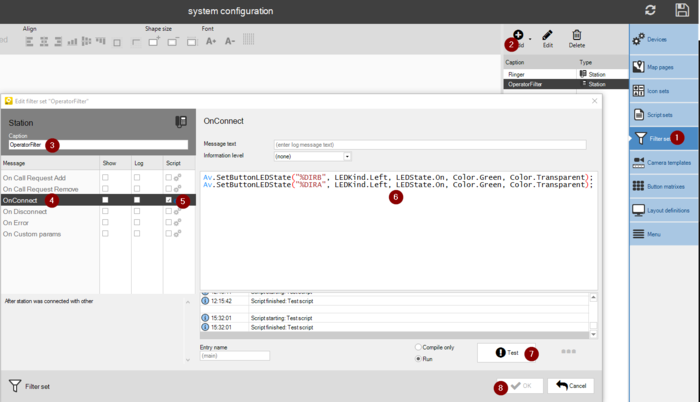 |
| Creating the "OperatorFilter" - OnConnect script |
- Select On Disconnect (1), and check "Script" (2).
- Add the following script (3):
App.SetButtonLEDState("%DIRB", LEDKind.Left, LEDState.Off, Color.Transparent, Color.Transparent);
App.SetButtonLEDState("%DIRA", LEDKind.Left, LEDState.Off, Color.Transparent, Color.Transparent);
- Select Test (4), then OK (5) to save. (Note that if pressing "OK" without having done "Test" first, the script will not be saved!).
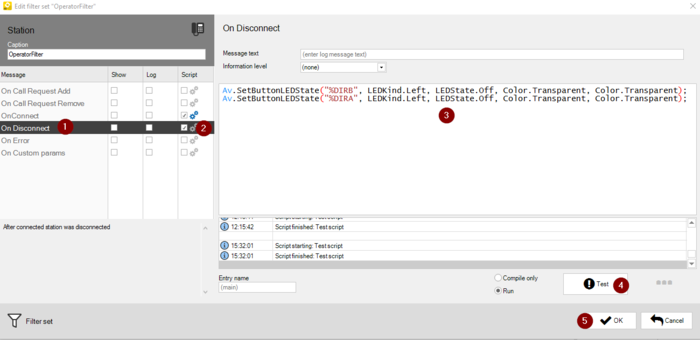 |
| Creating the "OperatorFilter" - OnDisconnect script |
Define a Filter Set called "RemoteFilter"
- In VS-Operator, System Configuration, select Filter sets (1) > Add (2) > Station, and enter the name RemoteFilter (3).
- Select On Call Request Add (4), and check "Script" (5).
- Add the following script (6):
App.SetButtonLEDState("%DIRA", LEDKind.Right, LEDState.Fast, Color.Red, Color.White);
- Select Test (7), then OK (8) to save. (Note that if pressing "OK" without having done "Test" first, the script will not be saved!).
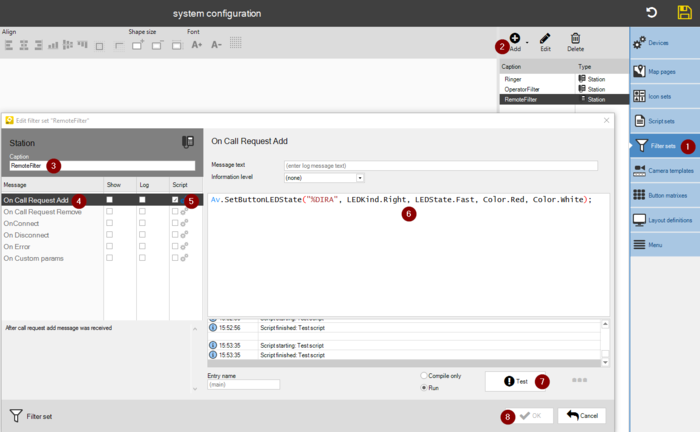 |
| Creating the "RemoteFilter" - On Call Request Add script |
- Select On Call Request Remove (1), and check "Script" (2).
- Add the following script (3):
App.SetButtonLEDState("%DIRA", LEDKind.Right, LEDState.Off, Color.Transparent, Color.Transparent);
- Select Test (4), then OK (5) to save. (Note that if pressing "OK" without having done "Test" first, the script will not be saved!).
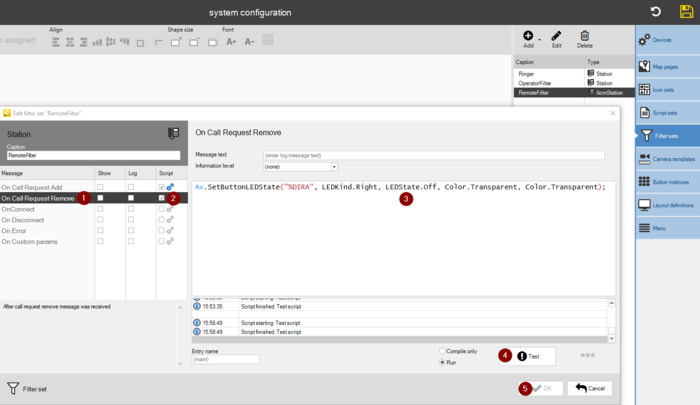 |
| Creating the "RemoteFilter" - On Call Request Remove script |
Assign the Filter Set to stations
Select the Devices menu, select the VS-Operator associated station, and assign it to "OperatorFilter".
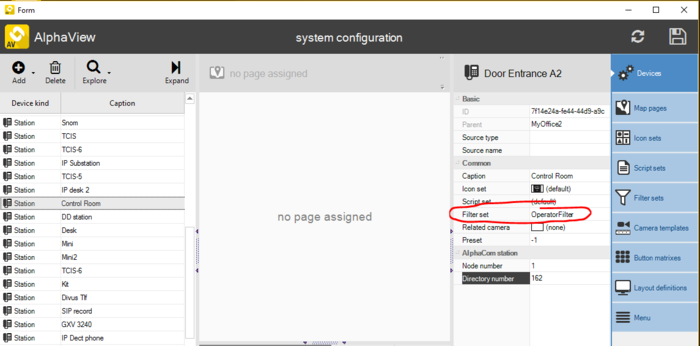 |
| Assign the Operator station to the "OperatorFilter" |
Select the Devices menu, select the calling substation, and assign it to "RemoteFilter".
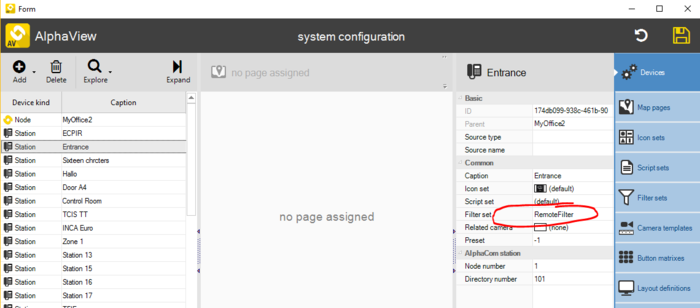 |
| Assign the substation to the "RemoteFilter" |
Now there should be RED flashing LED at Call Request, and steady green during conversation.

