Difference between revisions of "Pocket Paging"
From Zenitel Wiki
(→Answering Paging at the Nearest Intercom Station) |
(→Sending a Mail message to a Display Pocket Receiver) |
||
| Line 195: | Line 195: | ||
=== Sending a Mail message to a Display Pocket Receiver === | === Sending a Mail message to a Display Pocket Receiver === | ||
| + | [[Image:Picture5.jpg|right|200px|thumb|Mail message to pager]] | ||
| + | Sending a Mail message to a pocket receiver is similar to sending a standard | ||
| + | voice/mail message to an intercom station. After dialing the directory number, you | ||
| + | dial 46 + the mail message number and any extra digits required. To complete the | ||
| + | procedure, press the M-key. The pager display then shows the message + the number | ||
| + | of the station that sent the message. | ||
Revision as of 15:07, 16 August 2007
Contents
- 1 Product Features
- 2 Installation Highlights
- 3 Connecting the Pager System to the Exchange
- 4 Serial ports Connections
- 5 Connecting a Stento or Multitone Pager System
- 6 Connecting a Tateco T940 SI Pager System
- 7 Connecting an Ericsson PSP800 Pager System
- 8 Feature description
Product Features
To provide a flexible range of paging services, the AlphaCom intercom exchange offers a serial data interface to pocket paging systems that conform to the ESPA 444
The AlphaCom is designed especially for connection to any of the following types of pager systems:
- Stento Multitone Access 1000/3000
- Stento/Multitone RPE 351<br\>Stento/Multitone RPE 651/Mk7
- Tateco T940SI
- Ericsson PSP800.
You can connect two of these to your AlphaCom system at the same time. It is possible to have Tateco pagers in combination with Ericsson or Multitone in a standard system. It is, however, not possible to have Multitone and Ericsson at the same time without changing the setup for the data ports of the exchange. This can be done by the Engineering Department at STENTO ASA.
Installation Highlights
To integrate the pager system you:
- Connect the paging system encoder to the AlphaCom exchange
- Program each receiver with a logical address in the paging system and program group
- Program the AlphaCom exchange with information about the paging system and
Connecting the Pager System to the Exchange
The following diagram provides an overview of the system:
Note that the RS 232 communication cable between the AlphaCom exchange and the paging system is not included in standard deliveries.
The AlphaCom exchange is responsible for starting and monitoring communication on the line. When a user makes a pocket paging call, the exchange builds a complete description of the call and then sends the data to the paging equipment.
Serial ports Connections
The pager equipment can be connected to any of the RS232 ports in the AlphaCom exchange. After the autoload, two of the ports are already prepared for connecting pager equipment:
- Port 4: Tateco paging system.
- Port 5: Multitone/Stento or Ericsson paging systems.
Only one paging system can be connected to each serial port - there is no multidrop function.
Connecting a Stento or Multitone Pager System
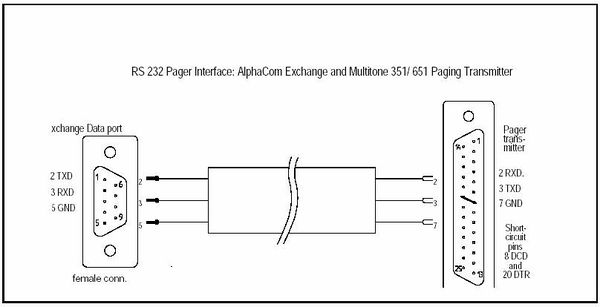
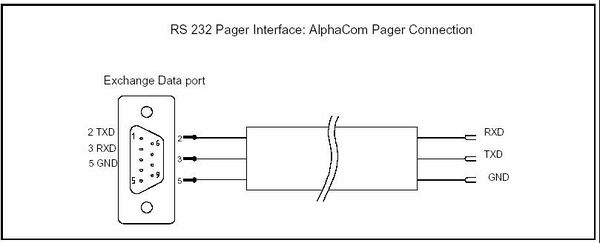
Connect the pocket paging encoder to an RS232 on the Data Connection Board (port 5 has been prepared).
The connector on the exchange side is a 9-pin female D-sub.
The Multitone system has no particular lamp signals to indicate successful installation.
For more information on cabling on the pager side, see the installation instructions included with the pager system.
RPE 351 and RPE 651/Mk7
Access 1000/3000
Connecting a Tateco T940 SI Pager System
Connect the pocket paging encoder to an RS232 on the Data Connection Board (port 4 has been prepared).
The connector on the exchange side is a 9-pin female D-sub.
For more information on cabling on the pager side, see the installation instructions included with the pager system.
The red lamp inside the Tateco T940 SI box flashes until you have successfully installed the RS232 connection on the autoloaded port. If you use another port, the lamp will flash till the port is correctly programmed (using AlphaPro)It then shows a steady light
Connecting an Ericsson PSP800 Pager System
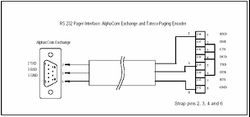
Connect the pocket paging encoder to an RS232 on the Data Connection Board (port 5 has been prepared).
The connector on the exchange side is a 9-pin female D-sub.
The additional boards shown in the picture below are supplied with the paging system. For more information on cabling on the pager side, see the installation instructions included with the pager system.
Feature description
Feature overview
The AlphaCom System has unique capabilities of offering Pocket Paging (Radio Paging) features. There are several possibilities for paging:
- Paging with answer option:
- - Set-up of conversation.
- – Playback of voice message.
- Paging with mail messages:
- – Showing the number of the calling station in the pager display.
- – Showing one of the standard mail messages in the AlphaCom system.
NOTE: The features available depend on the type of Paging System, the set-up of the Paging System and the AlphaCom exchange programming.
Pocket Paging Someone Who is Not at Their Station
If you get no reply when you make a call to someone, you can activate the person’s pocket pager by pressing two digits. The defaults are 44, 45, 46 and 47.
- To send a mail message to the pocket pager showing the calling station number, press 44.
- To activate the user’s pocket pager and wait for the person to answer, press 45 (Personal Call).
- To activate one of the standard mail messages to be sent to the pocket pager, press 46.
- To activate one of the default Voice Messages to be heard by the owner of the pocket pager, press 47. The message will be heard when the paging is answered at a station.
- If the pager is programmed first in the search list: Press 9 to activate the pager. See page 28 for details on the Search function.
If you have a TouchLine Display Station, the options appear on the display.
If the subscriber does not have a pocket pager, the attempt is ignored and you remain connected to the other station. The pager equipment may be capable of detecting that the pager cannot be activated (in for battery charge, out of range). In this case the AlphaCom System notifies the initiator that the paging failed. If you have a Display Station, the display tells you if the called user has no pager.
If you wait for an answer (45), you cannot make or receive any intercom calls, or use any intercom functions, while you are waiting. When the paging equipment has transmitted the call, you hear an attention tone at your station. Until then, you can cancel the radio transmission, without activating the receiver, by pressing the C-key.
The person you have paged can answer from any station. If you do not get an answer within the time-out period, the answer possibility will be canceled, and the initiating station becomes free.
Additional Information:
→ After the time-out of the answer period, or if the initiator presses the C-key, the answer possibility followed by connection is no longer possible.
→ The time-out period is by default set to 30 seconds. This value can be changed by programming without any effect on the time-out on other features.
→ When using pocket paging in an AlphaNet system, each exchange must have its own paging system connected. You can activate a paging call in a remote exchange, but the pager display will show the physical number for the AGA-board and not the number for the calling station. You can answer a paging call normally.
Queuing of Paging
The AlphaCom system handles up to 5 simultaneous paging calls with answer option. If paging without answer is used, the limit is 10 simultaneous paging calls. Paging calls are queued and transmitted to the paging system as they are received.
Additional Information:
→ The simultaneous pages must be sent to different pagers = pagers with different physical addresses in the paging system.
Paging Someone Who Has Left a Message
Activate Paging
You can activate paging when you hear an absence message at a station. The same possibilities as those described on the previous page are available.
Restricted Access To Paging During Absence Indication
If you call a person and hear an absence message, your station can be programmed so that it is not possible to make a transfer to the pocket pager connected to the station you call.
The feature is programmable per station. It is the setting of the calling station that determines whether access to paging is denied.
Answering Paging at the Nearest Intercom Station
If the paging is to be answered - meaning that the initiator has pressed 45 and is waiting for an answer - there are different ways of answering depending on the pager type and the exchange programming. At the nearest station, the paged person can:
- dial the personal answer code or
- dial the standard answer code 96 (if the pager has no display) or
- dial the answer code shown in the pager display (if applicable).
Additional Information:
→ After the time-out period, or if the initiator presses the C-key, the answer possibility followed by connection is no longer possible.
→ The default answer time for individual paging with answer possibility is set to 30 seconds.
→ The time-out value for the answer option can be changed by programming for each paging type. The change will not affect the default answer time for other features.
Sending a Mail message to a Display Pocket Receiver
Sending a Mail message to a pocket receiver is similar to sending a standard voice/mail message to an intercom station. After dialing the directory number, you dial 46 + the mail message number and any extra digits required. To complete the procedure, press the M-key. The pager display then shows the message + the number of the station that sent the message.


