SIP registrar node - configuration
From Zenitel Wiki
Contents
AlphaWeb Configuration
Insert SIP Trunk licenses
Log on to AlphaWeb and install the SIP Stations license.
Firewall (filter) settings
Enable the SIP protocol on the desired Ethernet port (default enabled for Ethernet port1).
AlphaPro Configuration
Create a SIP Registrar Node
From the AlphaPro main menu, use the ‘+’ button next to the ‘Select Exchange’ dropdown list to create a new exchange. The exchange type must be set to ‘SIP Node’.
- Select the AlphaCom node number which the SIP Registrar should be related to (normally node 1)
- Choose which of the ethenet ports 0 or 1 the SIP phones should use
Note: If the AlphaCom is configured with a SIP Trunk node in addition to the SIP Registrar node, the SIP Registar node must have a lower node number than the SIP Trunk node.
Define the AlphaCom <-> SIP routing
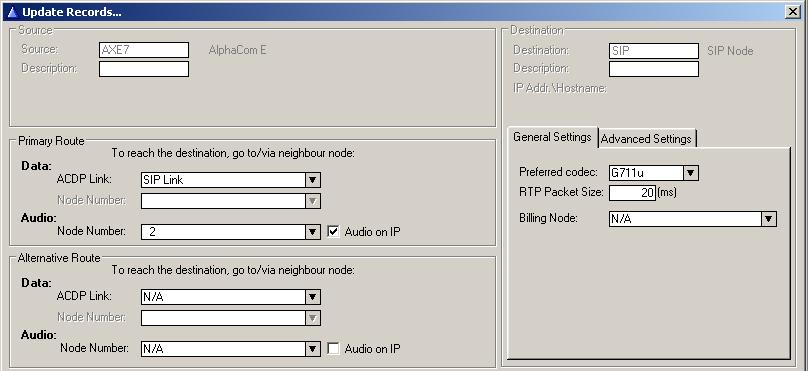
In Exchange & System > Net Routing use the Insert button to create a route between the AlphaCom and SIP Registrar node. Choose Data: ACDP Link = SIP Link, and set Preferred codec to G711u and RTP Packet Size to 10 ms.
Create SIP phone number
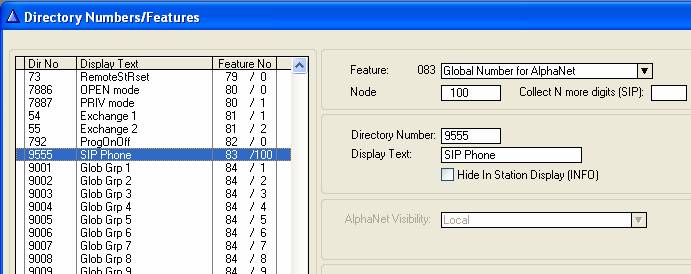
The directory number of the SIP phone(s) must be programmed in the AlphaCom directory table (Directory & Features menu) with feature 83 and Node = SIP Registrar node number (100 in this example). In the example below a SIP phone has been assigned directory number 9555.

Update the exchange
Log on to the exchange and update the exchange by pressing the SendAll button.


