Cisco Call Manager 10, 11 and 11.5 configuration guide
From Zenitel Wiki
This article describes how to configure SIP Trunk integration between ICX-AlphaCom (and AlphaCom XE) and Cisco Call Manager 10.0, 11.0 or 11.5.
Components used in this example:
- Cisco Call Manager 10.0, 11.0 or 11.5.
- ICX-AlphaCom or AlphaCom XE server
Configure Cisco Unified Call Manager
This guide assumes that basic configuration of the Cisco Call Manager has been completed.
Add SIP Trunk security profile
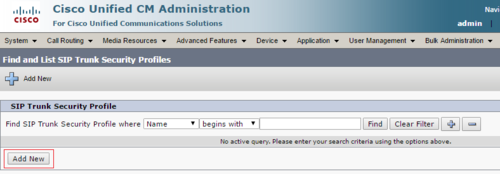
Select "System" -> "Security" -> "SIP Trunk Security Profile", then click "Add New" to add a new profile.
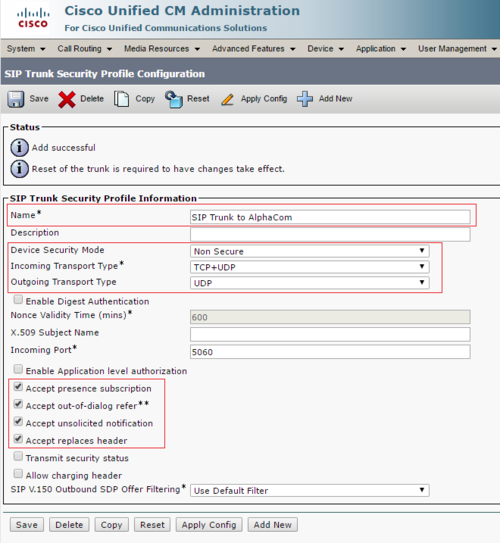
- Name: Descriptive name for the Security Profile
- Device Security Mode: Non Secure
- Incoming Transport Type: TCP+UDP
- Outgoing Transport Type: UDP
- Accept out-of-dialog refer: enabled
- Accept unsolicited notification: enabled
- Accept replaces header: enabled
- Accept presence subscription: enabled
Click "Save"
Create SIP Trunk
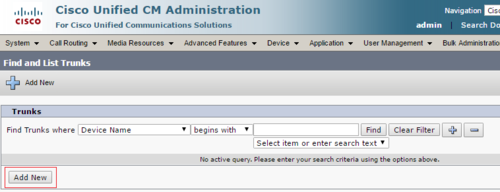
Select "Device" -> "Trunk", then click "Add New" to add a new Trunk.
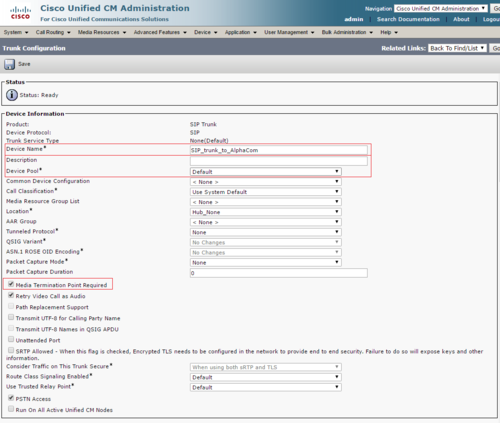
- Trunk Type: SIP Trunk
- Device Protocol: SIP
- Trunk Service Type: None(Default)
- Device Name: Descriptive name for the SIP Trunk
- Description: Optional description
- Device Pool: Default (Depending on configuration)
- Media Termination Point Required: Enabled (This ensures that CUCM sends SDP with Invite)
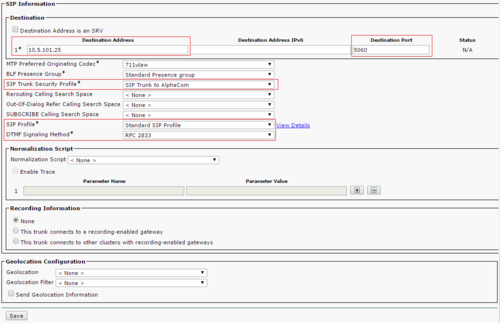
Scroll down to SIP Information section.
- Destination Address: IP address of AlphaCom
- Destination Port: 5060
- SIP Trunk Security Profile: Select the security profile we created earlier
- SIP Profile: Standard SIP Profile
- DTMF Signaling Method: RFC2833
Click "Save" and perform a "Reset".
Create Route Pattern
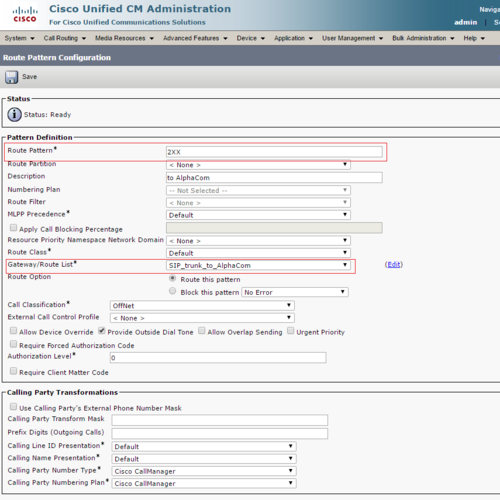
Select "Call Routing"-> "Route/Hunt" -> "Route Pattern", then click "Add New"
- Route Pattern:2XX will route every extension with 3 digits starting with 2 to the AlphaCom.
- Description: Choose a fitting description.
- Gateway/Route List*:Select the SIP Trunk created earlier in this guide.
Click "Save" to complete.
AlphaCom Configuration
AlphaWeb Configuration
Assign IP address to the AlphaCom XE Ethernet Port(s)
Log on to AlphaWeb and enter a valid IP address on the Ethernet port. In the example to the right, Ethernet port 1 is used. Consult your network administrator to obtain the IP address.
Assign IP routing to the AlphaCom XE Ethernet Port(s)
Log on to AlphaWeb and create a default routing. This is essential if the CUCM and AXE are on two different networks.
Insert SIP Trunk licenses
Log on to AlphaWeb and install the SIP Trunk License.
Firewall (filter) settings
- Enable the SIP protocol (UDP port 5060) on the desired Ethernet port. It is by default enabled for Ethernet port 1.
- Enable for VoIP audio (UDP port 61000 - 61150) on the desired Ethernet port. It is by default enabled for Ethernet port 1.
AlphaPro Configuration
Create a SIP Trunk Node
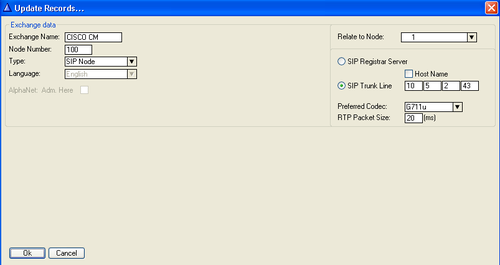
From the AlphaPro main menu, use the ‘+’ button next to the ‘Select Exchange’ dropdown list to create a new exchange. The exchange type must be set to ‘SIP Node’.
Set the parameters as shown in the figure to the right.
The SIP Trunk IP address must be identical to the IP address of the Cisco Call Manager.
Note: If the AlphaCom is configured with a SIP Registrar node in addition to the SIP Trunk node, the SIP Registrar node must have a lower node number than the SIP Trunk node.
Define the AlphaCom / SIP routing
In Exchange & System > Net Routing use the Insert button to create a route between the AlphaCom and Cisco Call Manager.
Set Preferred codec to G711u and RTP Packet Size to 20 ms.
Create access numbers
The Cisco phones can be accessed in three different ways:
- Prefix number: Dial Prefix + Phone number. “Phone number” will be called
- Integrated Prefix number: Dial Prefix + Phone number. The prefix will be included as a part of the called telephone number.
- Global number: Dial the phone number without using prefix
Prefix number
The directory number must be programmed in the AlphaCom directory table with feature 81 and Node = SIP Trunk node number (100 in this example). In the field “Collect N more digits (SIP)” you must enter the maximum number of digits in a phone number.
When the prefix is dialed, the AlphaCom will wait for more digits. When the number of digits specified in the “Collect N more digits (SIP)” is collected, a call setup message is sent to the Cisco Call Manager. If fewer digits are entered, the AlphaCom will time out after 4 seconds, and the call setup message will be sent. You can also terminate the digit collection by pressing the M-key. The call setup message will then be sent immediately.
In the example the right the directory number 0 is used as a prefix.
Dialing examples:
- 0 + 12345678: Telephone number 12345678 will be called
- 0 + 1234: After a 4 second timeout, telephone number 1234 will be called
- 0 + 1234 + M: Telephone number 1234 will be called
Integrated Prefix number
The directory number must be programmed in the AlphaCom directory table with feature 83 and Node = SIP Trunk node number (100 in this example). In the field “Collect N more digits (SIP)” you must enter the maximum number of digits in a phone number.
When the prefix is dialed, the AlphaCom will wait for further digits. When the number of digits specified in the “Collect N more digits (SIP)” is collected, a call setup message is sent to the Cisco Call Manager. If fewer digits are entered, the AlphaCom will time out after 4 seconds, and the call setup message will be sent. You can also terminate the digit collection by pressing the M-key. The call setup message will then be sent immediately.
In the example to the right the directory number 57 is used as a prefix.
Dialing examples:
- 57 + 12345678: Telephone number 5712345678 will be called
- 57 + 1234: After a 4 second timeout, telephone number 571234 will be called
- 57 + 1234 + M: Telephone number 571234 will be called
Global number
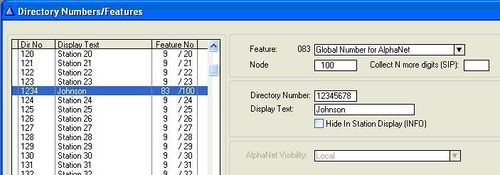
The directory number must be programmed in the AlphaCom directory table with feature 83 and Node = SIP Trunk node number (100 in this example). The field “Collect N more digits (SIP)” must be left blank.
When the global number is dialed, the AlphaCom will immediately send a call setup message to the Cisco Call Manager.
In the example to the right the directory number 12345678 is defined as a global number.
When dialing this number a call setup message is sent to the Cisco Call Manager, instructing it to call this phone number.
Update the exchange
Log on to the exchange and update the exchange by pressing the SendAll button. Reset the exchange when the transfer is finished.
Verify the configuration
You should now be able to dial from an AlphaCom station to a Cisco IP station and from a Cisco IP station to an AlphaCom station.


