I-Pro Video Insight VMS
From Zenitel Wiki
Introduction
Using the ONVIF S and T protocol, Zenitel audio and video intercoms, and IP speakers can be connected to I-Pro Video Insight, enabling video and audio streaming, device output control, and event triggers.
Compatibility
The integration has been verified by I-Pro to work with Video Insight version 7.10 and later. Earlier versions do not support full compatibility.
It is recommended that Zenitel devices run on firmware version 8.2.3.0 or later.
Functionality
- Device discovery
- Audio and video live streaming
- Audio and video recording and playback
- Bi-directional audio
- Device relay/output triggered from Video Insight
- Device digital input triggering events in Video Insight (Call button press, Station Call Events (In Conversation, Ringing, In call queue))
Licensing
A camera license is required for each intercom that is connected to Video Insight.
No license is required from Zenitel for the integration.
Configuration
Set-up and configuration of Zenitel devices
Ensure that ONVIF is enabled on the Zenitel device following the instructions for ONVIF HERE
Please note:
- To receive information about Call Button pressed, "Report DAK as Digital Input in ONVIF" option must be enabled in the Zenitel device prior to discovery.
- To receive information about Station Call Events (In Conversation, Ringing, In call queue), the "Report station events as Digital Input in ONVIF" option must be enabled in the Zenitel device prior to discovery.
Set-up and configuration of Video Insight
Adding Zenitel devices to to Video Insight
- Log into VI Monitor Plus using an administrator level account
- Navigate to Administration -> Servers -> Server Setup (the Server Setup window appears)
- From the Server Setup window, select the server the intercom will be added to
- Click the Camera tab
- At the bottom right corner of the window, click the Add Camera button (the Camera Setup window appears)
- Update the following fields in the General tab:
- Camera Name – enter the desired camera name
- Manufacturer – choose ONVIF from the dropdown menu
- Model – choose “ONVIF Profile T Compliant Camera”
- IP Address – enter the address of the intercom
- User Name – enter the ONVIF username of the camera (default is admin)
- Password – enter the ONVIF user password (default is alphaadmin)
- Check the box for Capture VCA Events
- If alternate ports are used, check the box and update the appropriate field
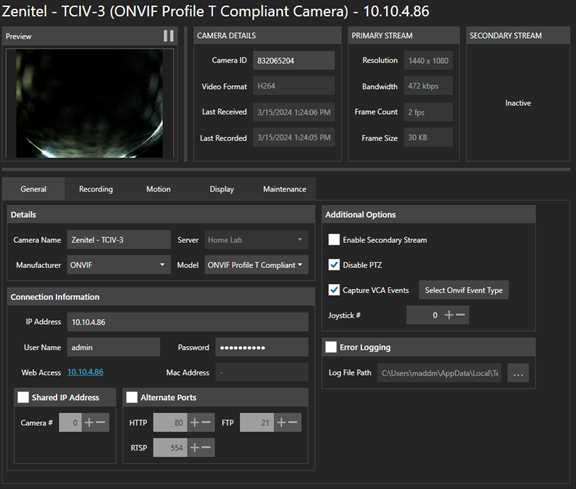 |
| General tab |
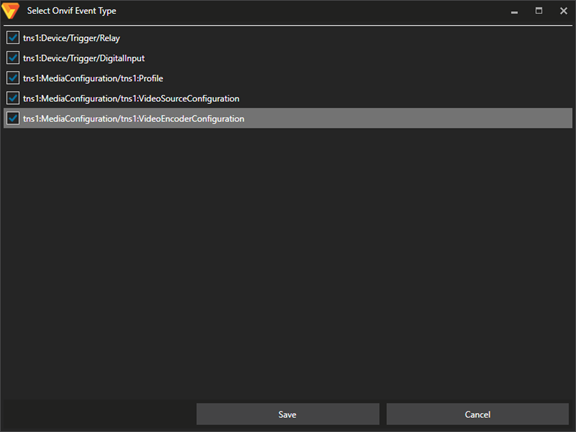 |
| ONVIF Event type |
- Update the following fields in the Recording tab:
- Check both the “Live” and “Recorded” boxes in the Enable Audio section
- In the Recording Type section, select the radio button to reflect the recording needs
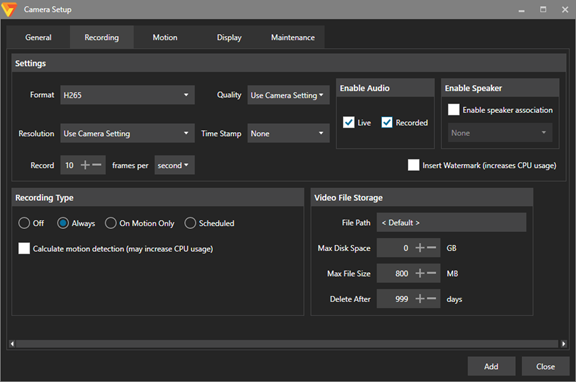 |
| Recording tab |
- Click the Add button at the bottom right to add the camera
- Click No when asked if you want to add more cameras (the Camera Setup window closes)
- Click the Save button at the bottom right to save the new camera(s)
- Close the Server Setup window (added camera(s) are displayed in the camera tree)
Read Button Press Rule
The Rules Manager is used to specify what happens when the Direct Access Key is pressed on the front of the intercom.
- While logged in using an administrator level account, navigate to Administration -> Servers -> Rules (the Rule Setup window appears)
- Click the plus sign (+) at the top-left to open the New Rule panel
- Choose the server that the rule should apply to (if needed)
- Enter the name of the rule
- Click the Add Event button in the Trigger Events section (the Add Event window appears)
- In the left side of the Add Event window, select "Analytics"
- The right-side of the window will change to reflect the selection, update the following fields:
- Reference Name – change to a to reflect the purpose of the input (if desired)
- Camera – select the intercom from the dropdown menu
- Analytic Rule – select “tns1:Device/Trigger/DigitalInput”
- Click the OK button to save the event (the Add Event window closes)
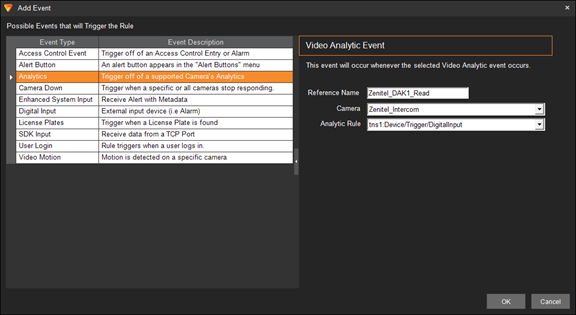 |
| Add Event window |
Trigger Digital Output Rule
The rules manager is used to trigger the device relay/output. The specific action must be configured.
- While logged in using an administrator level account, navigate to Administration -> Servers -> Rules (the Rule Setup window)
- Click the plus sign (+) at the top-left to open the New Rule panel
- Choose the server that the rule applies to (if needed)
- Enter the name of the rule
- Click the “Add Action” button in the Trigger Events section (the Add Action window appears)
- In the left side of the Add Action window, select “Digital Output”
- The right-side of the window will change to reflect the selection;, update the following fields:
- Reference Name – change to reflect the purpose of the output (if desired)
- Camera – select the intercom from the dropdown menu
- Port ID – select “1” from the dropdown menu (only available selection)
- Duration – use the selector and dropdown menu to specify the amount of time that the relay will be closed
- Click the OK button to save the action (the Add Action window closes)
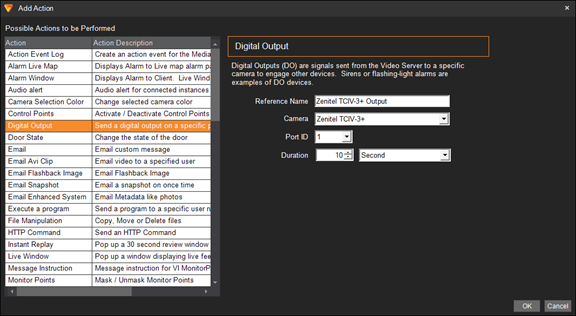 |
| Add Action window |
Documentation and Support
The admin guide for Video Insight is available on the I-Pro website http://www.downloadvi.com
