IP station Discovery and Initial Configuration from AlphaWeb
From Zenitel Wiki
This procedure is replaced by using IMT.
A walkthrough example of discovering and configuring factory default IP stations
IP stations from factory:
- All INCA IP stations come with factory default static IP address 169.254.1.100
- All Turbine IP stations come with DHCP as default.
- New IP stations (Turbine and INCA) come with default mode "Pulse"
Example Setup
This Example show how to configure and register 3 "factory" IP stations to an AlphaCom without logging into the stations.
The discovery function of the AlphaCom is very basic and require some pre-conditions to work.
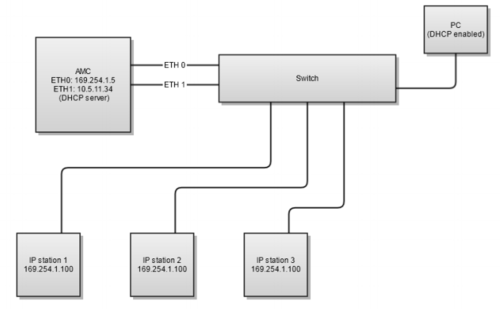
Initial Network Drawing:
- AlphaCom and stations must be on the same network. (No routers between stations and AlphaCom, only switches)
- Eth0 must have an address in the 169.254.x.x range. (Only needed for IP stations with static factory address 169.254.1.100. Default IP address on AlphaCom Eth0 is 169.254.1.5)
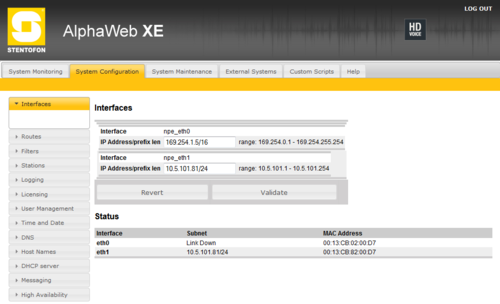
- Eth1 must have the "final" IP address of the AlphaCom. (In this example 10.5.101.81)
- Both Eth0 and Eth1 must be connected to the network. (Only needed for IP stations with static factory address)
- For discovering DHCP enabled stations the DHCP server must be located in the AlphaCom. (For static factory address station there must be a DHCP server in the network, either AlphaCom or in external equipment like a PC.)
- The PC should receive DHCP from AlphaCom. Use the AMC ETH1 address for connection to AlphaWeb (Not the 169.254.1.5 address).
Configuration of AlphaCom
Configuring the network Interface
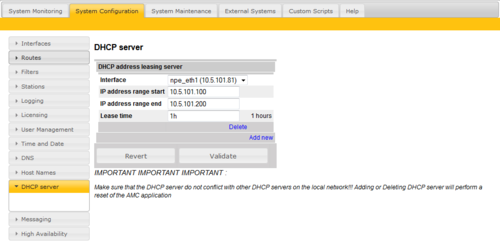
Configuring the DHCP server
Eth1 is configured with a DHCP server, allowing 100 IP addresses to be leased on the network.
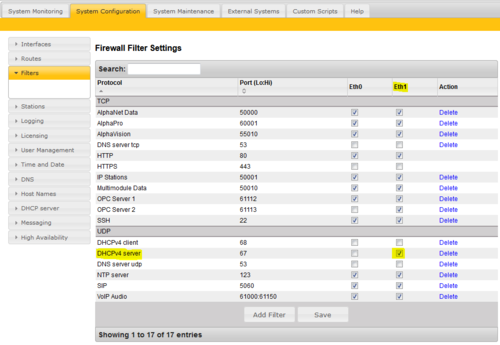
Open Firewall for DHCP server
Open the firewall for DHCP server on Eth1.
After all configuration changes have been applied, connect the PC to Eth1.
AlphaPro Configuration
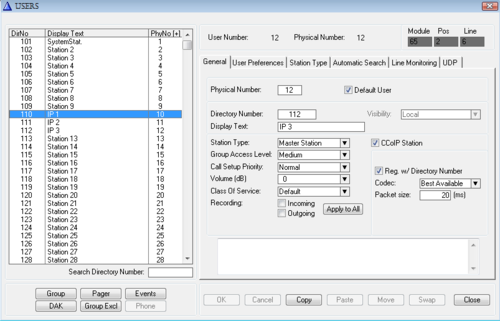
Configure 3 IP stations with "Reg/w directory number". Send the configuration to AlphaCom.
AlphaWeb - Station Discovery
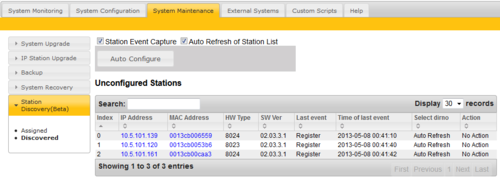
In the "System Maintenance" window select "Station Discovery".
Press the "Auto Configure" button.
The "Station Event Capture" and" Auto Refresh" will automatically be activated.
The auto configure function will:
- Discover all IP stations with factory IP address 169.254.1.100 and reconfigure them to:
- AlphaCom mode
- DHCP mode
- and set the AlphaCom IP address equal to the AlphaCom Eth1 address (in this example 10.5.101.81)
- Compare the list of currently registered IP stations and the list of leased DHCP addresses of the internal DHCP server. Find all DHCP leases to IP stations (Zenitel mac) not currently registered with AlphaCom.
These stations are then auto configured.
The auto discover function should only be used in a controlled environment.
As long as there are stations with "factory default" still present in the network, the message "Running Auto Configure of default IP stations" will be displayed.
Initiating auto-configuration will take approx 15 seconds for each IP station.
The discovery algorithm will do a reset of the IP station, thus there will be several minutes delay before the first IP stations starts to show up in the list.
Be patient!
If some stations has previously been registered with this AlphaCom, the stations will re-register because the last used Mac address of the station is stored in AlphaCom. This will not happen with a new database or with new stations, but can occur during test situations, like after factory reset of a previously registered station. I.e. if nothing happens in the "Unconfigured Stations" list, take a look at the "Assigned station" list.
The 3 connected IP stations are now shown in the list.
Identifying the Stations
The stations connected in this example are three master stations.
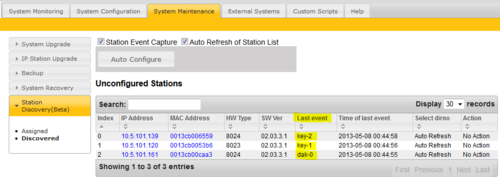
Press key 1 on the first master, then key 2 on the second then the first DAK key on the third (substations will show DAK0).
The "last event" column will show the identification.
The station events are now shown in the list.
If all three stations are of "one button" type the "Time of last event" can be used to distinguish the stations. (Or press only one station at the time).
Assigning Directory Numbers
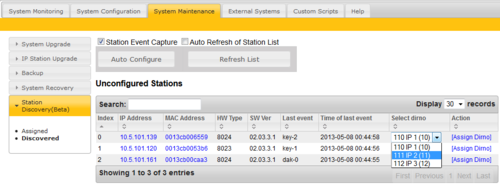
Turn off the "Auto Refresh of station list" check flag. The "Select dirno" column will then show a list of available directory numbers.
The selectable directory numbers will be IP stations not currently registered.
For the station with key-2 select "111 IP 2" then press the "Assign Dirno" in the "Actions" column.
The station will then be assigned the directory number and removed from the list.
Assign all stations in the same way. Use the "Refresh list" button if updated list of "Last Event" is needed.
Assigning Wrong Directory Number
If assigning the wrong directory number the station can be "released" from the "Assigned menu"
Pressing the "Release" button in the "Action" column will release the station from the configuration.
The station will then show up in the "Discovered" list instead, and can then be reassigned to a different directory number.

