ITS-1 (ICX-AlphaCom)
From Zenitel Wiki


This article describes how to set up the ITS-1 Video Intercom to operate in an ICX-AlphaCom or AlphaCom XE system. The ITS can be used for audio only, or it can also be used to show the video image from a Zenitel Video Door Station.
Licensing
The ITS-1 requires a license.
- ICX-AlphaCom system: SIP station license (1002600700 ILS-SIP)
- AlphaCom XE server: SIP station license (1009643001)
Supported features
The ITS-1 is a SIP phone, and is using the SIP protocol for communication with the ICX-AlphaCom. SIP phones has some limited functionality compared to native Zenitel IP stations.
ICX-AlphaCom configuration
The Directory Number (SIP User ID) and Name of the ITS-1 must be configured in the ICX or AlphaCom Server.
- In AlphaPro, open Users & Stations and select a free user from the list box.
- Enter Directory Number and Display Text, and enable the "SIP Station" flag. Set Codec = G.722.
- Select Send All or Send Change to update to the server

Configuration of the ITS-1
Network settings
- Power up the ITS-1 unit
- Push on the touch screen, and select Settings > Status > Network status and make a note of the IP address.
- Open a web browser on your computer, enter the IP address into the address bar (e.g. "http://192.168.0.160" or "192.168.0.160") and click Enter.
- Enter the user name (default: admin) and password (default: alphaadmin) in the pop-up dialogue box and click Login
- The very first time you log in you are prompted to change the password.

|
Make sure to make a note of the new password! |
- 6. Select Network Settings > Ethernet Settings to configure the phone to use DHCP (obtain an IP address automatically) or Static IP address.

SIP account
- Select Account > Account 1 > General Settings tab
- Account active: Enable
- Account name: Is shown in the LCD screen to identify the account
- SIP Server: Enter the IP address of the ICX-AlphaCom
- SIP User ID: Must match the number entered in the ICX-AlphaCom
- SIP Authentication ID: This ID is identical to the "SIP User ID"
- Display Name: This text is shown as Caller ID when placing a call
- Press Save, then Apply to activate the settings

Configuration for Video
The ITS-1 phone can be configured to show video image from Zenitel IP Video Stations, such as:
The video is streamed directly from the camera to the ITS-1. The ICX-AlphaCom Server is not involved in the video stream. The cameras must have a static IP address.
The directory number of the Video Door Station must be defined in the Camera List, together with the URL of the camera of the Video Door Station. When a call is received, the ITS will look up in this Camera List, and find the correct URL for the associated camera.
- Select System Settings -> Monitor -> IPC -> Add
- Give the link a name
- Set "Connection Type" to RTSP(UDP)
- RTSP URL: Copy the video URL from the video device and paste it here
- Set username and password
- Define the call number of the Video Door station

- Use the Add button to add more Door Video stations
- Select Save to save the configuration.
What URL to use depends on the type/model of Video Door Station being used.
| Protocol | URL | Example | Comment |
|---|---|---|---|
| Turbine TCIV+ (10083150x0) | |||
| RTSP/H264 | rtsp://<username>:<password>@<IP address of the station>:554/media?encoder=H264 | rtsp://admin:alphaadmin@10.9.5.187:554/media?encoder=H264 | Authentication (username/password) always required |
|
|
The authentication credentials for the RTSP stream on TCIV+/TCIV are same as the login credentials to TCIV+/TCIV Web |
Configuration of Video Stations
Configuration of the TCIV+ station (10083150x0)
By default the TCIV+ station is set to use RTSP/H264 with authentication enabled, and further settings should not be necessary in order to receive the video stream in ITS-1.
To verify the settings:
- Log on to the TCIV+ station (default username: admin, password: alphaadmin)
- Select Advanced ICX-AlphaCom > Video Settings, and check the settings as below:

Disable missed call notification
In order to disable the missed call prompt, follow these steps:
- Under Account menu, select the used account
- Go to Call settings and scroll to Call Log
- From the drop-down menu select Do not show prompt for missed calls
- Save and Apply

Door Opening feature
During a conversation with a Zenitel Door Intercom, the door unit’s integrated relay can be activated by opening the keypad and pressing the digit “6”.
Adding a Door Opening icon
For a more user‑friendly interface, you can add a door‑opening icon to the display. This allows users to activate the door‑opening relay with a single press, instead of having to open the keypad and dialing a DTMF digit. To configure this, open the web interface of the ITS‑1 and navigate to: System Settings → Monitor
Click Add to create a new Door System, then fill in the following fields:

- Door system type: Others
- Door system number: The directory number of the door station with door opening
- Account: Select the account used to register with the ICX-AlphaCom
- Device IP: Enter the IP address of the ICX-AlphaCom the door station is registered with
- Related Display Name 1: The text below the icon, e.g. "Open Door".
- Access password 1: 6
For a sluice system it is possible also to enter a second digit to open the second door (control a second relay). This action must also then be added as a separate event in the event handler.
Security settings
If the device is using Constraint mode to limit the configuration possibilities via the Keypad menu, make sure to write down and store the password.
If the password is lost, first contact Zenitel support via alphasupport@zenitel.com.

|
Do not perform factory reset if the phone is using constraint mode and if the admin password is lost |
Troubleshooting
- To do a network trace on a ITS-1, see Capture Trace
- If ITV-1 stops ringing after 30 seconds, even when Private Call Time and Call Request Reminder Time are set to more than 30 seconds, then one of the two following settings need to be changed:
- Disable camera preview in the Camera List or in General Settings in Value-added Service or
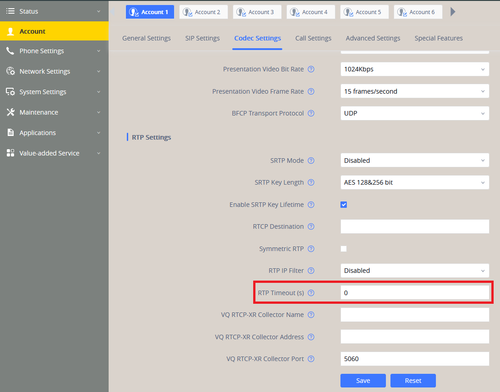
- Select the Account in use, then go to Codec Settings and scroll down to RTP settings. Set the RTP Timeout to "0" to disable it.
box
