Integration with ASL PAVA using the TKIE-2 kit
From Zenitel Wiki
This article describes the hardware and configuration required to connect Vipedia PAVA system with the ICX-AlphaCom system using a TKIE-2 kit.
This integration will enable:
- Group Calls launched within the ICX-AlphaCom can include zones(s) in the Vipedia PAVA system
- Announcements from an PAVA Microphone can include a group call in the ICX-AlphaCom
Contents
Audio from ICX-AlphaCom to Vipedia PAVA
This paragraph uses a TKIE-2, however a TKIS-2 can also be used.
Wiring the hardware
Connections between the TKIE-2 and the Vipedia:
- Relay of the TKIE-2 to GPIO input of the Vipedia
- Audio Line Out of the TKIE-2 to the Audio input of the Vipedia.
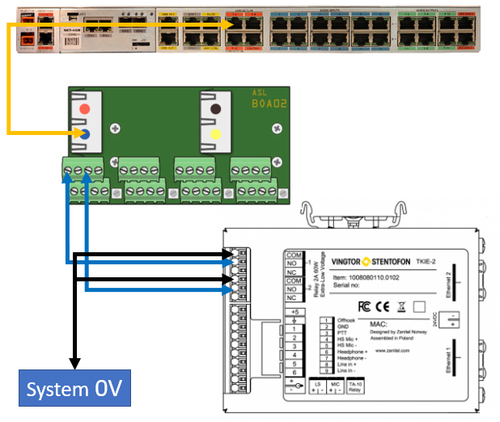
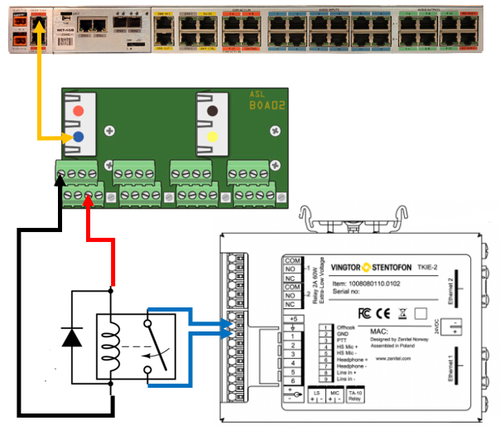
For the connections a BOA02 is used to break out the patch cable coming from the Vipedia to screw terminals. On the BOA02 the blue RJ45 is connected to the first terminal block, the red to the second, the yellow to the third and black to the fourth.
Wiring the relay of the TKIE-2
The TKIE relay triggering the GPIO input is used to establish the audio route within the Vipedia.
Connect one of the RJ45 ports on a BOA02 to a GPIO input connector of the Vipedia using a shielded patch cable. In all examples we show the first port of the BOA02 used, the wiring is the same for the other three. On the terminal block paired with the RJ45, the inputs are on the screwterminals as follows:
| Screwterminal | Connection |
| 1 | first GPIO input |
| 3 | second GPIO input |
| 5 | third GPIO input |
| 7 | fourth GPIO input |
Depending on whether you want active high or active low you will connect the terminals to the NC or NO side of the relay contacts in the TKIE-2. The COM side of the relay contact will connect to the 0V of the system.
Wiring the audio output from the TKIE
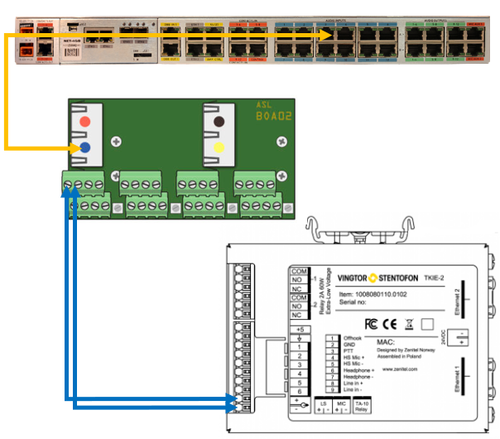
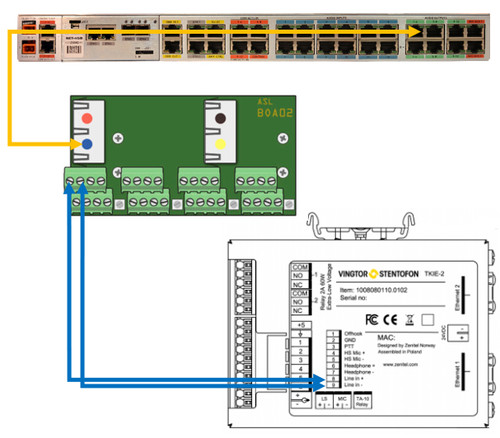
Connect one of the RJ45 ports on the BOA02 to the desired audio input on the Vipedia using a shielded patch cable. Then wire the plus side of the audio output of the TKIE-2 to screwterminal #1 and the minus to screw terminal #2.
Configuring the TKIE relay operation in ICX-AlphaCom
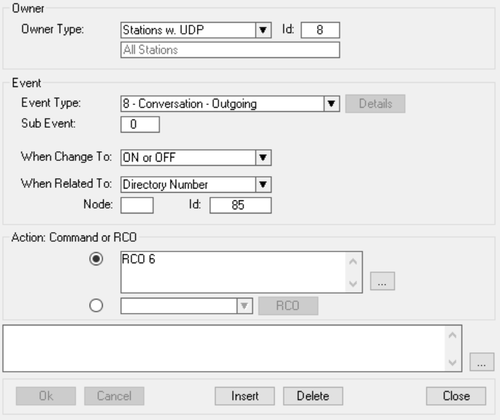
In the ICX-AlphaCom we need to configure the relay of the TKIE to operate when the group call is made. This is done in the Event Handler.
In the example below the Remote Control Output RCO 6 will be triggered when any station (= UDP 8) is calling group call 85.
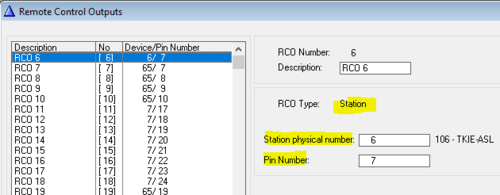
The logical RCO must be mapped to the physical relay of the TKIE. This is done in Exchange & System > RCO table.
Audio from Vipedia PAVA to ICX-AlphaCom
This part of the article only applies to the TKIE-2.
Wiring the hardware
For this part we wire the GPIO output of the Vipedia to the input of the TKIE using additional relays. The audio output of the Vipedia is connected to the Line input of the TKIE-2.
Wiring the input of the TKIE
To trigger the correct events in the ICX-500 the outputs of the Vipedia need to be connected to the inputs on the TKIE-2. To do this an intermediate relay is needed. This can be any box standard 24Vdc relay. The BOA02 is connected to the GPIO outputs of the Vipedia using the shielded patch cable. On the screwterminals you will have 6 outputs available and a 24 VDC. The connections are as follows:
| Screwterminal | Connection |
| 1 | first GPIO output |
| 2 | second GPIO output |
| 3 | third GPIO output |
| 4 | fifth GPIO output |
| 5 | sixth GPIO output |
| 6 | fourth GPIO output |
| 7 & 8 | 24 VDC |
The positive side of the relay coil is connected to terminals 7 and 8. The negative side is connected to the output you are going to use. Note that there is a suppression diode on the coil! The contact side of the relay is connected between the input used on the TKIE-2 and the GND.
Wiring the audio input on the TKIE
Connect the a RJ45 of a BOA02 to the audio output of the Vipedia using a shielded patchcable. There are 4 audio outputs in one patch cable so on the terminalblock the connections are as follows:
| Screwterminal | Connection |
| 1 & 2: | first audio output |
| 3 & 6: | second audio output |
| 4 & 5: | third audio output |
| 7 & 8: | fourth audio output |
The first number mentioned is always the positive and the other always the negative. So if you want to use the first audio output screwterminal #1 goes to the positive side of the audio input on the TKIE-2 and terminal #2 to the negative side.
Configuring the events in ICX-AlphaCom
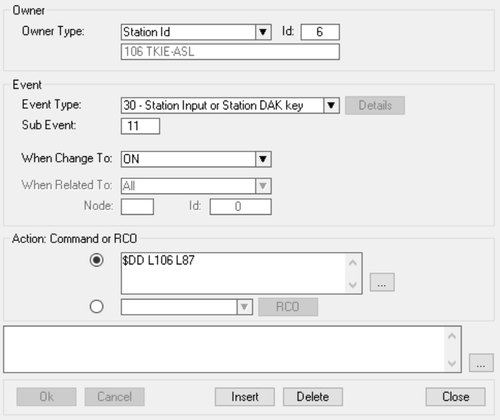
There are two events programmed in the ICX-AlphaCom, one to start the call and one to end the call. The first event to set up the all is configured as follows:
Action commands:
$DD L106 L87
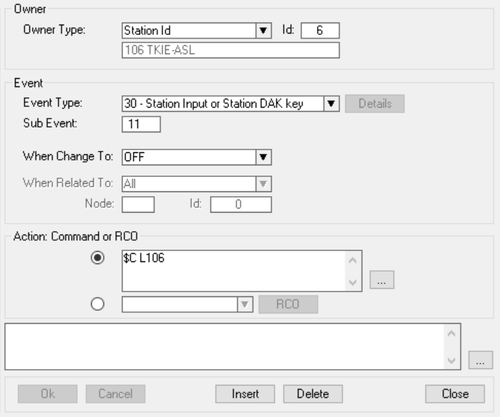
And the example for the second event to end the call:
Action commands:
$C L106
Group call configuration
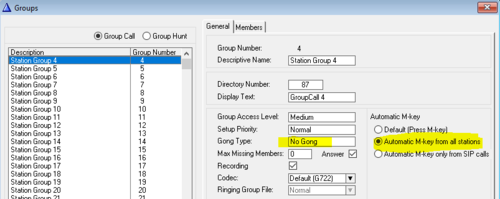
In AlphaPro, Local Groups, select the group used by the integration and turn on "Automatic M-key" and disable the chime.
Audio from ICX-AlphaCom to Vipedia PAVA - Using VOX instead of relays
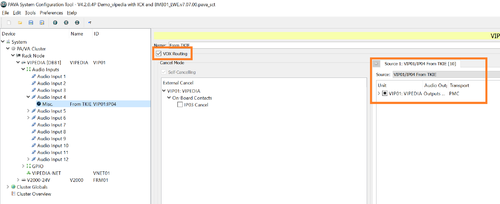
An option is to use VOX (Voice Operated Control) to set up the route instead of the relays. When VOX is enabled the Vipedia will detect if audio present on the input, and then established the preconfigured route.
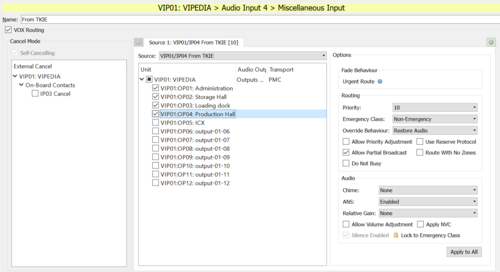
In the System Configuration Tool (SCT), select the MISC input used by the TKIE-2. Check the box VOX and define the route to be established when audio is detected on the input.
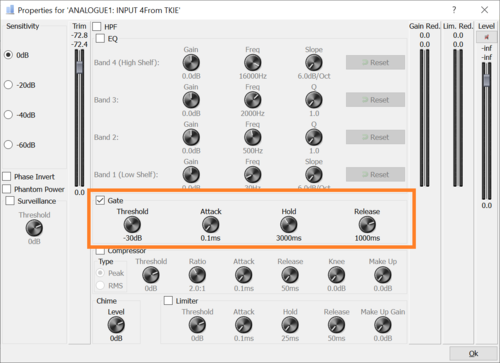
Then using the Router Dynamic Tool (RDT) you have to check the box Gate on the input. Also set the threshold and attack, hold and release times. The values in the picture below are a good starting point for use with a TKIE-2
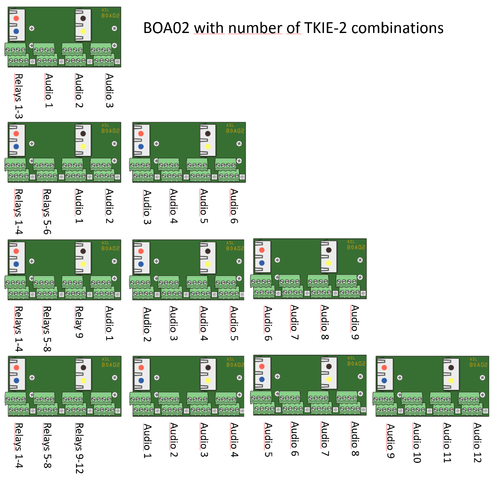
Suggestion for connection multiple TKIE-2
When wiring for audio from ICX-Alphacom to Vipedia PAVA you need on average one BOA02 per three TKIE-2. In the picture below there is a suggested arrangement to use per number of TKIE-2.

