Longer delays on Vipedia
From Zenitel Wiki

In the Vipedia it is possible to set a delay on the audio output. There is a maximum on this setting, however longer delays are possible by looping inputs and outputs. This article will explain delays on the Vipedia.
Usecase example
First an explanation of a simple short tunnel.
 |
| Short tunnel |
When a message is played to the whole tunnel you will get distorted audio when all speakers start to play at the same time. The reason is that when there is an observer at the second speaker they will hear the sound from the second speaker directly and the sound from the first speaker with some delay. To counteract this the second speaker has to start producing sound when the soundwaves from the first speaker arrive at the location of the second speaker. With an average speed of sound of 343m/s this will be 146 ms for the 50 meters in our example. And every next speaker will get a bigger delay to the first speaker. The last speaker is 1000 meters away from the first speaker so this will have the largest delay. The time for the soundwaves from the first speaker to arrive at the last speaker is 2,9 seconds. For this example the maximum delay in the Vipedia is enough but for the next example you will see the need for the additional delay.
 |
| Long tunnel |
The tunnel is completely the same with the same spacing of speakers, only difference is the total length of the tunnel. The total length of the tunnel has increased to 2000 meters. Using the same speed of sound this will give you a needed delay of 5,83 seconds (5830 ms) between the first and last speakers. This is more than the possible setting of 5000 ms and here we will use the loop through.
Hardware wiring
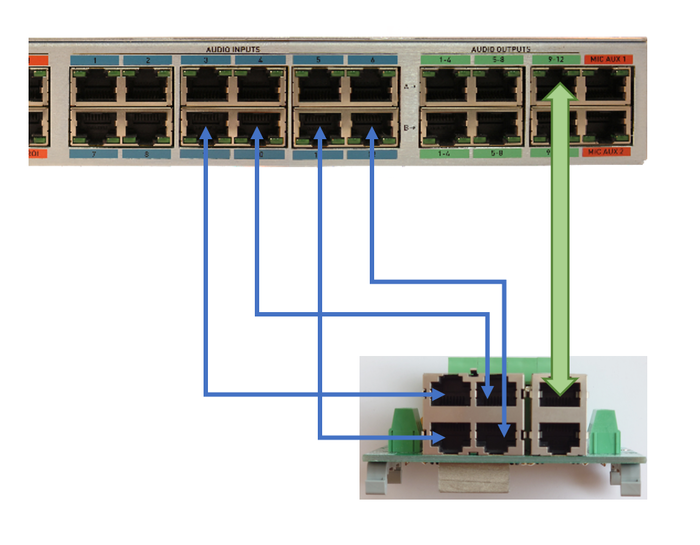
For the wiring a BOA-01 is used. One STP patch cable is run from the audio outputs connection to the BOA-01. This connection contains 4 audio outputs. On the group of 4 RJ-45 connectors on the BOA-01 these are split out. Therefor each can be connected to an audio input of the Vipedia. The counting is done from top left to bottom right. You only need to patch one input for each additional 5 second delay you need.
 |
| Patching the loop through |
The delay setting in the Vipedia
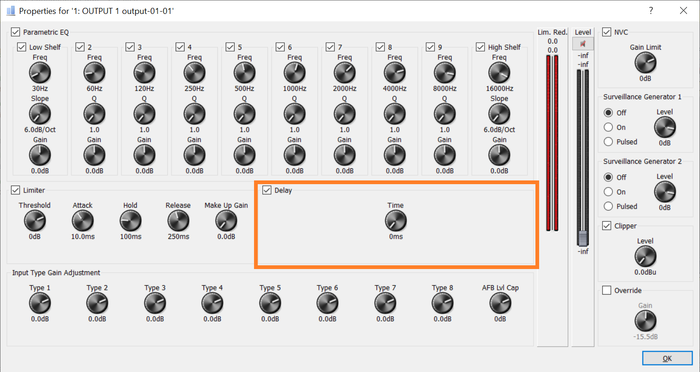
The delay setting for the output can be found in the router dynamic tool (RDT). Clicking on the little spanner button under an output will open the settings for the specific output. Here you will find a checkbox and dial to set the delay. Double clicking the number will present you an input box where you can type in the exact value.
 |
| Delay in the RDT |
When 1 output is set to the max of 5 seconds and wired back to an input you can route this input to a next set of outputs that can be configured with their own delay between 0-5 seconds. Giving you a total delay between 5-10 seconds, 5 from the first loop through and an amount of seconds of their own delay. You can keep looping outputs and inputs till the desired delay is reached.

