Processing audio for use as DVA
From Zenitel Wiki
Processing audio files for use as DVA
This article describes how to convert an audio (WAV / MP3) file to enable it to be loaded and played as a DVA on a Vipedia-12 or VIPA device.
The audio processing is necessary to ensure that the audio is at a level to match other inputs, such as Zenitel Microphones (EMS/MPS) and to ensure optimum intelligibility and that the file is formatted in such a way it can be loaded on to the Vipedia's DSP.
All DVAs must be in the following format:
- Format = WAV (Microsoft)
- Audio options = Mono
- Sample Rate - 48000 Hz
- Encoding = Signed 16-bit PCM
The following process describes how to create a Macro tool in Audacity 3.7.1 (and above) to automate the DVA formatting process.

|
DVAs must not exceed 2 minutes in length if being loaded onto a Vipedia-NET card |
Software
You can download the latest version of Audacity from here.
Creating a Macro in Audacity
These instructions will create a Macro with the following commands.
- Set the sample rate to 48000Hz
- Stereo to Mono - Changes to mono if necessary.
- Normalise to 0dB to clear any existing normalisation
- Adding a limiter to make up the gain.
- Adding a compressor to reduce dynamic range
- Normalise to -7dB for speech to finalise the message. (If your DVA contains Tones as these will need to be be individually normalised to -13dB)
- Export as .wav
Creating the Macro
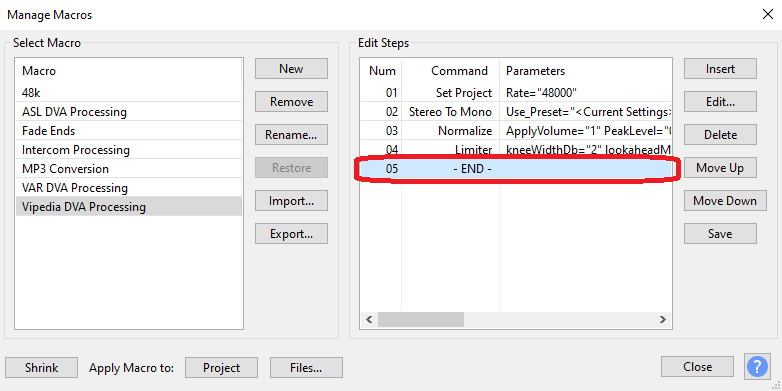
- To start, open Audacity and select Tools > Macro Manager

- Select New, name your new Macro (e.g. Vipedia DVA Processing) and click OK.

- Select Insert and select Set Project from the command list and select OK

- * Highlight Set Project in the "Edit Steps" window and select Edit. Enable Rate and set to 48000. Click OK.

- To maintain the order in which the effects are applied to the audio file, please ensure you select -END- before proceeding to the next step.


- Select Insert and select Stereo to Mono from the command list and click OK.

- Select Insert and select Normalize from the command list and click OK.

- Highlight Normalize in the "Edit Steps" window and select Edit. Set to 0dB and click Apply.

- To maintain the order in which the effects are applied to the audio file, please ensure you select -END- before proceeding to the next step.

- Select Insert and select Limiter from the command list and click OK.

- Highlight Limiter in the "Edit Steps" window and select Edit. Set the following parameters and click Apply:
- Compression Curve
- Threshold (dB) -5.0
- Make-up target (dB) -1.0
- Knee width (dB) 2.0
- Smoothing
- Lookahead (ms) 1.0
- Release (ms) 20.0
- Compression Curve

- To maintain the order in which the effects are applied to the audio file, please ensure you select -END- before proceeding to the next step.

- Select Insert and select Compressor from the command list and click OK.

- Highlight Compressor in the "Edit Steps" window and select Edit. Set the following parameters and click Apply:
- Compression Curve
- Threshold (dB) -10.0
- Make-up target (dB) 0.0
- Knee width (dB) 5.0
- Ratio 10.0
- Smoothing
- Lookahead (ms) 1.0
- Attack (ms) 30.0
- Release (ms) 150.0
- Compression Curve

- To maintain the order in which the effects are applied to the audio file, please ensure you select -END- before proceeding to the next step.


- Select Insert and select Normalize from the command list and click OK.
- Highlight Normalize in the "Edit Steps" window and select Edit. Set the Normalize peak amplitude to -7.0 dB and click Apply

- To maintain the order in which the effects are applied to the audio file, please ensure you select -END- before proceeding to the next step.


- Select Insert and select Export as WAV from the command list and click OK.

- The Macro is now complete. Click on Save and Close


|
You will need to configure the export location for the Macro output. |
- Click on Edit > Preferences > Directories - Add Macro Output location file path.

Processing Audio File
Open the audio file you wish to process. Select Tools > Apply Macro and select your macro from the list. The WAV file will now be processed.

Navigate to your Macro output location, double-click the exported file to open it and play the processed file to confirm contents. This will be the Macro output location you specified in Edit > Preferences > Directories
|
|
If there are tones contained within the DVA you are processing, you will need to normalise these sections of audio separately at -13dB |
- Using the cursor, click, hold & drag from the start to the end of the waveform where the tones are present in the DVA

- Select Effect > Volume and Compression > Normalize

- Enable and set Normalize peak amplitude to -13.0 dB

- Select File > Export Audio... > Specify the filename, export location folder and ensure you have the following parameters set, followed by Export:
- Format = WAV (Microsoft)
- Audio options = Mono
- Sample Rate - 48000 Hz
- Encoding = Signed 16-bit PCM
- Export Range: = Entire Project

Processing Multiple DVA Files
- Open a new Audacity session
- Select Tools > Macro Manager and select the Macro you have created on the left had side. Click on Files... and select all the DVAs you wish to process and click Open (If you have DVAs in the hundreds, you may want to process them in smaller groups).
- Each selected file will now be processed and exported to your Macro output folder.

- Navigate to your Macro output location, double-click the exported WAV files to open and play them to confirm their contents. This will be the Macro output location you specified in Edit > Preferences > Directories