ENA Configuration - AlphaCom mode: Difference between revisions
From Zenitel Wiki
| Line 60: | Line 60: | ||
===Address Book=== | ===Address Book=== | ||
See the article [[Address Book]] on how to configure the address book of the station models [[TCIS-6]] and [[TCIV-6]]. | See the article [[Address Book]] on how to configure the address book of the station models [[TCIS-6]] and [[TCIV-6]]. | ||
===Sound Detection=== | ===Sound Detection=== | ||
Revision as of 13:26, 21 March 2018
 THIS ARTICLE IS UNDER CONSTRUCTION !!!
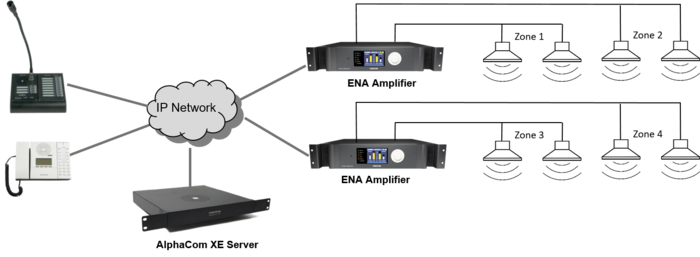
This article describes the configuration required for a Exigo Network Amplifier (ENA) to operate with an AlphaCom server. The ENA Amplifiers are configured through their web interface. The AlphaCom server is configured using the PC tool AlphaPro.
Configuration of amplifier
To make an ENA Amplifier operational there are essentially three parameters to configure:
- AlphaCom IP address
- Amplifier directory number
- Amplifier IP address
Log in to the Amplifier
Access the amplifier by logging into the web interface using a standard web browser:
- 1. Open a web browser on your PC
- 2. In the browser’s address bar, type the IP address of the amplifier. The login page will be displayed.
- 3. Enter Username and Password. Default username: admin. Default password: alphaadmin
The information page will now be displayed, showing the main configuration and status.
To find the IP address of the amplifier, use the Menu Selection Knob on the front of the amplifier, and navigate to Information > Network.
Main Settings
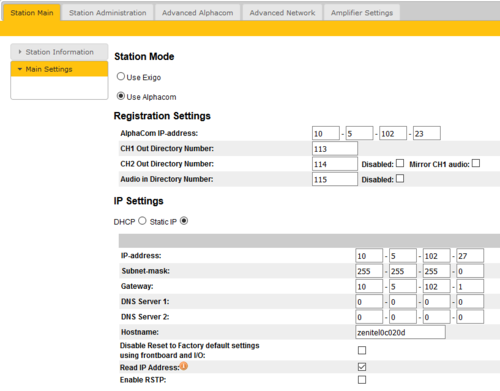
- Click Station Main > Main Settings to access the page for configuring station mode and IP parameters.
Station Mode: Select the Use Alphacom radio-button.
Registration Settings:
- AlphaCom IP-address: Enter the IP address of the AlphaCom server to which the amplifier is to be registered
The amplifier has up to three directory numbers you can configure: Channel 1, Channel 2 and Audio Input. Each of these require a license.
- CH1 Out Directory Number: Mandatory: Enter the directory number of the first loudspeaker output channel. The number must match the directory number defined in the AlphaCom server
- CH2 Out Directory Number: Optional: If the second loudspeaker channel should be addressed separately, the second channel must be registered to the AlphaCom using this directory number
- Audio In Directory Number: Optional: If the Line In is to be used from the amplifier, the input must be registered to the AlphaCom using this directory number
IP Settings:
- DHCP – Select this option if the IP station shall receive IP Settings from a DHCP server.
- Static IP – Select this option if the IP station shall use a static IP address. Enter values for:
- - IP-address
- - Subnet-mask
- - Gateway
- - DNS Server 1 (option for network administration)
- - DNS Server 2 (option for network administration)
- - Hostname (option for network administration)
- Disable Reset to Factory default settings using frontboard and I/O: If enabled, factory reset will only be possible from the web interface. This is disabled by default.
- Read IP Address: Not in use
- Enable RSTP: RSTP is only required when using redundant networking
Click Save followed by Apply to apply the new configuration settings.
OLED Labels
See article OLED Labels on how to configure the display in the station models TCIS-4 and TCIS-5.
Address Book
See the article Address Book on how to configure the address book of the station models TCIS-6 and TCIV-6.
Sound Detection
The Sound Detection, also known as Voice Activity Detection (VAD) samples the audio level from the microphone located in the IP Station. If the audio level meets defined criterias an action in AlphaCom can be triggered.
Read more about Sound Detection.
Time Settings
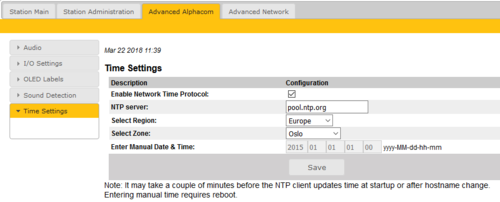
- Select Advanced AlphaCom > Time Settings from the menu
Time Settings: You can enable Network Time Protocol, select the time zone and set the hostname or the IP address of the NTP server.
Logging
From the web interface of the station it is possible to activate logging, which can be useful for debugging and troubleshooting purposes. See Logging - IP Stations for more information.
Configuration of the AlphaCom server
AlphaPro configuration
Define a User
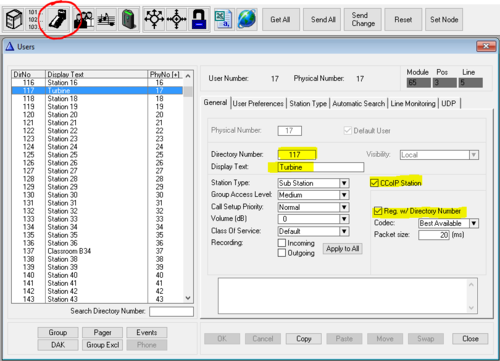
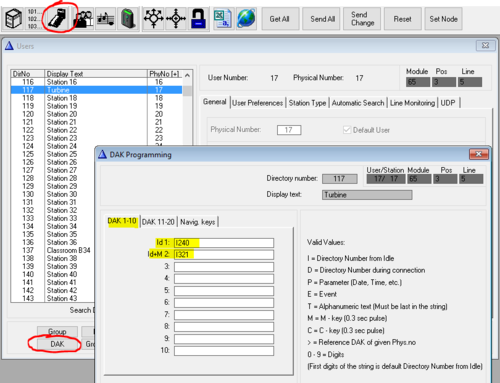
The station is defined in Users & Stations window, General tab. For minimum configuration you need to enter these fields:
- Directory Number - must match the directory number configured in the IP station itself
- Display Text - Any free text. Used as Caller ID.
- Station Type - Set to Substation unless the station has full keypad 0-9. If full keypad, set Master Station
- CCoIP Station - Tick this checkbox when IP Station (and not analog station) is used
- Reg. w/Directory Number - When checked (most common setting) the station will register to the AlphaCom server by its Directory Number. When unchecked the station will register by its MAC address. With this option you need to enter the MAC address of the station in the MAC Address field.
In hybrid exchanges (AlphaCom XE7, XE20 and XE26), where there is a mix of analog and IP stations, you should avoid using physical numbers for IP Stations that later might be used for analog intercom stations.
Configure the Call Button(s)
- Go to the Users & Stations window, and select the station from the list box.
- Press the button DAK (Direct Access Key)
- Enter the number to call on line 1 (and on line 2 if the station has two call buttons)
AlphaWeb configuration
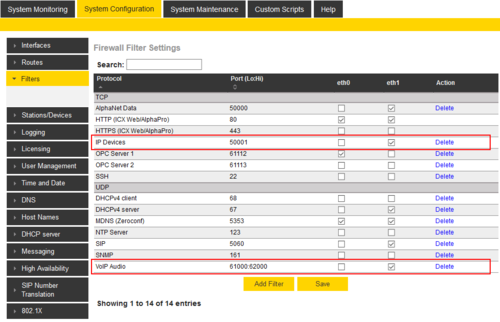
Filter settings
Log on to the web interface of the AlphaCom server, and select System Configuration > Filters.
Enable "IP Stations" on TCP port 50001 and "VoIP Audio" on UDP ports 61000-61150 on the ethernet port used for the IP stations. By default these ports are enabled on ethernet port 1.
IP Station licenses
The IP Stations require IP Station license in the AlphaCom server.

