Difference between revisions of "AMC Flash Image Update XE"
From Zenitel Wiki
(→Troubleshooting) |
|||
| Line 1: | Line 1: | ||
{{A}} | {{A}} | ||
| − | This article describes how to install a new flash image on the AMC-IP board, using the | + | This article describes how to install a new flash image on the AMC-IP board, using the VS-AlphacomXE.ImageUpgrade PC tool. Note that there are two versions of the PC tool for image upgrade: |
*'''VS-AlphacomXE.ImageUpgrade''' is used for: | *'''VS-AlphacomXE.ImageUpgrade''' is used for: | ||
Revision as of 12:09, 16 October 2018
This article describes how to install a new flash image on the AMC-IP board, using the VS-AlphacomXE.ImageUpgrade PC tool. Note that there are two versions of the PC tool for image upgrade:
- VS-AlphacomXE.ImageUpgrade is used for:
- Upgrading the image file on AMC-IP boards already running software version 11
- Upgrading an AMC-IP board from software version 10 to version 11
- Downgrading an AMC-IP board from software version 11 to version 10. Note: Only AMC-IP boards with red PCB can be downgraded to version 10. AMC-IP boards with black PCB will not run with version 10.
- The image file has the extension .aimg.
- VS-AlphacomXE.ImageUpgrade is used for upgrading image file on AMC boards running software version 10. The image files has the extension .bin. This application is described in a separate article.
The VS-AlphacomXE.ImageUpgrade application and the image files are available for download at the download site
Contents
About AMC-IP hardware and software versions
- AMC-IP board hardware revision 01 to 04: These boards have RED PCB. They come from factory with software version 10, but can be upgraded to version 11. Not all features in software version 11 (Audio Messaging, Auto-attendant, Billing) can be utilized when version 11 runs on this hardware version. In some documentation these boards are called AMC 10.
- AMC-IP board hardware revision 05 and 06: These boards have BLACK PCB. These boards come from factory with software version 11. In some documentation these boards are called AMC 11. This board cannot be downgraded to software version 10.
The hardware version is printed in the PCB, to the top right on the rear side of the board. For example "PCB. NO. 8000/4" means hardware version 04.
Preparations
The image upgrade will erase all current configurations and settings, including the licenses. Only basic configuration like IP Setting are kept during the upgrade.
- Before the image upgrade can be performed, make sure the software on the AMC-IP board is version 10.52 or higher
- Any software licenses will be deleted. If there are licenses on the board, make sure you have a copy of the license key before starting the image upgrade. The license key has to be re-entered after the image upgrade.
- Backup customer data by doing a GetAll from AlphaPro
Image update procedure
- Download the PC software "VS-Tools.msi " from the download page
- Install the software by double-clicking file VS-Tools.msi
- The software requires that "Microsoft .NET Framework" is installed on the PC. The installation program will check if Microsoft .NET Framework is already installed. If not, you are notified and a link to Microsoft's download site is displayed. Follow this link and install .NET Framework (freeware). Then run the installation file "VS-Tools.msi" again
- Download the AMC IP Flash Image file "axeu_bxxxx_ayyyyyyy.aimg" ((xxxx = Board Support version number, yyyyyy = AMC software version) from the download page
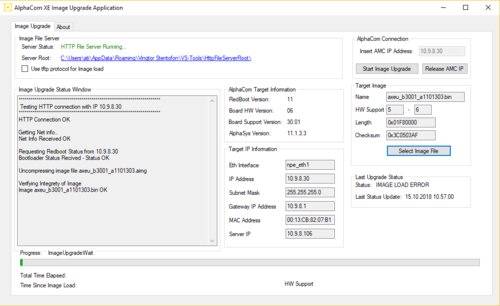
- Start the VS-AlphacomXE.ImageUpgrade application. Note: If "Server Status:" Could not Start the HTTP File Server, skip the points 6 - 8 below, and jump to the paragraph #Upload using TFTP Server.
- Insert the AlphaCom IP address, and press Connect to Target
- Press Select Image File and browse to the required .aimg file:
- Select axeu_b3001_a1101303.aimg to upgrade a black AMC-IP board to the latest image
- Select axeu_b2200_a1100300.aimg to upgrade a red AMC-IP board from version 10 to version 11
- Select alpha_uimage_18.aimg to downgrade a AMC-IP board from version 11 to version 10 (Possible only on red AMC-IP boards)
- Press Start Image Upgrade. The upgrade process takes approx. 9 minutes to finish. The Image Update application will tell you when the update is finished.
Upload using TFTP Server
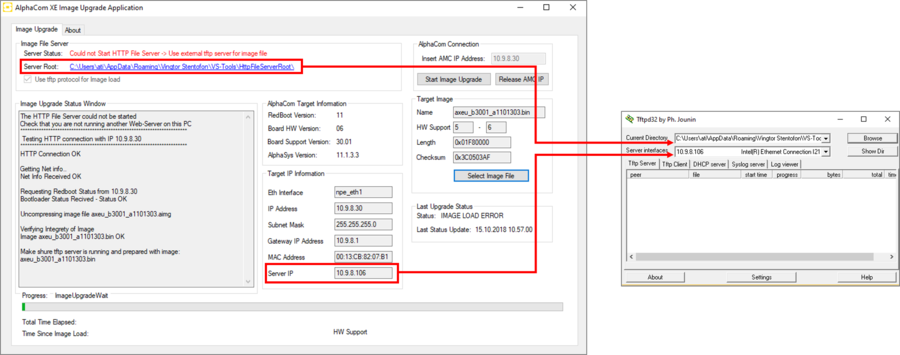
By default the Image Upgrade application tries to start a HTTP Server. If there is a HTTP Server already running on the PC, you will get the Server Status: Could not Start the HTTP File Server. The image can then be uploaded using an external TFTP Server instead.
- Download and install a TFTP Server, e.g. from TFTPd
- Start the VS-AlphacomXE.ImageUpgrade application.
- Insert the AlphaCom IP address, and press Connect to Target
- Press Select Image File and browse to the required .aimg file.
- Select axeu_b3001_a1101303.aimg to upgrade a black AMC-IP board to the latest image
- Select axeu_b2200_a1100300.aimg to upgrade a red AMC-IP board from version 10 to version 11
- Select alpha_uimage_18.aimg to downgrade a AMC-IP board from version 11 to version 10 (Possible only on red AMC-IP boards)
- Start the TFTP Server.
- Browse to the folder specified in Server Root
- Set the "Server Interface" to the same as in Server IP
- Press Start Image Upgrade. The upgrade process takes approx. 9 minutes to finish. There is no indication in the Image Update application when the update is finished, you need to watch the green "run LED" on the AMC-IP board. When the staus LED is flashing, the AMC-IP is up and running again.
Finalizing the AMC-IP board
When installing the image file some settings will automatically be restored after the installation. During the upgrade process the configuration file "amc_ip_config.xml" is temporarily stored in NVRAM, and is restored after the upgrade process. This means that the following information is automatically restored after the upgrade:
- IP addresses
- IP routing
- Filter settings
- Log configuration (the actual log files are erased)
The following information needs to be reconfigured from AlphaWeb:
- License key
- Time settings
- If logging was enabled, the logging feature needs to be reactivated. Go to System Configuration -> Logging, and press "Apply"
Now you should upgrade to the latest AMC software version.
Finally restore the intercom configuration be by doing a SendAll from AlphaPro.
Troubleshooting
Error messages in the "VS-AlphacomXE.ImageUpgrade" software:
- Server Status: Could not Start HTTP File Server: The upgrade software is using a web server application during the upgrade proccess. If there is another web server application running on the computer, it must be shut down before the Image Upgrade can be executed. To stop any running http server on the PC, run the Windows Command Promt as Administrator, and execute the command "net stop http". As an alternative one can upload the image file using a TFTP server program.
- Image Load Timeout: A firewall is probably blocking port 80. If the PC is connected directly to the AMC-IP, check that VS-AlphacomXE.ImageUpgrade is enabled in the Windows Firewall. (Windows 10: Control Panel > System and Security > Windows Defender Firewall > Allow an app or feature through Windows Defender Firewall > Change settings > Locate "VS-AlphacomXE.ImageUpgrade" and enable for the relevant Network Profile (Domain, Private and/or Public).). Altenatively one can temporarily disable the PC firewall completely.
- Image Load Timeout: Ping Reply is blocked by windows. Windows 10: Go to Control Panel > Network and Internet > Network and Sharing Centre > Change advanced sharing settings and Turn on Network Discovery for your network profile.
- Async callback exeption: Authorization Request or Async callback exeption: Unauthorised: Due to security updates in the AlphaCom software from version 11.5.x.x, older versions of the AlphaCom XE Image Update tool will not work towards 11.5.x.x. or newer AlphaCom software. Make sure you are using the latest version of the tool. Download the latest version "VS-Tools.msi " from the download page
Other errors:
- Transfer the image file from external TFTP Server fails: Check that "TFTP Server" is enabled in the Windows Firewall. (Windows 10: Control Panel > System and Security > Windows Defender Firewall > Allow an app or feature through Windows Defender Firewall > Change settings > Locate "TFTP Server" and enable for the relevant Network Profile (Domain, Private and/or Public).)


