AlphaNet: Difference between revisions
From Zenitel Wiki
| Line 43: | Line 43: | ||
[[File:CreateNode2.png|thumb|left|500px]] | [[File:CreateNode2.png|thumb|left|500px]] | ||
<br style="clear:both;" /> | <br style="clear:both;" /> | ||
[[File:CreateNodeB.png|thumb|left|500px]] | |||
<br style="clear:both;" /> | |||
[[File:CreateNode3.png|thumb|left|500px]] | [[File:CreateNode3.png|thumb|left|500px]] | ||
Revision as of 09:07, 1 September 2017
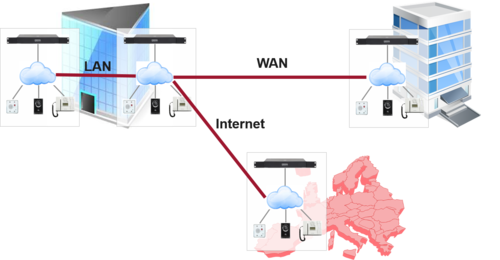
AlphaNet is STENTOFON's internal networking technology made for critical communications. Some of the highlighted features of AlphaNet are:
- Group and conference calls
- VoIP bandwidth management
- Priority handling of events and resources
- Alternative routing
- Backwards compatibility
- All features available over the network
- VoIP, digital and analogue infrastructure support
VoIP AlphaNet Configuration
AlphaWeb settings
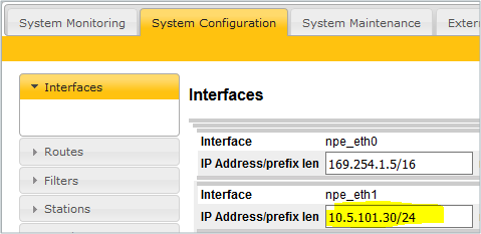
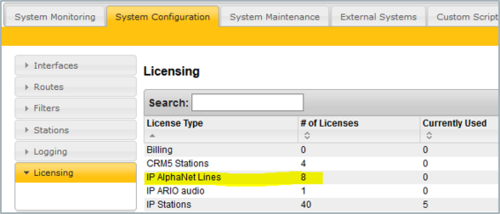
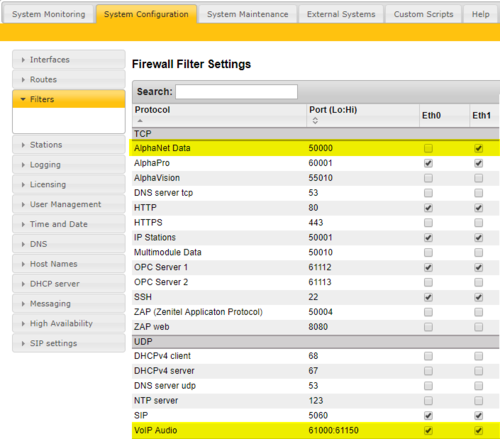
In each node you must:
- set a unique IP address
- insert an AlphaNet license
- edit the firewall
Setting IP address
Inserting AlphaNet license
Editing the firewall
Create all the nodes in the AlphaNet
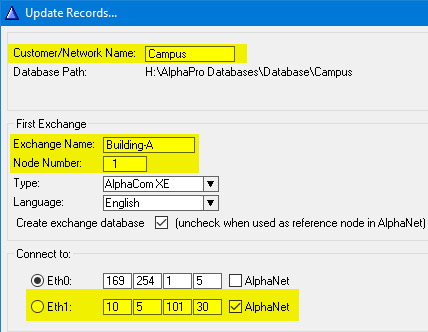
Create the AlphaNet database and define the first node by clicking the + sign as highlighted below. Give the node a descriptive name and select which network interface to be used to communicate with other nodes.
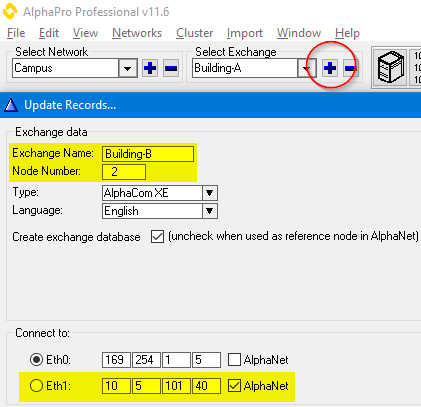
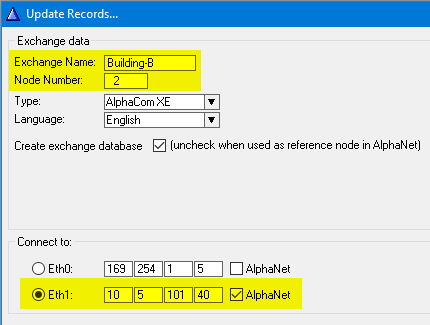
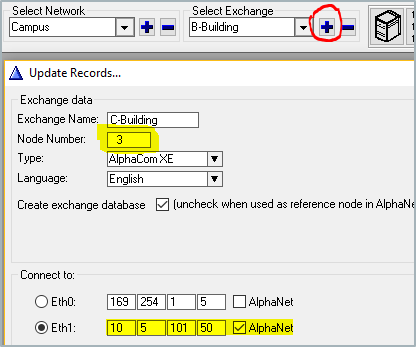
Add more nodes to the database by clicking the + sign as highlighted below. Give the node a descriptive name and select which network interface to be used to communicate with other nodes.
Note: In some cases it is not desired to program all the exchanges in the AlphaNet in the same AlphaPro database.
            In this case you should add the exchange in the network, but uncheck the tick-off for "Create exchange database".
Create AlphaNet routing
Routing must be specified from all nodes to all nodes. For each node:
- Click on the "Exchange & System" icon
- Select "Net Routing"
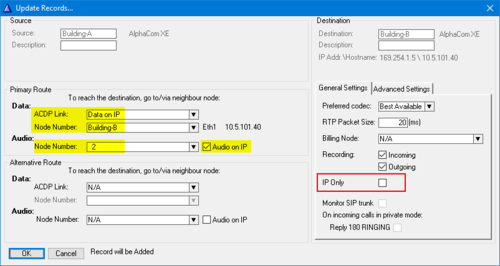
- Press "Insert"
- Select the remote AlphaCom node for the AlphaNet
If the Destination Node is an AlphaCom XE1, enable “IP Only”
Create AlphaNet audio routes
Create VoIP audio channels:
- Select the AlphaCom E exchange
- Click on the "Exchange & System" icon
- Press "Net Audio"
- Press "Insert"
- Select destination node and press "Select"
- Enter the parameters as shown (Image coming soon)
- Enter the parameters as shown
- Confirm by "OK"
Repeat the insert operation for the number of wanted VoIP audio channels.
Note: By selecting dynamic route as destination node, the audio channel can dynamically be used to any VoIP AlphaNet link.
Note: The physical numbers 605 to 635 are logical numbers inside the AlphaCom E, reserved for VoIP AlphaNet and SIP
- Press "Close" to close the AlphaNet Audio Connections window
- Press "Close to close the Exchange Information window
Create circut switched audio channels:
- Select the AlphaCom E exchange
- Click on the "Exchange & System" icon
- Press "Net Audio"
- Press "Insert"
- Select destination node and press "Select"
- Enter the physical numbers in the "Source" and "Destination" exchange as shown (Image coming soon)
- The module, position and line numbers are automatically defined when physical number is entered.
- Confirm by "OK"
- Repeat "Insert" for the number of wanted audio channels
Cluster node programming
Cluster programming is a option to simplify programming and updating of numbers in AlphaNet when operating with integrated number series. To get access to the AlphaNet Visibility menu, the exchange has to be given a Cluster Node Number in the Exchange & System window. Nodes with the same Cluster Node Number (1-255) are members of the same cluster.
- Go to User & Stations or to Directory & Features and type new directory number and name, and set the AlphaNet Visibility to Cluster Global, Cluster Local or Cluster Identical
- Cluster Global
The directory number and name will immediately be copied to the other exchanges in the cluster node as a global number. If the number exists from before in any of the other exchanges, it will be deleted. AlphaNet Visibility will be set to Cluster Automatic in the other exchanges.
Modify
When modifying the number or name of an existing global user, you must do the modification in the exchange were the user is physically connected, i.e. were the visibility is set to Cluster Global. - Deleting:
When deleting a directory number that has visibility Cluster Global or Cluster Automatic, it will automatically be deleted from all cluster nodes. - Cluster Local
The directory number will not be copied to the other exchanges in the cluster node. - Cluster Identical
The directory number and name will be copied to the other exchanges. The feature number will be identical in all exchanges, i.e. the feature will remain local in each exchange, but with the same number and name. AlphaNet Visibility will be set to Cluster Identical in all exchanges.
Update the directory in each exchange
Create directory number for AlphaNet Area Codes:
- Click on the "Directory & Features" icon
- Press "Insert"
- Select Area Code for AlphaNet - 81 from the "Feature" menu
- Enter node number for the exchange owning the area code
- Enter the directory number you want to use as area code
- Select Cluster Identical from the "AlphaNet Visibility" menu
Make AlphaCom stations visible in the AlphaNet cluster
- Click on the "Users & Stations" icon
- Select the station to have global number
- Select Cluster Global from the AlphaNet
- Confirm by "OK"
- Cluster Global can also be set from the "Directory & Feature" menu. All stations can then be set in one operation.
Create directory number for Global Numbers for AlphaNet:
- Click on the "Directory & Features" icon
- Press "Insert"
- Select Global Number for AlphaNet - 83 from the "Feature" menu
- Enter node number for the exchange
- Enter the directory number you want to use as global number
- Confirm by "OK"
Group and conference calls
AlphaNet has full group- and conference call capability. Each AlphaCom E has a built in multi-party conferencing unit, providing local mixing for group and conference calls. This local mixing allows AlphaCom E to only use a single VoIP channel when setting up a group or conference call between exchanges.
VoIP Bandwidth management
AlphaNet provides bandwidth management limiting the VoIP bandwidth to not take more capacity than provisioned. If a high priority call is set up when all VoIP channels are occupied, AlphaCom E will immediately release the call with the lowest priority allowing the high priority call to proceed.
Priority handling of events and resources
All calls and events that are sent between nodes are marked with priority. This allows the system to act upon the priority, presenting and handling the events and calls in the correct order.
Alternative routing
Alternative routing of calls allows call completion even when the primary AlphaNet route is down. As a secondary route AlphaCom E can either use its secondary IP interface or it can put the call over a traditional interface such as an analouge or digital line.
NOTE: Alternative routing in mixed environments (AMC9 and AMC-IP) is not supported!
Backwards compatibility
AlphaCom E provides 100% backwards compatibility between traditional AlphaNet technologies and new VoIP AlphaNet. The backwards compatibility allows mixing of the AlphaCom E nodes working over IP with current nodes so configuration can be maintained Note: AlphaCom E has two RS232 ports which can be used for AlphaNet. If more ports are needed, an Ethernet to use RS232 converter must be used.
All features available over the network
Consistent features and services across the organization regardless of location, providing improved user friendliness. AlphaCom E provides all current AlphaNet features available today with the enhanced features of connection to LAN/WAN.
VoIP, digital and analouge infrastructure support
AlphaNet works over any infrastructure being IP, digital or analogue.

