IP-DECT base 300: Difference between revisions
From Zenitel Wiki
No edit summary |
|||
| (17 intermediate revisions by 2 users not shown) | |||
| Line 1: | Line 1: | ||
This article is quick setup guide describing the minimum requirements to setup the STENTOFON | {{A}} | ||
{{obsolete}} | |||
{{Note| Zenitel (Stentofon) does not provide any DECT product anymore. The information in this article may be outdated!}} | |||
This article is quick setup guide describing the minimum requirements to setup the STENTOFON IP DECT Base 300 to work with the AlphaCom E using the SIP protocol. | |||
[[Image:STENTOFON IP DECT Configuration Example.JPG|thumb|410px|Configuration example]] | [[Image:STENTOFON IP DECT Configuration Example.JPG|thumb|410px|Configuration example]] | ||
==Configuration of AlphaCom XE== | |||
How to configure the AlphaCom XE depends on the software version in the AMC-IP board. | |||
=== AMC 10.56 and newer === | === AMC 10.56 and newer === | ||
[[ | The AlphaCom must be equipped with [[Licenses#SIP_station_license|license for SIP stations]]. | ||
* AlphaPro software 10.56. or newer is required for the configuration | * AlphaPro software 10.56. or newer is required for the configuration | ||
* From the '''Users & Stations''' window in AlphaPro, select a user and enable the 'SIP station' flag | * From the '''Users & Stations''' window in AlphaPro, select a user and enable the 'SIP station' flag | ||
* Configure Directory number and Display text | * Configure Directory number and Display text | ||
* Select a supported codec for the SIP station to use | * Select a supported codec for the SIP station to use | ||
[[Image:SIP phone as station.png|left|thumb|350px|SIP phones are configured in the Users & Stations window]] | |||
<br style="clear:both;" /> | |||
=== AMC 10.55 and earlier === | === AMC 10.55 and earlier === | ||
| Line 17: | Line 25: | ||
==Configuration of STENTOFON IP-DECT== | ==Configuration of STENTOFON IP-DECT== | ||
=== Getting access to the embedded web server=== | === Getting access to the embedded web server=== | ||
Load factory default configuration on the IP-Dect Server by pressing the reset button through the hole at the rear with an unbend paper clip for 10 sec. Observe the front LED; when pressing the reset button the LED becomes steady red for about 5 seconds, it then starts to flash slowly. When releasing the reset button after 10 seconds, the LED starts to flash fast, colored red. It finally turns off (the server is rebooting). | Load factory default configuration on the IP-Dect Server by pressing the reset button through the hole at the rear with an unbend paper clip for 10 sec. Observe the front LED; when pressing the reset button the LED becomes steady red for about 5 seconds, it then starts to flash slowly. When releasing the reset button after 10 seconds, the LED starts to flash fast, colored red. It finally turns off (the server is rebooting). | ||
| Line 31: | Line 36: | ||
The GENERAL STATUS page should now be displayed | The GENERAL STATUS page should now be displayed | ||
[[Image:DECT - General Status.JPG|left|thumb|350px|GENERAL STATUS page - Logged on to IP address 192.168.0.1]] | |||
<br | <br style="clear:both;" /> | ||
===General Configuration=== | ===General Configuration=== | ||
''All changes to fields marked with two stars need a reboot to take effect''<br/> | ''All changes to fields marked with two stars need a reboot to take effect''<br/> | ||
On the General Configuration page you define IP settings for the STENTOFON IP-DECT Base 300. | On the General Configuration page you define IP settings for the STENTOFON IP-DECT Base 300. | ||
| Line 47: | Line 50: | ||
#Click Save. Answer yes on the following control question. | #Click Save. Answer yes on the following control question. | ||
#Click Reboot. You need to change your computers IP address to match your new address in the server in order to enter the configuration again. | #Click Reboot. You need to change your computers IP address to match your new address in the server in order to enter the configuration again. | ||
[[Image:DECT - General Configuration.JPG|left|thumb|350px|General Configuration]] | |||
<br style="clear:both;" /> | <br style="clear:both;" /> | ||
| Line 52: | Line 56: | ||
''All changes to fields marked with two stars need a reboot to take effect''<br/> | ''All changes to fields marked with two stars need a reboot to take effect''<br/> | ||
In the Configuration/SIP page you define the general SIP settings. | In the Configuration/SIP page you define the general SIP settings. | ||
#Click Configuration, and then click SIP. | #Click Configuration, and then click SIP. | ||
| Line 61: | Line 63: | ||
#Click Save to save your SIP configuration data. | #Click Save to save your SIP configuration data. | ||
#Go to the Administration page and click Reboot to make all the changes take effect. | #Go to the Administration page and click Reboot to make all the changes take effect. | ||
[[Image:DECT2.PNG|left|thumb|350px]] | |||
<br style="clear:both;" /> | |||
[[Image:DECT3.PNG|left|thumb|350px|SIP Configuration]] | |||
<br style="clear:both;" /> | <br style="clear:both;" /> | ||
| Line 68: | Line 73: | ||
===Registering IP-DECT Handsets=== | ===Registering IP-DECT Handsets=== | ||
To register handsets you use the web based Administration Page of the STENTOFON IP-DECT Base 300. | To register handsets you use the web based Administration Page of the STENTOFON IP-DECT Base 300. | ||
Each handset in the wireless solution must be programmed with the serial number (IPEI) before it can operate. This serial number must be registered in the web based Administration Page of the IP-DECT Base. Serial numbers are a unique fingerprint of each handset. The serial number is programmed into the handset during the manufacturing process and cannot be changed by field personnel. The serial number can be found on a label beneath the battery or it can be viewed in the handsets display. | Each handset in the wireless solution must be programmed with the serial number (IPEI) before it can operate. This serial number must be registered in the web based Administration Page of the IP-DECT Base. Serial numbers are a unique fingerprint of each handset. The serial number is programmed into the handset during the manufacturing process and cannot be changed by field personnel. The serial number can be found on a label beneath the battery or it can be viewed in the handsets display. | ||
* For Rough and EX handsets: press '''*99984*V''' | * For Rough and EX handsets: press '''*99984*V''' | ||
* For Office handsets: press '''Menu''', '''Status''', '''Firmware version'''. | * For Office handsets: press '''Menu''', '''Status''', '''Firmware version'''. | ||
''The Serial number consists of 12 digits and always starts with '''00077''' | ''The Serial number consists of 12 digits and always starts with '''00077''' | ||
Log in to the IP DECT Base 300 and go to the Users page. | Log in to the IP DECT Base 300 and go to the Users page. | ||
#Click New. | |||
#In the '''IPEI''' field, type the '''IPEI number''' (serial number) of the handset. | |||
#In the '''Username/Extension''' field, type the Directory number configured in the AlphaCom. | |||
#In the '''Domain''' field, type the Domain used in your system, for example '''Stentofon.com''' | |||
#In the '''Displayname field''', type the name to be displayed (caller ID) (optional). | |||
#Click Save to save the registration(s). | |||
Leave the rest to default settings. <br/> | Leave the rest to default settings. | ||
[[Image:DECT - User Registration.JPG|left|thumb|350px|Registering Users]] | |||
<br style="clear:both;" /> | |||
====Subscribing Rough & EX Handsets==== | ====Subscribing Rough & EX Handsets==== | ||
| Line 94: | Line 98: | ||
==Related articles== | ==Related articles== | ||
* [[IP DECT Base Repeater Wall]] | * [[IP DECT Base Repeater Wall]] | ||
[[Category: | [[Category:Discontinued Accessories]] | ||
Latest revision as of 15:01, 8 November 2021

|
Zenitel (Stentofon) does not provide any DECT product anymore. The information in this article may be outdated! |
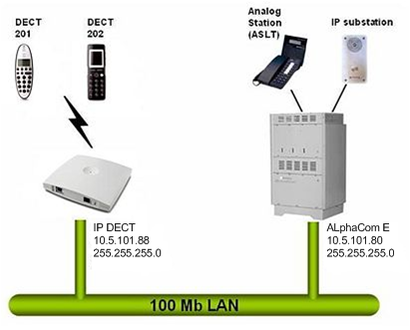
This article is quick setup guide describing the minimum requirements to setup the STENTOFON IP DECT Base 300 to work with the AlphaCom E using the SIP protocol.
Configuration of AlphaCom XE
How to configure the AlphaCom XE depends on the software version in the AMC-IP board.
AMC 10.56 and newer
The AlphaCom must be equipped with license for SIP stations.
- AlphaPro software 10.56. or newer is required for the configuration
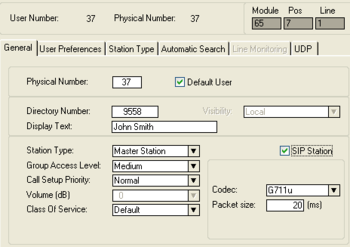
- From the Users & Stations window in AlphaPro, select a user and enable the 'SIP station' flag
- Configure Directory number and Display text
- Select a supported codec for the SIP station to use
AMC 10.55 and earlier
The AlphaCom E needs to be configured with a SIP registrar node, and must be equipped with license for SIP stations.
Configuration of STENTOFON IP-DECT
Getting access to the embedded web server
Load factory default configuration on the IP-Dect Server by pressing the reset button through the hole at the rear with an unbend paper clip for 10 sec. Observe the front LED; when pressing the reset button the LED becomes steady red for about 5 seconds, it then starts to flash slowly. When releasing the reset button after 10 seconds, the LED starts to flash fast, colored red. It finally turns off (the server is rebooting).
Before the PC can access the IP Dect Server, the IP address of the PC must be changed to match the same subnet (for example 192.168.0.2). To access the embedded web server of the IP-Dect Server, start your internet browser (e.g. Internet Explorer) and in the address field enter 192.168.0.1. You will be prompted for a username and password.
Default (case senstive):
- Username: admin
- Password: kws300
The GENERAL STATUS page should now be displayed
General Configuration
All changes to fields marked with two stars need a reboot to take effect
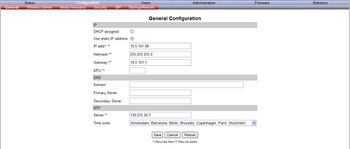
On the General Configuration page you define IP settings for the STENTOFON IP-DECT Base 300.
- Click Configuration.
- In the IP Addr field, type in the IP address of the IP-DECT Base 300.
- In the Netmask field, type in the network mask.
- In the Gateway field, type in the IP address of the default gateway (optional).
- Leave the rest to default settings.
- Click Save. Answer yes on the following control question.
- Click Reboot. You need to change your computers IP address to match your new address in the server in order to enter the configuration again.
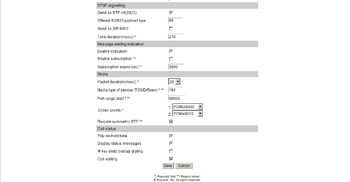
IP-DECT Base 300 SIP Configuration
All changes to fields marked with two stars need a reboot to take effect
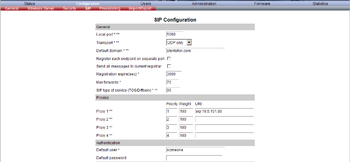
In the Configuration/SIP page you define the general SIP settings.
- Click Configuration, and then click SIP.
- In the Default Domain field, type the name of the domain. For example Stentofon.com.
- In the Proxy field, type in the IP address of your AlphaCom.
- Leave the rest to default settings.
- Click Save to save your SIP configuration data.
- Go to the Administration page and click Reboot to make all the changes take effect.
Handset Registration and Subscription
This section provides information about handset registration and subscription. You must register and subscribe a handset before you can use it. When registering handsets you enter information about the handset settings (such as; the handset serial number (IPEI), name etc.) in the system database. When subscribing handsets you subscribe a registered handset to the system for usage. If the handset is not registered in the system database, subscription of the handset is not possible.
Registering IP-DECT Handsets
To register handsets you use the web based Administration Page of the STENTOFON IP-DECT Base 300. Each handset in the wireless solution must be programmed with the serial number (IPEI) before it can operate. This serial number must be registered in the web based Administration Page of the IP-DECT Base. Serial numbers are a unique fingerprint of each handset. The serial number is programmed into the handset during the manufacturing process and cannot be changed by field personnel. The serial number can be found on a label beneath the battery or it can be viewed in the handsets display.
- For Rough and EX handsets: press *99984*V
- For Office handsets: press Menu, Status, Firmware version.
The Serial number consists of 12 digits and always starts with 00077
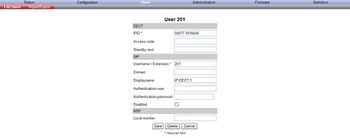
Log in to the IP DECT Base 300 and go to the Users page.
- Click New.
- In the IPEI field, type the IPEI number (serial number) of the handset.
- In the Username/Extension field, type the Directory number configured in the AlphaCom.
- In the Domain field, type the Domain used in your system, for example Stentofon.com
- In the Displayname field, type the name to be displayed (caller ID) (optional).
- Click Save to save the registration(s).
Leave the rest to default settings.
Subscribing Rough & EX Handsets
See Configuration_guide_for_STENTOFON_IP-DECT#Subscribing_Rough_and_EX_Handsets
Subscribing Office Handsets
See Configuration_guide_for_STENTOFON_IP-DECT#Subscribing_Office_Handsets


