Door Opening - Configuration example: Difference between revisions
From Zenitel Wiki
No edit summary |
|||
| (9 intermediate revisions by one other user not shown) | |||
| Line 14: | Line 14: | ||
As an option, it is also possible to play a prerecorded message at the door, saying e.g. "''The door is open, please enter''". | As an option, it is also possible to play a prerecorded message at the door, saying e.g. "''The door is open, please enter''". | ||
<div style="float:right;"> <youtube width="300" height="180">omKysK2PTDA=3s</youtube> </div> | |||
==Map the relay to a Logical RCO== | ==Map the relay to a Logical RCO== | ||
All Zenitel IP stations have an inbuilt relay. The relay must be mapped to a "Logical RCO" in the ICX-AlphaCom server. The mapping is done from AlphaPro, [[Exchange_%26_System_%28AlphaPro%29#RCO|Exchange & System > RCO]]. Here the logical RCO is assigned to a physical address. The physical address is given as '''Station ID''' + '''Pin Number'''. | All Zenitel IP stations have an inbuilt relay. The relay must be mapped to a "Logical RCO" in the ICX-AlphaCom server. The mapping is done from AlphaPro, [[Exchange_%26_System_%28AlphaPro%29#RCO|Exchange & System > RCO]]. Here the logical RCO is assigned to a physical address. The physical address is given as '''Station ID''' + '''Pin Number'''. | ||
Open [[Exchange_%26_System_%28AlphaPro%29#RCO|Exchange & System > RCO]], and select a free RCO from the list to the left and click the '''Change''' button | Open [[Exchange_%26_System_%28AlphaPro%29#RCO|Exchange & System > RCO]], and select a free RCO from the list to the left and click the '''Change''' button. | ||
Change the following parameters: | Change the following parameters: | ||
| Line 37: | Line 37: | ||
<table style="max-width:80%; border-style: double; border-color: #c7c7c7;"> | <table style="max-width:80%; border-style: double; border-color: #c7c7c7;"> | ||
<tr style="rowspan:2;"> | <tr style="rowspan:2;"> | ||
<td style="display: block; vertical-align: bottom;">[[Image: | <td style="display: block; vertical-align: bottom;">[[Image:RCO mapping.PNG|700px]]</td> | ||
</tr> | </tr> | ||
<tr> | <tr> | ||
<td style='background-color:#efefef;'>Mapping logical RCO 6 to the relay of station | <td style='background-color:#efefef;'>Mapping logical RCO 6 to the relay of station 11 (106 - Entrance)</td> | ||
</tr> | </tr> | ||
</table> | </table> | ||
What '''Pin Number''' to use depends on the station type: | What '''Pin Number''' to use depends on the station type: | ||
* [[:Category:Stations#Turbine_stations|Zenitel IP Stations (Turbine generation)]]: | * [[:Category:Stations#Turbine_stations|Zenitel IP Stations (Turbine generation)]]: Pin Number = 7 refers to the relay. Pin 1-6 refers to the six I/Os of the Zenitel Device. | ||
* [[:Category:Stations | * [[:Category:INCA Stations|INCA Stations (the previous generation Zenitel IP stations)]]: Use Pin Number = 1 | ||
For an overview of which devices are supporting RCOs and what pin numbers they use, see [[RCO_-_Remote_Control_Output#Devices_supporting_RCOs|Devices_supporting_RCOs]] | For an overview of which devices are supporting RCOs and what pin numbers they use, see [[RCO_-_Remote_Control_Output#Devices_supporting_RCOs|Devices_supporting_RCOs]] | ||
| Line 137: | Line 137: | ||
</table> | </table> | ||
{{code2| | |||
RCO 6 | RCO 6 | ||
$GRM L%1.dir L890 %chg(1,0) | $GRM L%1.dir L890 %chg(1,0) | ||
| Line 143: | Line 143: | ||
$GM L890 L8193 U1 U0 U0 | $GM L890 L8193 U1 U0 U0 | ||
ENDIF | ENDIF | ||
}} | |||
| Line 157: | Line 158: | ||
If you want to combine Auto-termination of Call, and playback of audio message, insert the following Action Command: | If you want to combine Auto-termination of Call, and playback of audio message, insert the following Action Command: | ||
{{code2| | |||
RCO 6 | RCO 6 | ||
$GRM L%1.dir L890 %chg(1,0) | $GRM L%1.dir L890 %chg(1,0) | ||
| Line 165: | Line 167: | ||
$C L%1.dir | $C L%1.dir | ||
ENDIF | ENDIF | ||
}} | |||
[[Category: How to]] | [[Category: How to]] | ||
[[Category:AlphaCom Applications]] | |||
[[Category:ICX-AlphaCom Applications]] | |||
[[Category:Applications using Event Handler]] | |||
Latest revision as of 10:16, 24 October 2023
 |
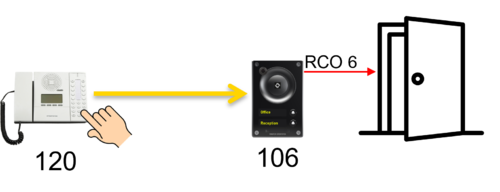
| Operator 120 in conversation with Door 106, pressing digit "6" to open the door |
This article explains how to configure the Door Opening feature.
Door opening is a standard feature in the ICX-AlphaCom and AlphaCom XE. When an operator is in a conversation with a door station, the operator can press digit 6 to activate a relay. The relay will be pulsed for 3.5 seconds (configurable).
As an option, it is also possible to play a prerecorded message at the door, saying e.g. "The door is open, please enter".
Map the relay to a Logical RCO
All Zenitel IP stations have an inbuilt relay. The relay must be mapped to a "Logical RCO" in the ICX-AlphaCom server. The mapping is done from AlphaPro, Exchange & System > RCO. Here the logical RCO is assigned to a physical address. The physical address is given as Station ID + Pin Number.
Open Exchange & System > RCO, and select a free RCO from the list to the left and click the Change button.
Change the following parameters:
- Description: Any text
- RCO Type = Station
- Station physical number: The physical number of the door station (Not the directory number)
- Pin number: The output number related to the relay, normally "7" (see below)
 |
| Mapping logical RCO 6 to the relay of station 11 (106 - Entrance) |
What Pin Number to use depends on the station type:
- Zenitel IP Stations (Turbine generation): Pin Number = 7 refers to the relay. Pin 1-6 refers to the six I/Os of the Zenitel Device.
- INCA Stations (the previous generation Zenitel IP stations): Use Pin Number = 1
For an overview of which devices are supporting RCOs and what pin numbers they use, see Devices_supporting_RCOs
Creating Event for Door Opening
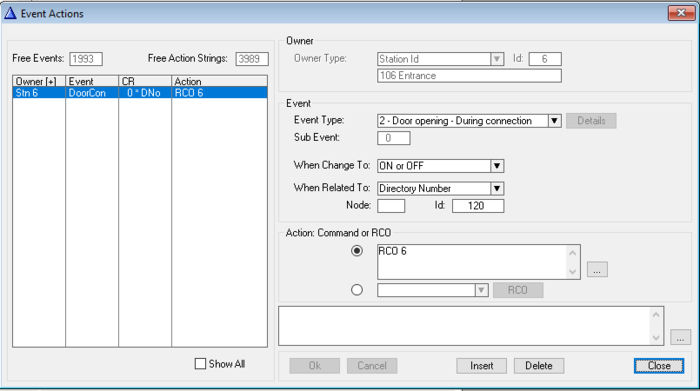
In AlphaPro, open Users & Stations, and select the door station from the list to the left. Then select the button Events. Insert a new event with the following properties:
 |
| Door Opening event |
The When Related To field specifies who should be allowed to trigger the Door Opening feature. There are three options:
- Any station: Set "When Related To" = All (default)
- A specific station: Set "When Related To" = Directory Number, and in the "Id" field enter the directory number of the station that should be allowed to open the door (station 120 in the screenshot above)
- A group of stations: Set "When Related To" = Stations w. UDP, and in the "Id" field enter the ID of the UDP group (1-8). See UDP group on how to include stations in a UDP group
In the example above RCO 6 will be pulsed for 3.5 sec when the Door Opening feature (digit 6) is pressed on station number 120. The RCO Pulse Time can be change in the Exchange & System > System > Timers tab.
Upload the database using the Send All button.
Optional configuration
Automatic termination of the call after activation of door opening
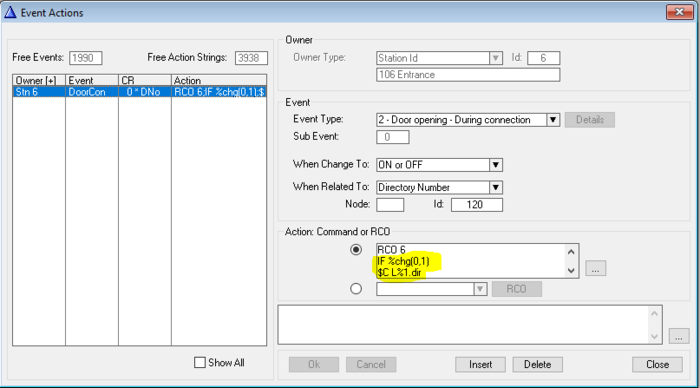
The system can be configured to terminate the call automatically after the door opening feature has been activated, eliminating the need for the operator to press the C-key to end the call. Three lines must be added to the Action Command:
 |
| Event for auto-termination of call |
The Action commands are (one can copy/paste from below):
Action commands:
RCO 6
IF %chg(0,1)
$C L%1.dir
ENDIF
Playing a prerecorded message at the door

|
This feature requires an Audio Messaging license |
 |
| Playing an audio message at the door |
A prerecorded audio message can be played at the door when the operator activates the door lock, saying e.g. "The door is open, please enter".
A wav file must be uploaded to the ICX-AlphaCom server. Sample wav files can be found in the Audio files section on download page.
 |
| Uploading the wav file as Announcement Message (Message group 30) number 3 (Group index 3) |
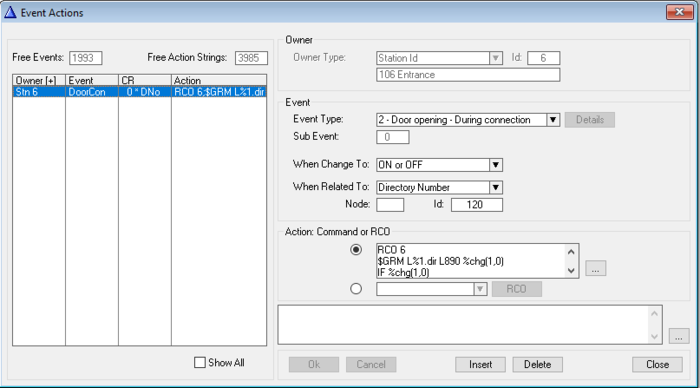
The action commands in the Door Opening event created in the previous section needs to be modified. In the example below station group 890 is used for dispatching the message. If this group is already in use, the below event must be modified to use a different group.
 |
| Door Opening event playing message 3 (8193) to group 890 |
Action commands:
RCO 6
$GRM L%1.dir L890 %chg(1,0)
IF %chg(1,0)
$GM L890 L8193 U1 U0 U0
ENDIF
Explanation:
- When the Door Opening event goes ON:
- Turn on RCO 6
- Include ($GRM) the door station in station group 890
- Play message 8193 to group 890
- When the Door Opening event goes OFF 3.5 sec later:
- Turn off RCO 6
- Exclude ($GRM) the door station from station group 890
If you want to combine Auto-termination of Call, and playback of audio message, insert the following Action Command:
Action commands:
RCO 6
$GRM L%1.dir L890 %chg(1,0)
IF %chg(1,0)
$GM L890 L8193 U1 U0 U0
ENDIF
IF %chg(0,1)
$C L%1.dir
ENDIF

