ENA2100 - One Channel Mode: Difference between revisions
From Zenitel Wiki
No edit summary |
No edit summary |
||
| (8 intermediate revisions by 2 users not shown) | |||
| Line 1: | Line 1: | ||
{{ | {{AIS}} | ||
The [[ENA2100-AC Amplifier]] supports '''One Channel Mode'''. | The [[ENA2100-AC Amplifier]] supports '''One Channel Mode'''. | ||
When "One Channel mode" is activated, the two loudspeaker channels will play identical audio, and the audio will be in phase. One can then choose to use two separate loudspeaker loops, each with maximum 100W, or one can bridge the two output channels, and use one loudspeaker loop with up to 200W load. | When "One Channel mode" is activated, the two loudspeaker channels will play identical audio, and the audio will be in phase. One can then choose to use two separate loudspeaker loops, each with maximum 100W, or one can bridge the two output channels, and use one loudspeaker loop with up to 200W load. | ||
When One Channel mode is used, you need [[Licenses#Exigo_.28ENA.29_Amplifier_license|amplifier license]] for one channel only. | |||
== Configuration == | |||
[[Logging into an IP Station|Log in to the ENA Amplifier]]. Select '''Amplifier Settings''' > '''Line Control''', and enable '''One Channel Mode''': | |||
[[File:ENA OneChannelMode.png|thumb|left|500px|Enabling One Channel Mode]] | [[File:ENA OneChannelMode.png|thumb|left|500px|Enabling One Channel Mode]] | ||
<br style="clear:both;" /> | <br style="clear:both;" /> | ||
== Status LED == | |||
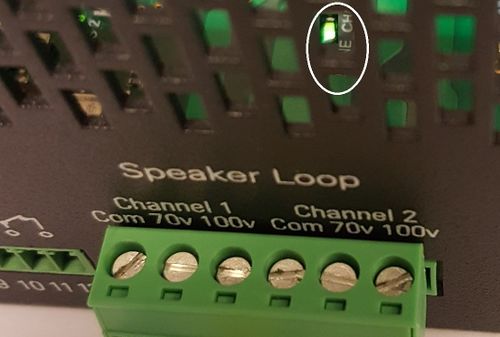
There is a green LED inside the Amplifier, right behind the loudspeaker connector, which will turn ON when "One Channel mode" is active. The LED can be seen through the rear grille. | |||
[[File:OneChannel light through grille 2.jpg|thumb|left|500px|The OneChannel LED can be seen through the grille]] | |||
<br style="clear:both;" /> | |||
It is recommended to check that the "OneChannel-LED" is turned ON before bridging the two channels. | |||
== Wiring == | == Wiring == | ||
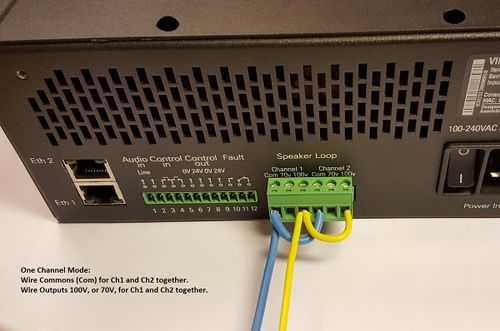
The bridging | The bridging the two loudspeaker channels into one must be done by the installer, by shorting wires on the rear connector, or at external terminal blocks. | ||
In case of 100V line: | In case of 100V line: | ||
| Line 20: | Line 33: | ||
[[File:OneChannel Wire outputs .jpg|thumb|left|500px|One Channel Mode - Connecting channel 1 and channel 2 in parallel]] | [[File:OneChannel Wire outputs .jpg|thumb|left|500px|One Channel Mode - Connecting channel 1 and channel 2 in parallel]] | ||
<br style="clear:both;" /> | <br style="clear:both;" /> | ||
Latest revision as of 13:15, 13 June 2024
The ENA2100-AC Amplifier supports One Channel Mode.
When "One Channel mode" is activated, the two loudspeaker channels will play identical audio, and the audio will be in phase. One can then choose to use two separate loudspeaker loops, each with maximum 100W, or one can bridge the two output channels, and use one loudspeaker loop with up to 200W load.
When One Channel mode is used, you need amplifier license for one channel only.
Configuration
Log in to the ENA Amplifier. Select Amplifier Settings > Line Control, and enable One Channel Mode:
Status LED
There is a green LED inside the Amplifier, right behind the loudspeaker connector, which will turn ON when "One Channel mode" is active. The LED can be seen through the rear grille.
It is recommended to check that the "OneChannel-LED" is turned ON before bridging the two channels.
Wiring
The bridging the two loudspeaker channels into one must be done by the installer, by shorting wires on the rear connector, or at external terminal blocks.
In case of 100V line:
- Short "Com"-terminal for Ch1 to "Com"-terminal for Ch2.
- Short "100V"-terminal for Ch1 to "100V"-terminal for Ch2.
In case of 70V line:
- Short "Com"-terminal for Ch1 to "Com"-terminal for Ch2.
- Short "70V"-terminal for Ch1 to "70V"-terminal for Ch2.


