Logging into an Zenitel IP Device
From Zenitel Wiki
(Redirected from Logging into an IP Station)Access the web interface of a Zenitel IP device with a standard web browser:
 |
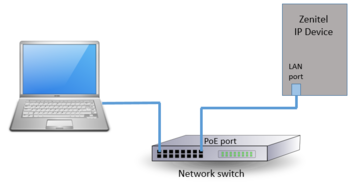
| Connect the laptop and the IP device to a network switch, and open a web browser |
- Open a web browser
- In the browser’s address bar, type the IP address of the device
- - The login page will be displayed.
 |
| The login page |
To log into the device:
- Click on one of the login options
- Enter the User Name. Default is admin
- Enter the Password. Default is alphaadmin
The Station Information page will now be displayed, showing the IP configuration and status.
Default IP addresses
- The Zenitel stations and devices are set to obtain IP address automatically from the network (DHCP). If no DHCP server present, it will get a random 169.254.x.x address The station will speak its own IP address when pressing the Call button, a Digit key a DAK key or activate an Input of the station.
- The previous generation of Zenitel IP stations (known as INCA) has default IP address 169.254.1.100.
How to set a static IP Address on your Windows 10 computer
In order to access the web interface of the station, your computer must be in the same subnet range as the device.
- Click Start, and type Control in the search field, then select Control Panel.
- Click on Network and Internet.
- Click on Network and Sharing Center.
- On the left pane, click the Change adapter settings link.
- Right-click the network adapter and select Properties.
- Select the Internet Protocol Version 4 (TCP/IPv4) option.
- Click the Properties button.
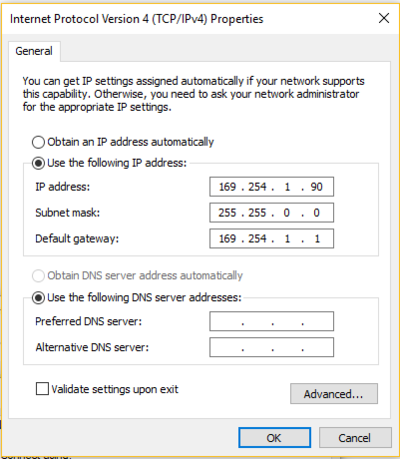
- Select the Use the following IP address option.
- Set the IP address (e.g., 169.254.1.90).
- Set the Subnet mask. (e.g., 255.255.0.0).
- Set the Default gateway. This address is typically your router’s IP address (e.g., 169.254.1.1).
- Click OK.
- Click Close again to close the network adapter properties.
 |
| Setting a Static IP Address on the laptop |
Once you’ve completed the steps, you can open your web browser and try logging into the device.

