Ascom IP-DECT: Difference between revisions
From Zenitel Wiki
(New page: Test report Ascom IP-Dect Category:SIP) |
No edit summary |
||
| (85 intermediate revisions by 2 users not shown) | |||
| Line 1: | Line 1: | ||
{{A}} | |||
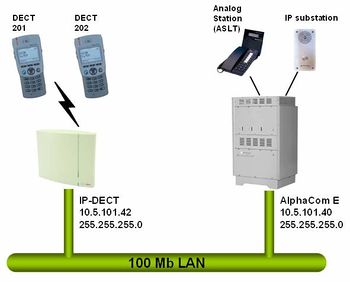
This article describes how to setup an Ascom IP-DECT Base Station (IPBS1) to work with the AlphaCom E using the SIP protocol. | |||
[[Image:Ascom configuration example.jpg|thumb|350px|left|Configuration example]] | |||
<br style="clear:both;" /> | |||
=== Configuration of AlphaCom E === | |||
The AlphaCom E needs to be configured with a [[SIP registrar node - configuration|SIP registrar node]], and must be equipped with [[Licenses#SIP_station_license|license for SIP stations]]. | |||
[[ | === Configuration of Ascom IP-DECT === | ||
==== Getting access to the embedded web server ==== | |||
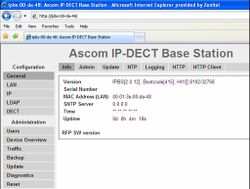
[[Image:Ascom log on.jpg|thumb|250px|left|INFO page - Logged on to MAC address 00-da-48]] | |||
Load factory default configuration on the IP-Dect unit by pressing the reset button through the hole at the rear with an unbend paper clip for 10 sec. | |||
[[Category:SIP]] | The Ethernet port is by default set to obtain an IP address automatically (DHCP) if connected to a LAN network with DHCP server. To access the embedded web server of the IP-Dect unit, start your internet browser (e.g. Internet Explorer) and in the address field enter '''ipbs-xx-xx-xx''', where xx-xx-xx is the last six digits of the MAC address printed at the rear of the IP-Dect unit. The INFO page should now be displayed: | ||
If the IP Dect unit doesn't receive an IP address from the network (no DHCP service), it will get the IP address '''192.168.0.1''', subnet mask '''255.255.0.0'''. Before the PC can access the IP Dect unit, the IP address of the PC must be changed to match the same subnet (192.168.x.x). Now the unit can be accessed by typing 192.168.0.1 in the address field of the internet browser, and the INFO page will be displayed. | |||
When selecting any other web page you will be prompted for username and password. The defaults are: | |||
:Username: admin | |||
:Password: changeme | |||
==== Enter IP-address ==== | |||
The IP Dect unit should be using static IP address. Disable the DHCP in '''LAN''' > '''DHCP''', set ''Mode = Off''. <br> | |||
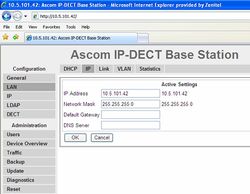
In '''LAN''' > '''IP''' enter the ''IP Address'' and ''Network Mask'' of the unit. | |||
[[Image:Ascom set IP address.jpg|thumb|250px|left|Setting the IP address]] | |||
<br style="clear:both;" /> | |||
==== DECT Base configuration ==== | |||
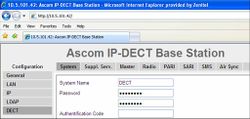
*In '''DECT''' > '''System''' enter a ''System Name'' (any) and a ''Password'' (any). Verify the password on the next line. | |||
[[Image:Ascom Base setup.jpg|thumb|250px|left|Setup of Dect base]] | |||
<br style="clear:both;" /> | |||
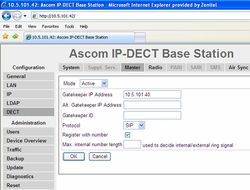
*In '''DECT''' > '''Master''' enter the following information: | |||
: ''Mode'': Active | |||
: ''Gatekeeper IP Address'': The IP address of the AlphaCom E | |||
: ''Protocol'': SIP | |||
: ''Register with number'': Enabled | |||
:Save (OK) and reset the device. | |||
[[Image:Ascom Master base.jpg|thumb|250px|left|Configure DECT Master base]] | |||
<br style="clear:both;" /> | |||
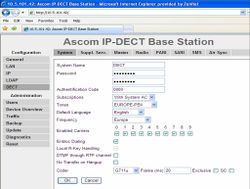
*In '''DECT''' > '''System''' enter the following information: | |||
: ''Authentication code'': 0000 (any) | |||
: ''Enbloc Dialing'': Enabled | |||
: ''Coder'': G711u | |||
: ''Frame (ms)'': 20 | |||
[[Image:Ascom Base setup2.jpg|thumb|250px|left|DECT -> System menu]] | |||
<br style="clear:both;" /> | |||
*In '''DECT''' > '''SARI''' enter the SARI certificate provided by your IP DECT dealer. | |||
*In '''DECT''' > '''Air Sync''' set ''Sync Mode'' = Master. Leave the remaining fields blank. | |||
==== DECT Handset configuration ==== | |||
Add users from the web interface. | |||
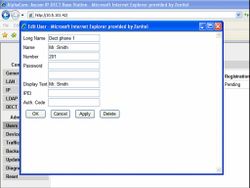
*In '''Users''' > '''New''' enter information about the DECT handsets: | |||
[[Image:Ascom new user.jpg|thumb|250px|left|Add a new user]] | |||
<br style="clear:both;" /> | |||
*To view all DECT handsets entered in the unit, select '''Users''' > '''Show'''.<br> | |||
[[Image:Ascom all users.jpg|thumb|250px|left|Show all users]] | |||
<br style="clear:both;" /> | |||
Configuration on the DECT handset it self: | |||
*In the phone menu go to Settings, System, Register, New | |||
*Enter name of system (any text) + OK + OK + OK | |||
*Enter AC (authentication code). Same as DECT System authentication code entered in the web interface (0000 in this example). | |||
*The phone should respond with ''Registration OK'' | |||
*Dial the number you want to assign to the handset + Off-Hook button. Response: Busy tone | |||
*Go On-Hook, and the display text should appear in the display | |||
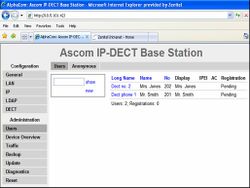
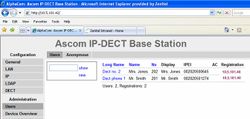
Go to '''Users''' > '''Show''' to verify the registration. | |||
:The ''Registration'' field has the following meaning: | |||
::Pending: The handset is not registered to the DECT base unit | |||
::Subscribed: The handset is registered to the DECT base unit, but not to the AlphaCom E | |||
::AlphaCom E IP Address: The handset is registered, both to the DECT base unit and the AlphaCom E | |||
[[Image:Ascom registration.jpg|thumb|250px|left|Successful registration]] | |||
<br style="clear:both;" /> | |||
=== Related articles === | |||
*[[Test report Ascom IP-Dect]] | |||
[[Category:IP DECT]] | |||
[[Category:AlphaCom - SIP Integration]] | |||
Latest revision as of 22:50, 10 February 2017
This article describes how to setup an Ascom IP-DECT Base Station (IPBS1) to work with the AlphaCom E using the SIP protocol.
Configuration of AlphaCom E
The AlphaCom E needs to be configured with a SIP registrar node, and must be equipped with license for SIP stations.
Configuration of Ascom IP-DECT
Getting access to the embedded web server
Load factory default configuration on the IP-Dect unit by pressing the reset button through the hole at the rear with an unbend paper clip for 10 sec.
The Ethernet port is by default set to obtain an IP address automatically (DHCP) if connected to a LAN network with DHCP server. To access the embedded web server of the IP-Dect unit, start your internet browser (e.g. Internet Explorer) and in the address field enter ipbs-xx-xx-xx, where xx-xx-xx is the last six digits of the MAC address printed at the rear of the IP-Dect unit. The INFO page should now be displayed:
If the IP Dect unit doesn't receive an IP address from the network (no DHCP service), it will get the IP address 192.168.0.1, subnet mask 255.255.0.0. Before the PC can access the IP Dect unit, the IP address of the PC must be changed to match the same subnet (192.168.x.x). Now the unit can be accessed by typing 192.168.0.1 in the address field of the internet browser, and the INFO page will be displayed.
When selecting any other web page you will be prompted for username and password. The defaults are:
- Username: admin
- Password: changeme
Enter IP-address
The IP Dect unit should be using static IP address. Disable the DHCP in LAN > DHCP, set Mode = Off.
In LAN > IP enter the IP Address and Network Mask of the unit.
DECT Base configuration
- In DECT > System enter a System Name (any) and a Password (any). Verify the password on the next line.
- In DECT > Master enter the following information:
- Mode: Active
- Gatekeeper IP Address: The IP address of the AlphaCom E
- Protocol: SIP
- Register with number: Enabled
- Save (OK) and reset the device.
- In DECT > System enter the following information:
- Authentication code: 0000 (any)
- Enbloc Dialing: Enabled
- Coder: G711u
- Frame (ms): 20
- In DECT > SARI enter the SARI certificate provided by your IP DECT dealer.
- In DECT > Air Sync set Sync Mode = Master. Leave the remaining fields blank.
DECT Handset configuration
Add users from the web interface.
- In Users > New enter information about the DECT handsets:
- To view all DECT handsets entered in the unit, select Users > Show.
Configuration on the DECT handset it self:
- In the phone menu go to Settings, System, Register, New
- Enter name of system (any text) + OK + OK + OK
- Enter AC (authentication code). Same as DECT System authentication code entered in the web interface (0000 in this example).
- The phone should respond with Registration OK
- Dial the number you want to assign to the handset + Off-Hook button. Response: Busy tone
- Go On-Hook, and the display text should appear in the display
Go to Users > Show to verify the registration.
- The Registration field has the following meaning:
- Pending: The handset is not registered to the DECT base unit
- Subscribed: The handset is registered to the DECT base unit, but not to the AlphaCom E
- AlphaCom E IP Address: The handset is registered, both to the DECT base unit and the AlphaCom E

