Difference between revisions of "GSM gateway (Mobile VoIP)"
From Zenitel Wiki
(→Configuration of the MV-370) |
(→Related articles) |
||
| (92 intermediate revisions by 5 users not shown) | |||
| Line 1: | Line 1: | ||
| − | [[Image:2200003000 RS.jpg|thumb| | + | {{AI}} |
| + | [[Image:2200003000 RS.jpg|thumb|600px|GSM Gateway MV-370]] | ||
| − | + | Alternative solution: [[IP Telephony Service (ICX-AlphaCom)]] | |
| − | |||
| − | + | __TOC__ | |
| + | |||
| + | This article describes the setup of the GSM gateway MV-370 (Mobile VoIP) for communication with the ICX system or the AlphaCom. | ||
| + | |||
| + | The GSM Gateway must be equipped with a SIM card and registered to the GSM network as a regular mobile phone subscriber. Via the gateway calls can be made from the ICX or AlphaCom to the GSM network, as well as from the GSM network in to the ICX/AlphaCom. | ||
| + | |||
| + | [[Image:MV370 ICX.png|thumb|left|500px|GSM Gateway]] | ||
| + | <br style="clear:both;" /> | ||
| − | + | It is also possible to [[Send SMS messages from ICX-AlphaCom|send SMS messages from the ICX/AlphaCom]] via the GSM gateway. | |
| − | [[ | + | |
| + | ==Licenses== | ||
| + | |||
| + | *'''AlphaCom''': [[Licenses#SIP_trunk_license|License for SIP Trunk, 100 9642 001]]. One license for each connected gateway. | ||
| + | *'''ICX''': [[Licenses for ICX-500 and ICX-AlphaCom Core|ILI-SIP2 SIP Trunking, 2 lines, 1002602101]]. One license can serve two gateways. | ||
| + | |||
| + | ==GSM Gateway Configuration== | ||
| + | '''Important:''' If you have a SIM card with PIN code activated, '''DO NOT''' insert the SIM card yet. | ||
| + | |||
| + | |||
| + | ===Load Factory Default values=== | ||
| + | The GSM Gateway comes with default network parameters (factory default parameters). The default IP address is '''192.168.0.100'''. | ||
| + | |||
| + | You can load factory network parameters and reset the username and password to its default settings (username: '''voip''', password: '''1234''') by following these steps: | ||
| + | |||
| + | #Press and hold the button SW1 located at the bottom of the unit (you have to remove the lid) for about 7-8 seconds | ||
| + | #Wait for the "Mobile" and "LAN" leds to start blinking | ||
| + | |||
| + | [[File:GSM FactoryDef.PNG|left|500px|thumb|Set default IP Address: Press SW1 for 7-8 seconds]] | ||
| + | <br style="clear:both;" /> | ||
| + | |||
| + | |||
| + | *The GSM Gateway will now get the IP address '''192.168.0.100''', subnet mask 255.255.255.0. | ||
| + | |||
| + | ===Accessing the gateway=== | ||
| + | |||
| + | *Change the IP address of your '''PC to 192.168.0.99''', subnet mask 255.255.255.0. | ||
| + | *Connect the LAN port of the PC to the Ethernet port of the GSM Gateway. | ||
| + | *Start your Web Browser and type 192.168.0.100 in the URL field. | ||
| + | *Type in username '''voip''' and password '''1234'''. (Case-sensitive!) | ||
| + | |||
| + | [[File:GSM accessing.PNG|left|500px|thumb|Accessing the gateway]] | ||
<br style="clear:both;" /> | <br style="clear:both;" /> | ||
| − | |||
| − | |||
| − | * | + | *The Home page of the Web Interface will appear: |
| − | |||
| − | + | [[File:GSM Home.PNG|thumb|left|500px|Homepage of the GSM Gateway]] | |
| − | [[ | ||
<br style="clear:both;" /> | <br style="clear:both;" /> | ||
| + | |||
| + | ===Network settings=== | ||
Change the network settings according to the network environment. Select '''Network > WAN Settings''': | Change the network settings according to the network environment. Select '''Network > WAN Settings''': | ||
| + | |||
:*'''IP Type''' = Enable ''Fixed IP'' | :*'''IP Type''' = Enable ''Fixed IP'' | ||
:*'''IP''' = IP address of the Mobile VoIP unit | :*'''IP''' = IP address of the Mobile VoIP unit | ||
| Line 25: | Line 62: | ||
:*'''Gateway''' = IP address of the network gateway <br style="clear:both;" /> | :*'''Gateway''' = IP address of the network gateway <br style="clear:both;" /> | ||
| − | == SIP | + | [[Image:MV-370-WAN.PNG|left|thumb|500px|Network Settings]] |
| − | [[Image:MV-370- | + | <br style="clear:both;" /> |
| + | |||
| + | |||
| + | ===Mobile settings=== | ||
| + | Go to '''Mobile''' > '''Settings''' and define the following parameters: | ||
| + | |||
| + | *'''SIP From''' = User/Tel (Not Reg) | ||
| + | *'''Mobile PIN Code''' = ON. Code: Enter the PIN code for the SIM card. Confirmed: Enter the PIN code again. | ||
| + | |||
| + | [[Image:MV-370-MobileSettings.PNG|left|thumb|500px|Mobile settings]] | ||
| + | <br style="clear:both;" /> | ||
| + | |||
| + | |||
| + | |||
| + | The SIM card can now be inserted. The gateway uses Standard (Mini) SIM card (15x25mm). | ||
| + | [[File:GSM SIM Placement.PNG|thumb|left|300px|SIM card placement]] | ||
| + | <br style="clear:both;" /> | ||
| + | |||
| + | After the SIM card is inserted, you can check that the gateway is successfully registered to the GSM network in '''Mobile''' > '''Status'''. | ||
| + | |||
| + | Some parameters to look for are: | ||
| + | |||
| + | *'''Operator''' = The telecom provider | ||
| + | *'''Signal Quality''' = Shows the signal strength. The signal should be in the range of 10 - 31. | ||
| + | |||
| + | [[File:GSM Registered.PNG|thumb|left|500px|Gateway successfully registered to the GSM network]] | ||
<br style="clear:both;" /> | <br style="clear:both;" /> | ||
| + | |||
| + | If these parameters does not show, your gateway is not registered to the GSM network. Check that SIM card is properly inserted, and that the PIN code is correctly entered. | ||
| + | |||
| + | '''TIP''': Try the SIM card in a regular mobile phone. | ||
| + | |||
| + | ===SIP settings=== | ||
In the menu '''SIP Settings > Service Domain''', enter information for "Realm 1": | In the menu '''SIP Settings > Service Domain''', enter information for "Realm 1": | ||
| + | |||
:*'''Active''' = ON | :*'''Active''' = ON | ||
:*'''User Name''' = Any text, used for Caller ID. This text will be shown in the display on incoming calls from the GSM network, together with the telephone number | :*'''User Name''' = Any text, used for Caller ID. This text will be shown in the display on incoming calls from the GSM network, together with the telephone number | ||
| − | :*'''Proxy Server''' = IP address of the AlphaCom | + | :*'''Proxy Server''' = IP address of the ICX or AlphaCom |
| + | |||
| + | [[Image:MV-370-SIP.PNG|left|thumb|500px|SIP Settings]] | ||
| + | <br style="clear:both;" /> | ||
'''Status''' will show ''Not Registered''. | '''Status''' will show ''Not Registered''. | ||
| − | + | ===Configure outgoing calls to the GSM network=== | |
| − | |||
| − | + | The configuration is done in '''Route''' > '''Lan To Mobile Settings'''. | |
| − | [[ | + | ====Two-stage dialing==== |
| + | This is the default-setting after a factory-reset. | ||
| + | |||
| + | The call progress is like this: | ||
| + | |||
| + | #The caller dials a prefix | ||
| + | #A connection will be established to the GSM Gateway, and a second dial-tone is generated from the GSM-gateway | ||
| + | #The caller dials the destination phone number | ||
| + | |||
| + | [[File:GSM mv370-two-stage-lantomobile.PNG|left|thumb|400px|Two-stage Lan to Mobile]] | ||
<br style="clear:both;" /> | <br style="clear:both;" /> | ||
| − | Select '''Route > Mobile to LAN Settings'''<br> | + | |
| − | + | ''Additional information:'' <br> | |
| + | As soon as the prefix is dialed, a voice connection is established between the ICX/AlphaCom and the GSM gateway. The GSM gateway will respond with the SIP message OK. Further dialing is signaled as DTMF signals to the GSM gateway. | ||
| + | |||
| + | ====One-stage dialing==== | ||
| + | In this mode the outgoing number can either be configured directly in the GSM gateway or be sent to the GSM-gateway in the SIP invite from the ICX/AlphaCom. | ||
| + | |||
| + | ''Phone number defined in the GSM gateway:''<br> | ||
| + | In this mode the call is set up to the GSM gateway and the defined number is dialed automatically. | ||
| + | [[File:GSM mv370-one-stage-in-mv370.PNG|left|thumb|400px|One-stage Lan to Mobile]] | ||
| + | <br style="clear:both;" /> | ||
| + | |||
| + | ''Phone number received in SIP-INVITE from ICX/AlphaCom:''<br> | ||
| + | In this mode the entire number is sent from the ICX/AlphaCom. | ||
| + | |||
| + | '''N.B. If using MV-370 together with an ATLB card and analogue stations this is the recommended method.''' | ||
| + | [[File:GSM mv370-one-stage-sipinvite.PNG|left|thumb|400px|One-stage lan to Mobile]] | ||
| + | <br style="clear:both;" /> | ||
| + | |||
| + | ''Additional information:'' <br> | ||
| + | When One-Stage Dialing is used, the GSM gateway will respond with the SIP message RINGING while the call is being established. The caller will hear the ringing tone generated by the ICX/AlphaCom. When the remote party answers the call, the GSM Gateway will send SIP message OK, and the voice communication will be established between the ICX/AlphaCom and the GSM gateway. | ||
| + | |||
| + | ===Configure incoming calls from the GSM network=== | ||
| + | |||
| + | There are two options: | ||
| + | |||
| + | *Two-stage dialing | ||
| + | *Automatic dialing | ||
| + | |||
| + | ====Two-stage dialing==== | ||
| + | With this setting there will be a second Dial-Tone presented on incoming calls from the GSM network. The user must dial the intercom number. The dialing can be terminated by '#', or alternatively one can wait for 5 seconds and the call will be established. | ||
| + | |||
| + | Select '''Route > Mobile to LAN Settings''', and set:<br> | ||
| + | |||
:*'''CID''' = * | :*'''CID''' = * | ||
:*'''URL''' = * | :*'''URL''' = * | ||
| − | |||
| − | + | ====Automatic dialing==== | |
| + | With this setting incoming calls will automatically be connected to station 101 (or any other number you enter) in the ICX/AlphaCom. | ||
| + | |||
| + | |||
| + | Select '''Route > Mobile to LAN Settings''', and set:<br> | ||
| + | |||
:*'''CID''' = * | :*'''CID''' = * | ||
:*'''URL''' = 101 | :*'''URL''' = 101 | ||
| − | |||
| − | + | ||
| − | [[Image:MV-370- | + | [[Image:MV-370-MobileToLAN.PNG|left|thumb|500px|Routing Mobile to LAN - Automatic dialing]] |
<br style="clear:both;" /> | <br style="clear:both;" /> | ||
| − | |||
| − | |||
| − | |||
| − | |||
| − | + | ===DTMF Input from outside line=== | |
| − | == DTMF Input from outside line == | + | During a conversation between a intercom station and a telephone, the telephone operator can activate an output (e.g. trigger a relay for door opening) in the ICX/AlphaCom by pressing a digit on the phone. |
| − | During a conversation between a | ||
To enable digit actions from the telephone line during conversation, go to set '''SIP Settings''' > '''DTMF Setting''', and enable "SIP INFO": | To enable digit actions from the telephone line during conversation, go to set '''SIP Settings''' > '''DTMF Setting''', and enable "SIP INFO": | ||
| Line 71: | Line 181: | ||
<br style="clear:both;" /> | <br style="clear:both;" /> | ||
| − | = Configuration of AlphaCom | + | ==Configuration of ICX/AlphaCom== |
| + | |||
| + | Create a SIP trunk node in the ICX/AlphaCom. Follow the instructions in this article: [[SIP trunk node - configuration|SIP trunk node]] | ||
| + | |||
| + | ===Two-stage dialing=== | ||
| + | This section is valid when using two-stage dialing for outgoing calls. | ||
| + | |||
| + | #To access the GSM Gateway from the ICX/AlphaCom, a directory number with feature 83/<SIP node> must be created in the Directory & Features window of AlphaPro. | ||
| − | |||
| − | |||
[[Image:AlphaPro Create SIP AccessCode.jpg|left|thumb|500px|Example: Directory number "0" used for accessing the GSM Gateway]] | [[Image:AlphaPro Create SIP AccessCode.jpg|left|thumb|500px|Example: Directory number "0" used for accessing the GSM Gateway]] | ||
<br style="clear:both;" /> | <br style="clear:both;" /> | ||
| + | :2. In order to automatically call a fixed telephone number from a DAK key, from a Call Button, or via Call Forwarding or AutoSearch, set "SIP dial delay" = 20 (2 sec.) in '''Exchange & System -> System -> VoIP''': | ||
| − | + | [[File:SIP Delay.PNG|left|thumb|500px|Set "SIP Dial Delay" when using automatic call to fixed phone number]] | |
| + | <br style="clear:both;" /> | ||
| + | |||
| + | DAK key configuration: | ||
| + | [[File:DAK Phone.PNG|left|thumb|500px|DAK 1 will dial 0 + 73456823]] | ||
| + | <br style="clear:both;" /> | ||
| + | |||
| + | ===One-stage dialing=== | ||
| + | This section is valid when using One-stage dialing. | ||
| + | |||
| + | *To collect the phone number in ICX/AlphaCom, a directory number with feature 81/<SIP node> must be created in the Directory & Features window of AlphaPro. Parameter 2 defines the max amount of digits in the phone number. | ||
| + | *If less digits than "max" is dialed, you can press M-key to send the number, or wait for timeout (3 sec by default). | ||
| + | |||
| + | [[Image:Alphapro Feature 81 one stage.jpg|left|thumb|600px|Example: Directory number "0" is used to start collecting numbers in ICX/AlphaCom. Parameter 2 defines the maximum amount of numbers]] | ||
| + | <br style="clear:both;" /> | ||
| + | |||
| + | ==Features== | ||
| + | Outgoing calls from ICX/AlphaCom: | ||
| − | |||
| − | |||
:*Selective: Prefix + phone number: Yes | :*Selective: Prefix + phone number: Yes | ||
| − | :* | + | :*Dialed number shows in display: Yes |
:*Put call on hold and transfer: Yes | :*Put call on hold and transfer: Yes | ||
:*Call to predefined phone number from DAK: Yes (Set "[[New fields (AlphaPro 10.27)|SIP dial delay]]" = 20) | :*Call to predefined phone number from DAK: Yes (Set "[[New fields (AlphaPro 10.27)|SIP dial delay]]" = 20) | ||
| Line 96: | Line 227: | ||
:*Forward Call Requests to phone: Yes | :*Forward Call Requests to phone: Yes | ||
:*Forward if phone do not answer: '''''No''''' (The gateway responds with "200 OK" immediately) | :*Forward if phone do not answer: '''''No''''' (The gateway responds with "200 OK" immediately) | ||
| − | :*Call to remote service requiring DTMF | + | :*Call to remote service requiring DTMF signaling (e.g. Call Center): Yes |
:*Call to remote service: DAK 0 transmit DTMF "*", DAK 1 = DTMF "#": Yes (from firmware 669f in gateway) | :*Call to remote service: DAK 0 transmit DTMF "*", DAK 1 = DTMF "#": Yes (from firmware 669f in gateway) | ||
:*Call from analogue phone (ATLB) to external phone: Yes | :*Call from analogue phone (ATLB) to external phone: Yes | ||
| Line 107: | Line 238: | ||
Incoming calls from GSM network: | Incoming calls from GSM network: | ||
| − | :*Two-step (selective) inward | + | |
| − | :*Two-step (selective) inward | + | :*Two-step (selective) inward dialing - second dial tone: Yes |
| + | :*Two-step (selective) inward dialing - voice prompt: No | ||
:*Automatic call to predefined station: Yes | :*Automatic call to predefined station: Yes | ||
:*Delayed automatic call to predefined station: No | :*Delayed automatic call to predefined station: No | ||
| Line 119: | Line 251: | ||
:*Cancel call when on-hook from line: Yes | :*Cancel call when on-hook from line: Yes | ||
:*Cancel call when cancel at intercom station: Yes | :*Cancel call when cancel at intercom station: Yes | ||
| − | :*Call to intercom station which is | + | :*Call to intercom station which is transferred (71) to an other station: Yes |
:*Put calls on hold and transfer (from intercom station): Yes | :*Put calls on hold and transfer (from intercom station): Yes | ||
:*Force calls from GSM network to be in Private: Yes (Set AlphaPro flag "[[New fields (AlphaPro 10.27)|Incoming calls from SIP in private ringing mode]]") | :*Force calls from GSM network to be in Private: Yes (Set AlphaPro flag "[[New fields (AlphaPro 10.27)|Incoming calls from SIP in private ringing mode]]") | ||
:*Call to IP substation: Yes | :*Call to IP substation: Yes | ||
:*Call to IP Masterstation: Yes | :*Call to IP Masterstation: Yes | ||
| + | |||
<br> | <br> | ||
| − | == Related articles == | + | ==Related articles== |
| − | * [[Send SMS messages from AlphaCom]] | + | |
| + | *[[Send SMS messages from ICX-AlphaCom]] | ||
| + | *More documentation: https://www.zenitel.com/product/mv-370l-4g | ||
| − | [[Category:SIP]] | + | [[Category: ICX-AlphaCom - SIP Integration]] |
| − | [[Category:3rd party integration]] | + | [[Category: AlphaCom - SIP Integration]] |
| + | [[Category: 3rd party integration]] | ||
Latest revision as of 14:14, 16 April 2024
Alternative solution: IP Telephony Service (ICX-AlphaCom)
Contents
- 1 Licenses
- 2 GSM Gateway Configuration
- 3 Configuration of ICX/AlphaCom
- 4 Features
- 5 Related articles
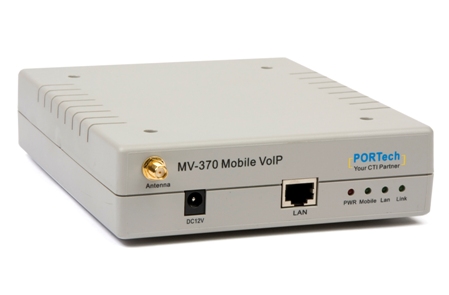
This article describes the setup of the GSM gateway MV-370 (Mobile VoIP) for communication with the ICX system or the AlphaCom.
The GSM Gateway must be equipped with a SIM card and registered to the GSM network as a regular mobile phone subscriber. Via the gateway calls can be made from the ICX or AlphaCom to the GSM network, as well as from the GSM network in to the ICX/AlphaCom.
It is also possible to send SMS messages from the ICX/AlphaCom via the GSM gateway.
Licenses
- AlphaCom: License for SIP Trunk, 100 9642 001. One license for each connected gateway.
- ICX: ILI-SIP2 SIP Trunking, 2 lines, 1002602101. One license can serve two gateways.
GSM Gateway Configuration
Important: If you have a SIM card with PIN code activated, DO NOT insert the SIM card yet.
Load Factory Default values
The GSM Gateway comes with default network parameters (factory default parameters). The default IP address is 192.168.0.100.
You can load factory network parameters and reset the username and password to its default settings (username: voip, password: 1234) by following these steps:
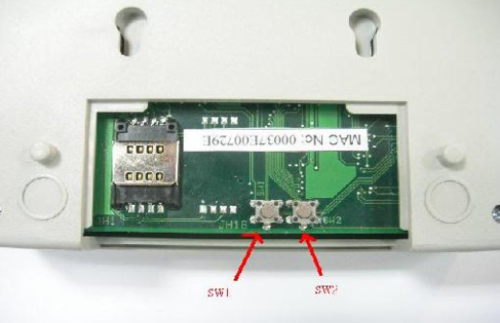
- Press and hold the button SW1 located at the bottom of the unit (you have to remove the lid) for about 7-8 seconds
- Wait for the "Mobile" and "LAN" leds to start blinking
- The GSM Gateway will now get the IP address 192.168.0.100, subnet mask 255.255.255.0.
Accessing the gateway
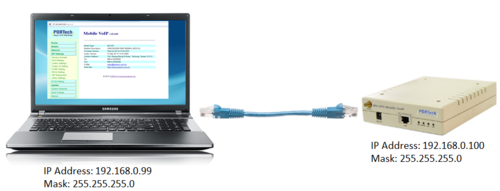
- Change the IP address of your PC to 192.168.0.99, subnet mask 255.255.255.0.
- Connect the LAN port of the PC to the Ethernet port of the GSM Gateway.
- Start your Web Browser and type 192.168.0.100 in the URL field.
- Type in username voip and password 1234. (Case-sensitive!)
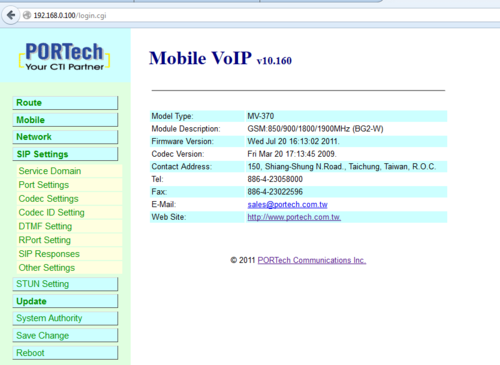
- The Home page of the Web Interface will appear:
Network settings
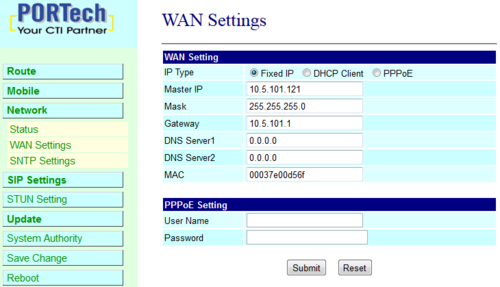
Change the network settings according to the network environment. Select Network > WAN Settings:
- IP Type = Enable Fixed IP
- IP = IP address of the Mobile VoIP unit
- Mask = Network mask
- Gateway = IP address of the network gateway
Mobile settings
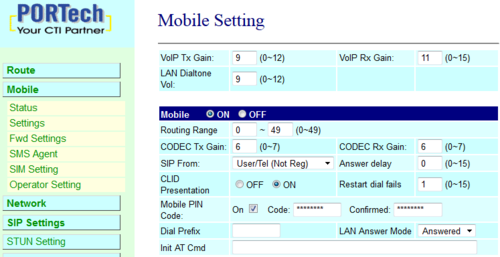
Go to Mobile > Settings and define the following parameters:
- SIP From = User/Tel (Not Reg)
- Mobile PIN Code = ON. Code: Enter the PIN code for the SIM card. Confirmed: Enter the PIN code again.
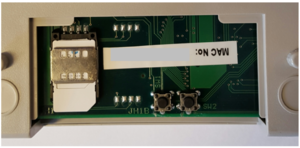
The SIM card can now be inserted. The gateway uses Standard (Mini) SIM card (15x25mm).
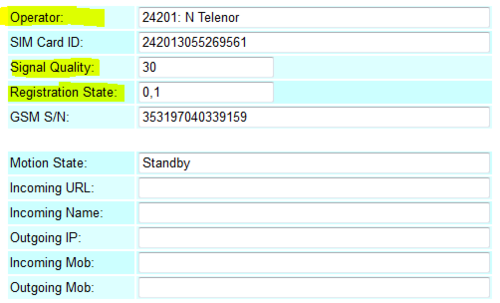
After the SIM card is inserted, you can check that the gateway is successfully registered to the GSM network in Mobile > Status.
Some parameters to look for are:
- Operator = The telecom provider
- Signal Quality = Shows the signal strength. The signal should be in the range of 10 - 31.
If these parameters does not show, your gateway is not registered to the GSM network. Check that SIM card is properly inserted, and that the PIN code is correctly entered.
TIP: Try the SIM card in a regular mobile phone.
SIP settings
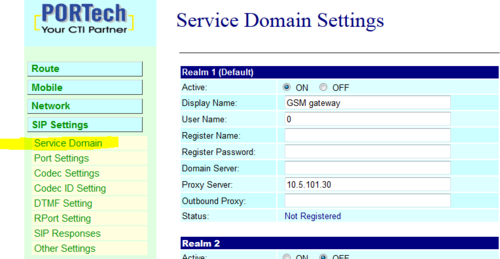
In the menu SIP Settings > Service Domain, enter information for "Realm 1":
- Active = ON
- User Name = Any text, used for Caller ID. This text will be shown in the display on incoming calls from the GSM network, together with the telephone number
- Proxy Server = IP address of the ICX or AlphaCom
Status will show Not Registered.
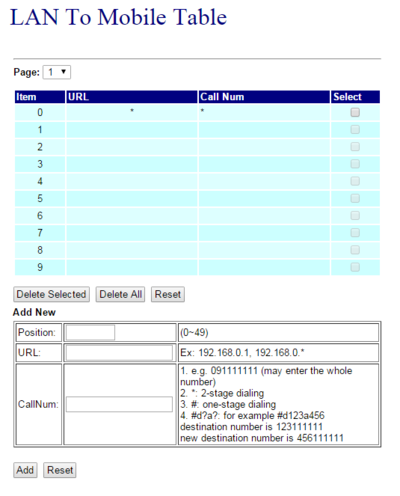
Configure outgoing calls to the GSM network
The configuration is done in Route > Lan To Mobile Settings.
Two-stage dialing
This is the default-setting after a factory-reset.
The call progress is like this:
- The caller dials a prefix
- A connection will be established to the GSM Gateway, and a second dial-tone is generated from the GSM-gateway
- The caller dials the destination phone number
Additional information:
As soon as the prefix is dialed, a voice connection is established between the ICX/AlphaCom and the GSM gateway. The GSM gateway will respond with the SIP message OK. Further dialing is signaled as DTMF signals to the GSM gateway.
One-stage dialing
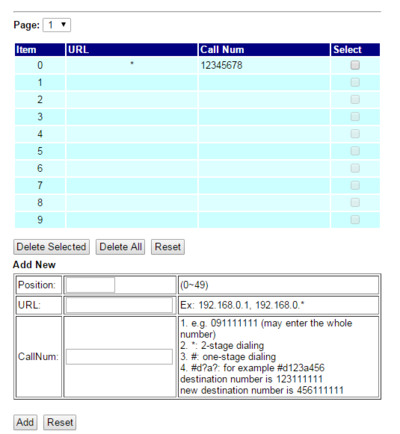
In this mode the outgoing number can either be configured directly in the GSM gateway or be sent to the GSM-gateway in the SIP invite from the ICX/AlphaCom.
Phone number defined in the GSM gateway:
In this mode the call is set up to the GSM gateway and the defined number is dialed automatically.
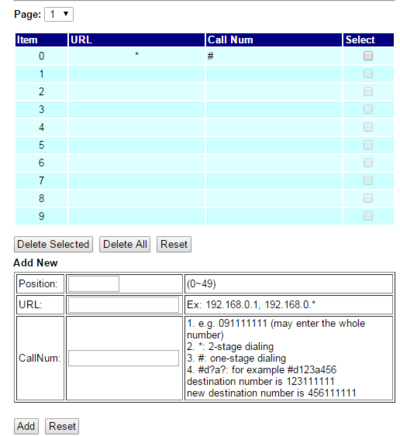
Phone number received in SIP-INVITE from ICX/AlphaCom:
In this mode the entire number is sent from the ICX/AlphaCom.
N.B. If using MV-370 together with an ATLB card and analogue stations this is the recommended method.
Additional information:
When One-Stage Dialing is used, the GSM gateway will respond with the SIP message RINGING while the call is being established. The caller will hear the ringing tone generated by the ICX/AlphaCom. When the remote party answers the call, the GSM Gateway will send SIP message OK, and the voice communication will be established between the ICX/AlphaCom and the GSM gateway.
Configure incoming calls from the GSM network
There are two options:
- Two-stage dialing
- Automatic dialing
Two-stage dialing
With this setting there will be a second Dial-Tone presented on incoming calls from the GSM network. The user must dial the intercom number. The dialing can be terminated by '#', or alternatively one can wait for 5 seconds and the call will be established.
Select Route > Mobile to LAN Settings, and set:
- CID = *
- URL = *
Automatic dialing
With this setting incoming calls will automatically be connected to station 101 (or any other number you enter) in the ICX/AlphaCom.
Select Route > Mobile to LAN Settings, and set:
- CID = *
- URL = 101
DTMF Input from outside line
During a conversation between a intercom station and a telephone, the telephone operator can activate an output (e.g. trigger a relay for door opening) in the ICX/AlphaCom by pressing a digit on the phone.
To enable digit actions from the telephone line during conversation, go to set SIP Settings > DTMF Setting, and enable "SIP INFO":
Configuration of ICX/AlphaCom
Create a SIP trunk node in the ICX/AlphaCom. Follow the instructions in this article: SIP trunk node
Two-stage dialing
This section is valid when using two-stage dialing for outgoing calls.
- To access the GSM Gateway from the ICX/AlphaCom, a directory number with feature 83/<SIP node> must be created in the Directory & Features window of AlphaPro.
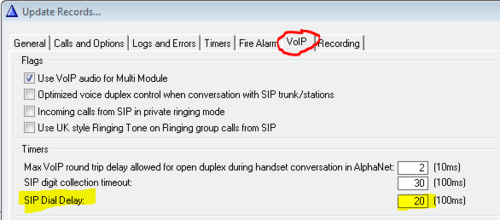
- 2. In order to automatically call a fixed telephone number from a DAK key, from a Call Button, or via Call Forwarding or AutoSearch, set "SIP dial delay" = 20 (2 sec.) in Exchange & System -> System -> VoIP:
DAK key configuration:
One-stage dialing
This section is valid when using One-stage dialing.
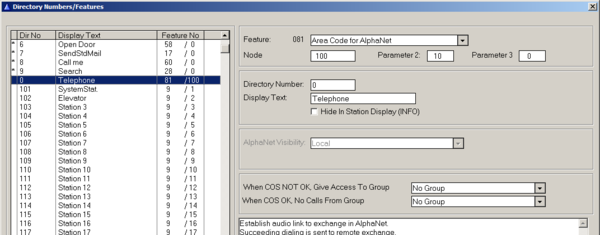
- To collect the phone number in ICX/AlphaCom, a directory number with feature 81/<SIP node> must be created in the Directory & Features window of AlphaPro. Parameter 2 defines the max amount of digits in the phone number.
- If less digits than "max" is dialed, you can press M-key to send the number, or wait for timeout (3 sec by default).
Features
Outgoing calls from ICX/AlphaCom:
- Selective: Prefix + phone number: Yes
- Dialed number shows in display: Yes
- Put call on hold and transfer: Yes
- Call to predefined phone number from DAK: Yes (Set "SIP dial delay" = 20)
- Call to predefined phone number from Substation: Yes (Set "SIP dial delay" = 20)
- Door Opening (6) from line: Yes (from firmware 669f in gateway)
- Cancel when remote phone hangs up: Yes
- Automatic cancel when remote phone is busy: Yes
- On-hook when intercom cancel the call: Yes
- Signal when dialing prefix and no lines are available : Busy tone (Camp on Busy)
- Call Forward (71) from intercom to external phone: Yes
- Forward Call Requests to phone: Yes
- Forward if phone do not answer: No (The gateway responds with "200 OK" immediately)
- Call to remote service requiring DTMF signaling (e.g. Call Center): Yes
- Call to remote service: DAK 0 transmit DTMF "*", DAK 1 = DTMF "#": Yes (from firmware 669f in gateway)
- Call from analogue phone (ATLB) to external phone: Yes
- Call from subscriber in remote AlphaNet node: Yes
- Call from SIP extension to external phone: Yes (X-Lite)
- Call from IP Substation: Yes
- Call from IP Master: Yes
- Access restriction for SIP Phones: Yes (OK with firmware 6.693t, was not OK with 6.690f)
Incoming calls from GSM network:
- Two-step (selective) inward dialing - second dial tone: Yes
- Two-step (selective) inward dialing - voice prompt: No
- Automatic call to predefined station: Yes
- Delayed automatic call to predefined station: No
- Caller ID: Yes. The display will show <Phone number> + <User Name>, "User Name" is the text entered in SIP Settings. E.g. "73905391 (GSM)"
- Call to a remote node (AlphaNet) using Area Code or Global number: Yes
- Call to a SIP extension: Yes (X-Lite)
- Make group call, with answer Meet Me (99): Yes
- M-key control from line: Yes (from firmware 669f in gateway)
- Door Opening (6) from line: Yes (from firmware 669f in gateway)
- Cancel call when on-hook from line: Yes
- Cancel call when cancel at intercom station: Yes
- Call to intercom station which is transferred (71) to an other station: Yes
- Put calls on hold and transfer (from intercom station): Yes
- Force calls from GSM network to be in Private: Yes (Set AlphaPro flag "Incoming calls from SIP in private ringing mode")
- Call to IP substation: Yes
- Call to IP Masterstation: Yes
Related articles
- Send SMS messages from ICX-AlphaCom
- More documentation: https://www.zenitel.com/product/mv-370l-4g


