Akuvox R29S (Edge): Difference between revisions
From Zenitel Wiki
| Line 15: | Line 15: | ||
* Press '''Save''' to store the new device in the Edge Controller | * Press '''Save''' to store the new device in the Edge Controller | ||
[[File: | [[File:Edge_Akuvox.jpg|thumb|left|700px|Adding new SIP device to the Edge System]] | ||
<br clear=all/> | <br clear=all/> | ||
== Configuration of the Akuvox R29S == | == Configuration of the Akuvox R29S == | ||
Latest revision as of 08:52, 6 July 2022


This article describes how to set up the Akuvox R29S device in an IC-EDGE System.
Edge Controller configuration
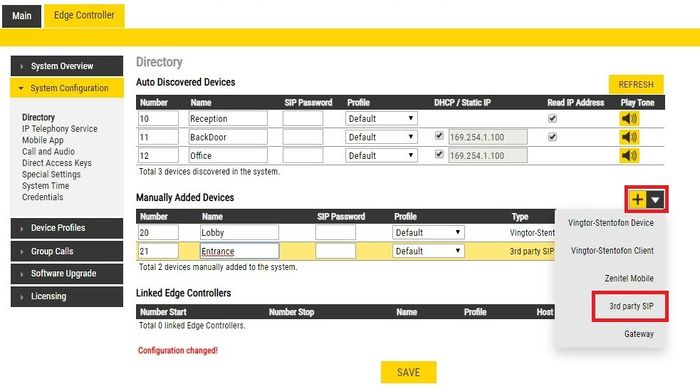
You need to manually add the Akuvox R29S as a 3rd party SIP device to the Edge Controller. SIP Client Extension license is required.
- Log on to the Edge Controller
- From the menu Edge Controller > System Configuration > Directory, under the Manually Added Devices section, press the "+" button
- Select 3rd party SIP from the dropdown list
- Modify Number and Name as required (a default Number and Name will be inserted, which you can modify)
- Optionally one can add a SIP Password. If a password is entered, one have to manually enter the same password in the Password field in the Akuvox R29S. The password is used for authentication during the registration process.
- Press Save to store the new device in the Edge Controller
Configuration of the Akuvox R29S
Network settings
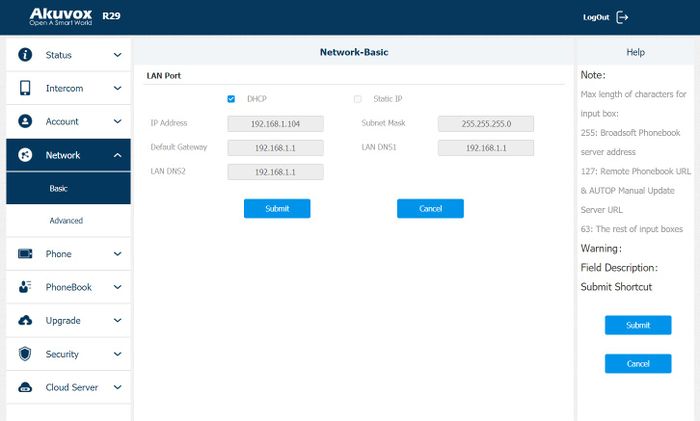
Akuvox R29S uses DHCP by default, which means that IP address, subnet mask and default gateway will be obtained from DHCP server automatically. To find the IP address of the station follow these steps:
- Power up the Akuvox R29S
- Go through the initial setup of selecting language and theme
- Push on the touch screen, and select Dial or Call, depending on the theme you selected
- Enter the secret code for the settings, by default "9999", and press the Call button
- Enter the password for the Setting menu, by default "3888" and press OK
- Go to Info to find the IP address of the station. If the IP address is 0.0.0.0, this means there is no DHCP Server in the network. You need to manually set the IP address, subnet mask and default gateway. To do this go to the Network menu, disable DHCP, enter the required information and press Save.
- Open a web browser on your computer, enter the IP address into the address bar and press Enter.
- Enter the user name (default: admin) and password (default: admin) in the pop-up dialogue box and click Login
- Select Network > Basic to configure the phone to use DHCP (obtain an IP address automatically) or Static IP address.
SIP account settings
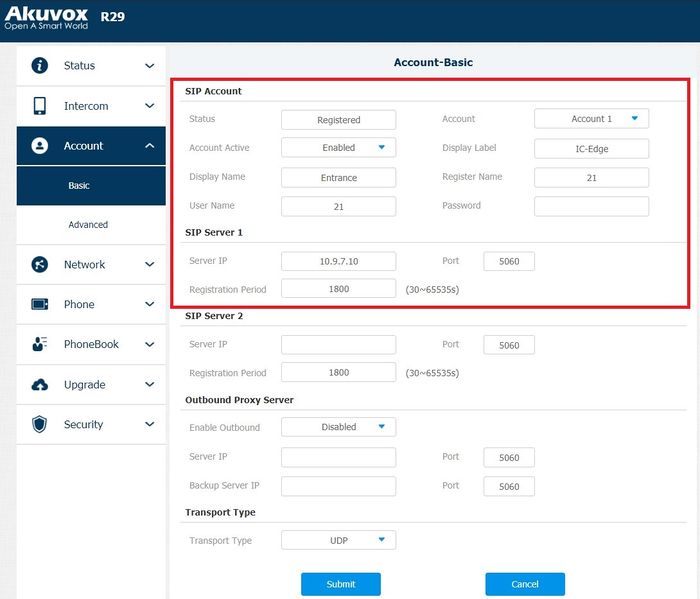
A SIP account must be configured using the settings from the IC-Edge controller. To set it up go to Account > Basic
SIP Account
- Status: Shows the status of the SIP account
- Account: Select "Account 1" or "Account 2"
- Account Active: Select "Enabled"
- Display Label: To enter the label name of this account, which will show on the account status interface
- Display Name: To enter the display name of this account, which will show on other devices when making calls
- Register Name: Used to register to the Edge Controller. Must match the directory number entered in the Edge Controller
- User Name: This ID is identical to the "Register Name". Must match the directory number entered in the Edge Controller
- Password(Optionally): If a password is entered, one have to enter the same password in the SIP Password field of the Edge Controller. The password is used as authentication during the registration process
SIP Server 1
- Server IP: Enter the IP address of the Edge Controller
- Port: The SIP port used. Normally 5060.
- Registration Period: The registration will expire after registration period, the phone will re-register automatically within registration period.
Video from Akuvox R29S
The Akuvox R29S will by default send video to a station with video display, like the ITSV-1. If there are issues with the video go to troubleshooting
Door Opening feature
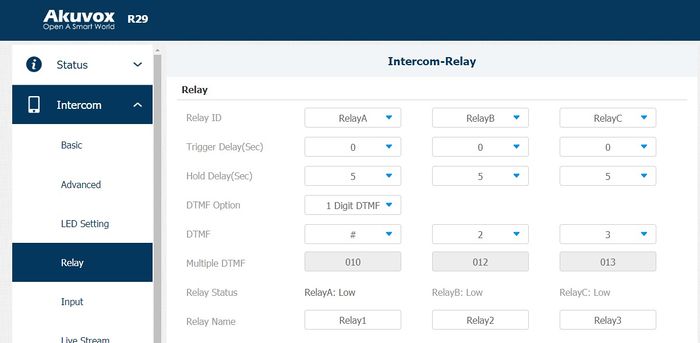
The Akuvox R29S has 3 integrated relays. By default, the relays can be activated during a call by pressing "#" for Relay A, digit "2" for Relay B and digit "3" for relay C. After activating a relay, the call will end after 5 seconds. This timer can be modified. To make changes to the relays settings, log in to Akuvox R29S, go to Intercom > Relay.
- Relay ID - ID of the relay
- Trigger Delay(Sec) - To delay the door opening action
- Hold Delay(Sec) - To configure the duration of opened relay. After this time, the relay will be closed again and the call will end. The default value is 5 seconds
- DTMF Option - To select digit of DTMF code, R29S supports maximum 4 digits DTMF code
- DTMF - To configure 1 digit DTMF code
- Multiple DTMF - To configure multiple digits DTMF code
- Relay Status: Low means that COM is connecting to NC, while High means that COM is connecting to NO
Input configuration
The Akuvox R29S has 3 inputs that can be used to connect buttons or switches that will activate a relay or trigger other events.
To configure what the inputs do, log in to the Akuvox R29S, go to Intercom > Input
- Input Service: To enable or disable input trigger service.
- Trigger Option: To choose open circuit trigger or closed circuit trigger. Low means that connection between Door terminal and GND is closed, while High means the connection is opened.
- Action to execute: To choose which action to execute after triggering.
- Http URL: To configure URL, if HTTP action is chosen.
- Action Delay: To delay the action
- Open relay: To configure relay to open
- Door status: To show the status of input signal.

Factory reset
Factory reset can be made from the web interface and from the station menu.
Factory reset from web interface
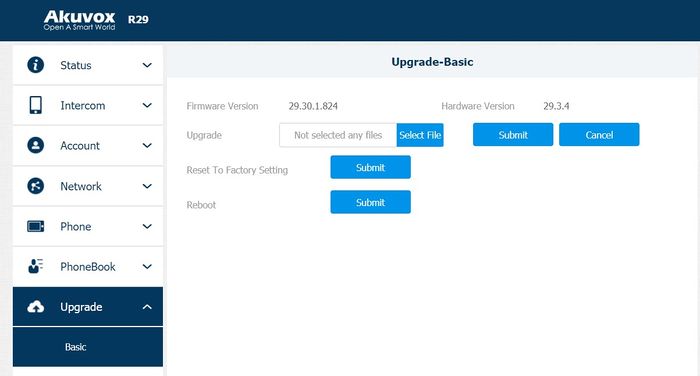
- Go to Upgrade > Basic
- Under Reset to Factory Setting click Submit
- Confirm the action
- The station will have DHCP enabled after Factory reset. To find out what is the IP address of the station go to Network Settings
- Press the Dial/Call button
- Enter the secret code for the settings, by default "9999", and press the Call button
- Enter the password for the Setting menu, by default "3888" and press OK
- Navigate to Restore button, press it and then press Confirm
- The station will have DHCP enabled after Factory reset. To find out what is the IP address of the station, go to Network Settings
Troubleshooting no video
The ITSV-1 should show video from a Akuvox R29S station when a call is established, without having to do any configuration. However, if no video is present during a call, check the following:
ITSV-1 unit:
- Log in to the ITSV and navigate to Account > Account 1 > Call Settings, and verify that Start Video Automatically is enabled.
Akuvox R29S:
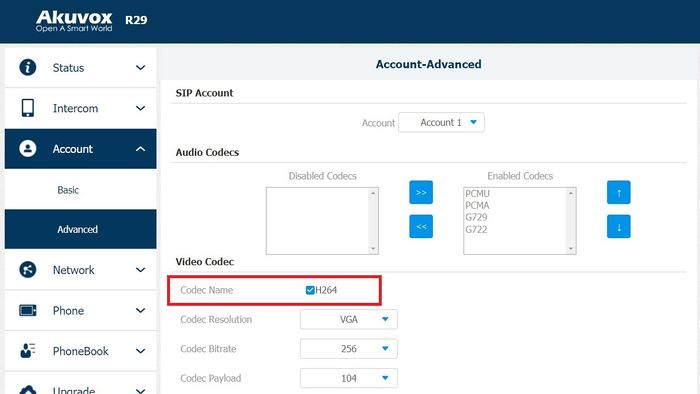
- Codec issue:
- Log in to the Akuvox R29S, and select Account > Advanced > Account 1
- Under the Video Code section, verify that the checkbox for H264 is checked
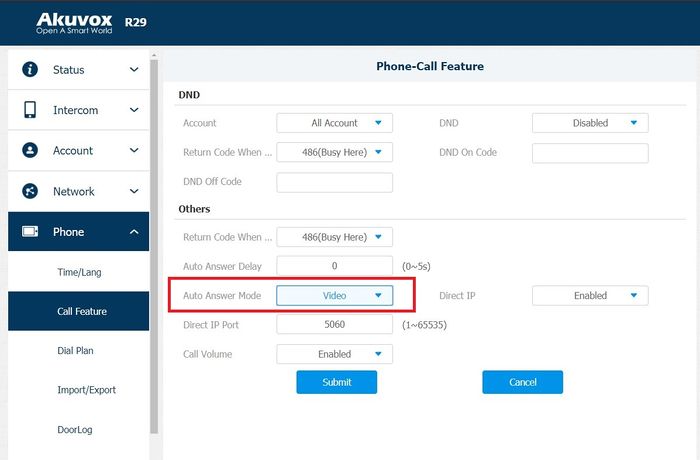
- Auto Answer Mode
- Log in to the Akuvox R29S, and select Phone > Call Feature
- Under Others in the Auto Answer mode check if Video is seleceted from the drop-down list
