Grandstream GXP2000: Difference between revisions
From Zenitel Wiki
| Line 1: | Line 1: | ||
== Configuration of the phone via Web Browser== | == Configuration of the GXP200 phone via Web Browser== | ||
The Grandstream GXP2000 has an embedded web server, from which the configuration of the phone is made. <br> | The Grandstream GXP2000 has an embedded web server, from which the configuration of the phone is made. <br> | ||
'''Preparations:''' | '''Preparations:''' | ||
Revision as of 14:19, 19 August 2009
Configuration of the GXP200 phone via Web Browser
The Grandstream GXP2000 has an embedded web server, from which the configuration of the phone is made.
Preparations:
- Latest firmware: Make sure that the phone has the latest firmware version from Grandstream
- Factory reset: The configuration described in this article is the minimum configuration required for a factory reset phone. If you don't know the current configuration, you might want to start from scratch by performing a factory reset.
Access the phone’s Web Configuration Menu
- Connect the computer to the same network as the phone
- Make sure the phone is turned on and shows its IP-address in the display
- Start a Web-browser on your computer
- Enter the phone’s IP-address in the address bar of the browser
- Enter the administrator’s password to access the Web Configuration Menu
The default administrator password is “admin”; the default end-user password is “123”.
NOTE: When changing any settings, always Update them by pressing the button on the bottom of the page. Reboot the phone to have the changes take effect. If, after having submitted some changes, more settings have to be changed, press the menu option needed.
Configuration of the GXP2000
Basic Settings:
- IP address: Select DHCP (obtain IP address automatically from the network), or enter IP address, subnet mask and gateway IP if using Static IP.
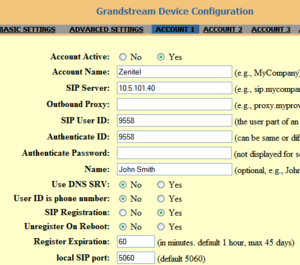
Account 1:
- Account Active: "Yes"
- Account name: Any text
- SIP Server: The IP address of the AlphaCom
- SIP User ID: The directory number of the phone. Must be the same as entered in the Users & Stations list in AlphaPro
- Authenticate ID: Same as SIP User ID
- Name: The name of the user, e.g. John Smith. Will show up in the display in idle.
- Send DTMF: Disable "in-audio", enable "via SIP INFO"
- Preferred Vocoder: Enter PCMU for all eight choises
Factory default settings
How to perform a Factory Reset of the GXP2000. All existing configuration will be erased and replaced by default settings:
- Disconnect the ethernet cable
- Press the round MENU button to enter the menu.
- Scroll down to CONFIG and select it (by pressing round button again)
- Scroll down to Factory Reset and select it.
- Move cursor to the empty space above the OK and CANCEL.
- Enter the MAC Address with alphabets and numbers.
- Once finished, press round button till cursor is on OK.
- Press the round button once more to initiate the Factory Reset.
- Reconnect the ethernet cable
The display will show the IP address of the phone.
Configuration in AlphaCom E
The configuration described below is applicable for AMC and AlphaPro software 10.56 and higher. As from AMC 10.56 the SIP phones are configured as regular stations in AlphaCom, which simplifies the configuration:
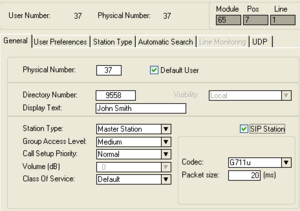
- In AlphaPro select the Users & Stations window
- Select a free user from the list. Select a user were there is no ASLT or ATLB line card present
- Enter the directory number, must be the same number as the SIP User ID in the phone
- Enter the name. Normally the same name as entered in the phone
- Enable the "SIP Station" flag
- Set Codec = G711u and packet size = 20ms.


