IP-ARIO Configuration
From Zenitel Wiki
Configuration of the IP-ARIO (Web browser)
The IP-ARIO unit features an embedded web server, which allows users to log in via a standard web browser. At commissioning, the IP-ARIO unit needs to be configured to enable it to subscribe to an AlphaCom server/exchange. To do this, your PC and the IP-ARIO unit have to be connected together via a PoE switch using network cables:
- Connect the PC to the PoE switch
- Connect the LAN port on the IP-ARIO unit to the PoE switch
The factory default IP address of the IP-ARIO unit is 169.254.1.100. In order for your PC to communicate with the unit it is necessary to change its Internet Protocol Properties to use an IP address that is in the same range as 169.254.1.100, e.g. 169.254.1.1 with subnet mask 255.255.0.0.
After the IP properties have been changed, access the IP-ARIO unit by logging into the web interface using a standard web browser:
- Open a web browser on your PC
- In the browser’s address bar, type http://169.254.1.100 and press the ENTER key. The IP-ARIO login page is displayed.
- Enter the default user name: admin
- Enter the default password: alphaadmin
The Station Info page will now be displayed, showing the IP-ARIO unit configuration. Use the menu bar at the top of each page to browse through the various pages.
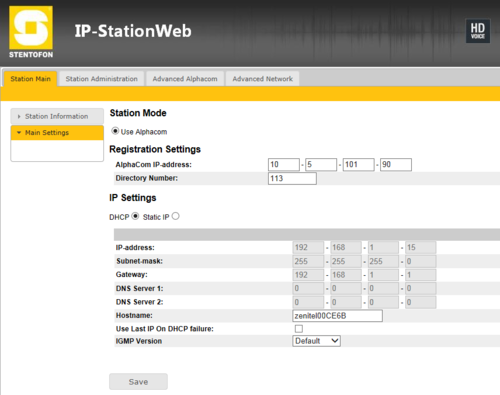
In Station Main -> Main Settings, set the following parameters:
- AlphaCom IP-address: Enter the IP address of the AlphaCom server/exchange in which the IP-ARIO unit is to be registered
- Request Directory Number: Enter the directory number of the IP-ARIO unit
- If a directory number is not entered, the IP-ARIO unit will register with its MAC address. The MAC address is found on the Station Info page and needs to be entered into the AlphaPro programming tool.
Under IP Settings, select one of the following options:
- DHCP – Use this option if the IP-ARIO unit should receive IP Settings from a DHCP server.
- Static IP – Use this option if the IP-ARIO unit should use a fixed IP address. Enter the IP address, subnet mask and gateway address.
- Click Save followed by Apply to apply the new configuration settings.


