Prison Applications using VS-Operator
From Zenitel Wiki
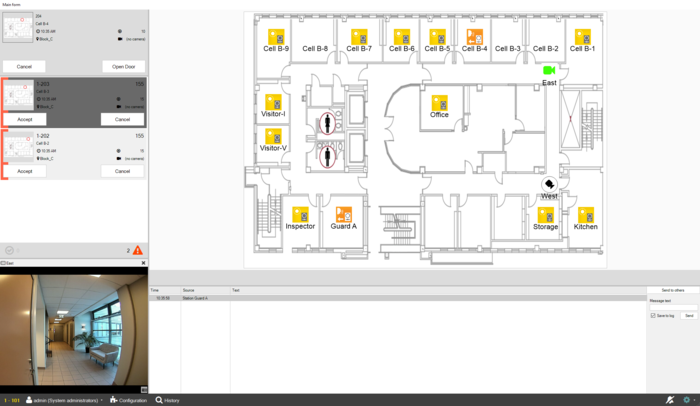 |
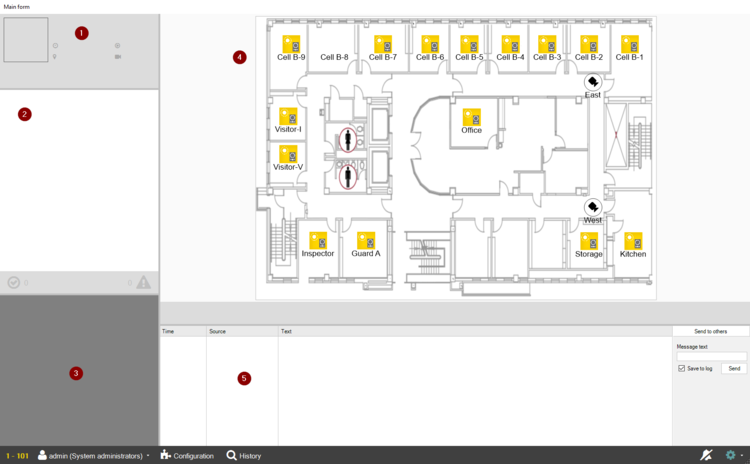
| The above image shows a typical layout for a prison. |
This is an article showing a few suggestions for using VS Operator in a prison environment. From the layout an operator will be able to handle:
- Call Requests
- Tamper Alarm
- Video control
- Visitor Intercom
- Recording
In the example used, all cell stations call the guard using Ringing Group 1.
Layout
The layout is divided into 5 parts:
- Established Call
- Call Request List
- Tile view (video)
- Map view
- Journal
Cell Script
Call Request Buttons
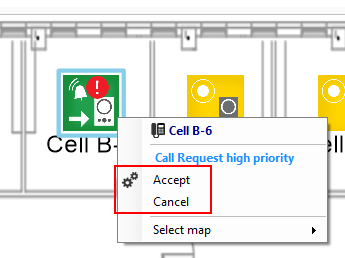
For each station in the Call Request list we can define two buttons that allows us to answer the incoming call, or dismiss it.
Create a new station script. In this example it is named CellScript. Add the following scripts for Call request buttons:
- Click the Call request buttons and then click Add
- Name the first button Accept and the second button Cancel
For button Accept enter in the field to the right the following script:
App.STE ("@U%NNOP $CALL L%DIROP L%DIRA");
|
For button Cancel enter in the field to the right the following script:
App.STE ("@U%NNOP $C L%DIRA");
|
Established call button
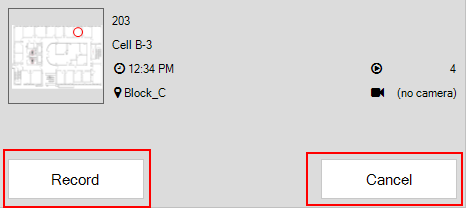
When the operator station is in a conversation with a cell, we can define two buttons. One for starting to record the conversation, and one for ending the conversation.
Edit the script CellScript. Add the following scripts for Call established buttons:
- Click the Established call buttons and then click Add
- Name the first button Record and the second button Cancel
For button Record enter in the field to the right the following script:
App.STE ("@U%NNOP $REC L%DIRA");
|
For button Cancel enter in the field to the right the following script:
App.STE ("@U%NNOP $C L%DIRA");
|
Icon commands
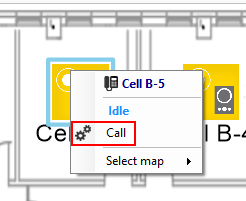
VS Operator can present different options by right clicking a Cell Icon in different Station States.
A station icon can have 8 states, ranging from 0 to 7. It is possible to present a different set of choices for each state when right clicking the icon:
- During Idle State
- During Conversation State
- During Call Request State
- During Tamper Alarm State
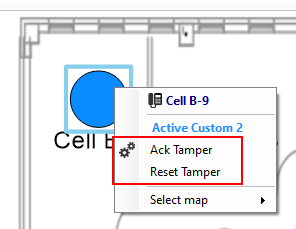
The command with cog wheel in front is the default command, i.e. the command that will be executed by simply clicking the icon directly.
Assign Script
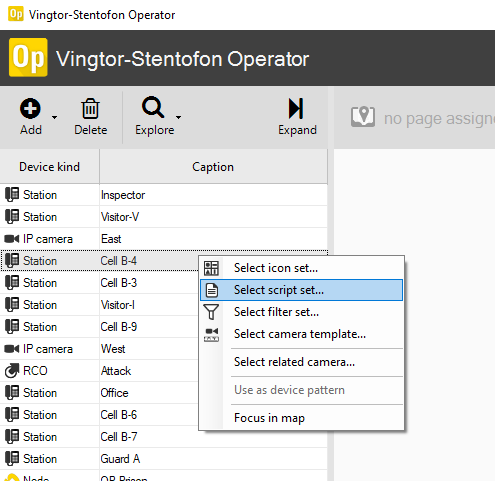
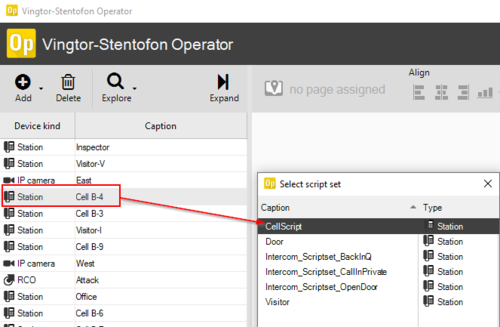
The script needs to be assigned to all Cell Stations that should have this behavior. This is done by simply rightclicking the Cell Station in the Operator device list, and selecting the script there. It is also possible to multiselect stations and assigning the same script to all.
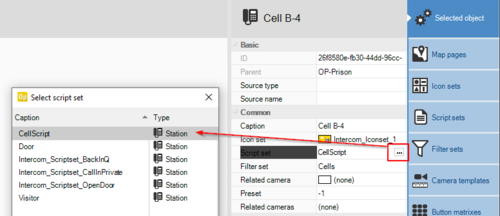
Script assignment can also be done from the Selected Object menu:
Video Script
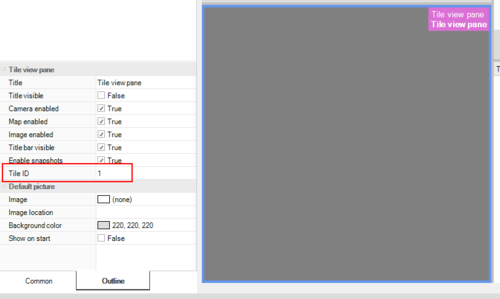
In the example there is one Video Tile added to the layout. This tile is defined as 1 in the layout configurator:
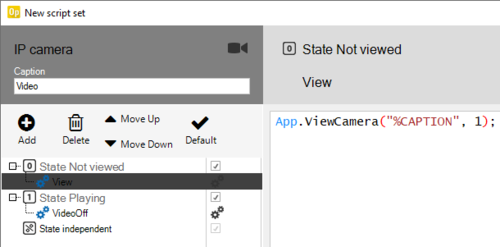
We can create a camera script and assign this to the cameras on our map:
Add one script for each state, name these View and VideoOff:
App.ViewCamera("%CAPTION", 1);
|
App.ViewClose(1);
|
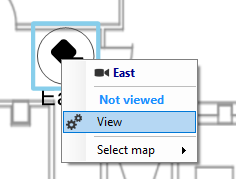
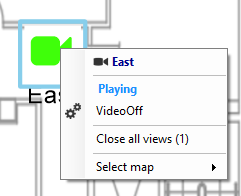
By rightclicking the camera icon on the map, the user can now chose to view the camera in the video tile, or close the view depending on the state it already has:
The cogwheel indicates the default command, and in this case we can simply toggle click the icon to switch video on off.
Visitor Script
In the example prison there is a visitor intercom solution.
Two Intercoms, one in each room are paired together. They are both configured to call the other when the button is pressed. They can also be controlled from the VS Operator in the following way:
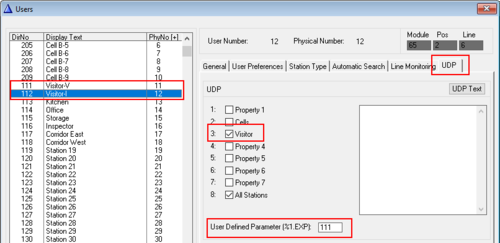
First, they need to be configured to call each other in the ICX, triggered by DAK9. Both are set to the same UDP group, and both have the number of the other as their EXP:
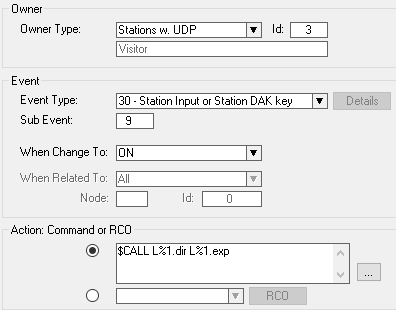
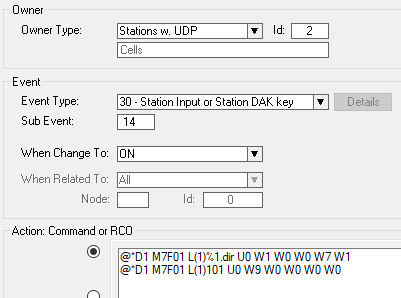
Second, we need an event that is triggered by DAK 9:
Action commands:
$CALL L%1.dir L%1.exp
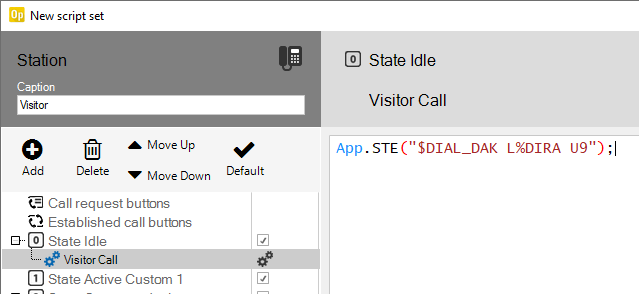
In the VS Operator we create a script for the visitor intercoms. The script will simulate that DAK9 is pressed on either station:
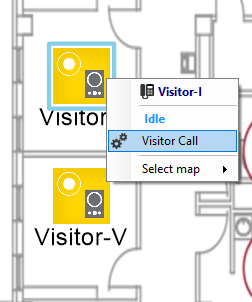
The script is executed when the operator selects the command Visitor Call by right clicking either Visitor icon:
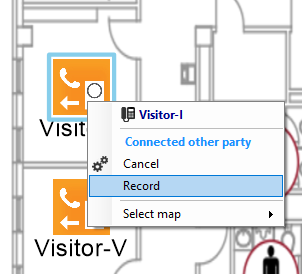
While the Visitor Intercoms are in conversation, the Operator can right click either icon and select to cancel the call, or to initiate recording if that option is used in the system:
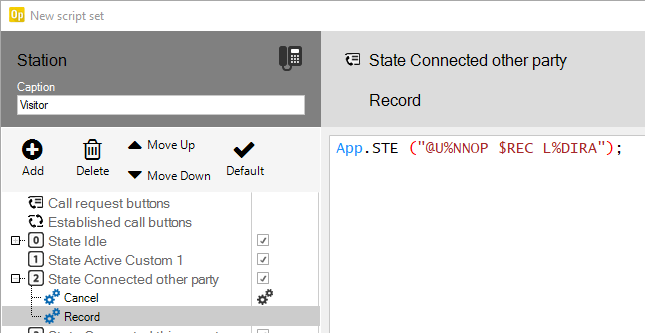
The above options are created in the Visitor script, under the Connected to other party state:

|
The Recording option requires that Recording on demand is applied to the system |
Tamper Alarm
Examples of tamper alarm from Vandal Station (TKIE) (I/O3) or VR3G (I/O4).
To make the tamper switch report an audiovisual alarm in the Operator we need an event in the ICX, which sends data to the VS Operator using the custom parameter.
This event is needed for VR3G stations with the tamper switch connected to I/O4. The Vandal Resistant Substation used I/O3 and the subevent must then be set to 13.
Action commands:
@*D1 M7F01 L(1)%1.dir U0 W1 W0 W0 W7 W1
@*D1 M7F01 L(1)101 U0 W9 W0 W0 W0 W0
Changing Icon
The first line sends a custom parameter belonging to the cell station it is triggered on. It sets parameters
- 1=1
- 4=7
- 5=1
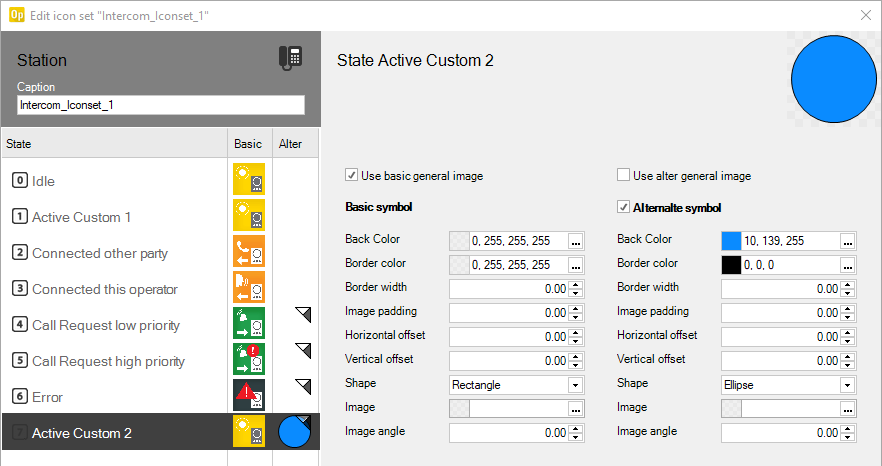
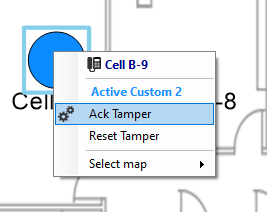
Parameter 4 and 5 will make the cell station enter Station State 7 (Active Custom 2). This makes the icon show the tamper alarm:
Journal Entry
To be able to write a custom text in the Operator Monitor Journal, we set a filter on the Cell stations. Since the event in the ICX is triggered by a cell station, it will carry the cell station directory number as a parameter, and we can filter on the cell station in VS Operator.
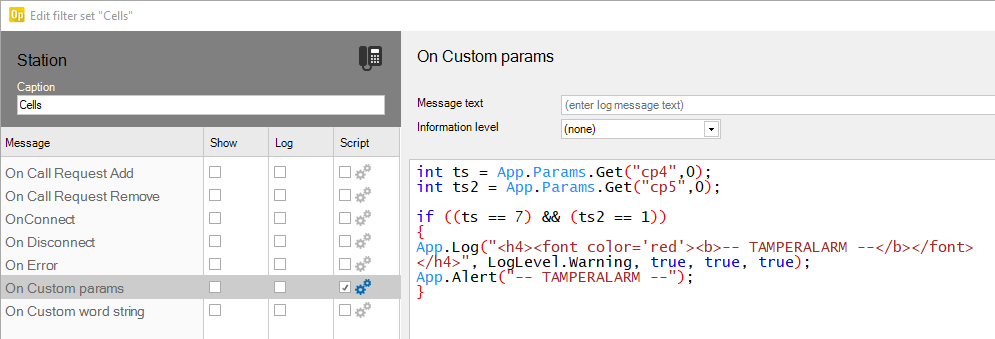
Create a new station filter, name it Cells. Select Script for the On Custom Params option and enter this code:
int ts = App.Params.Get("cp4",0);
int ts2 = App.Params.Get("cp5",0);

if ((ts == 7) && (ts2 == 1))
{
App.Log("<h4><font color='red'><b>-- TAMPERALARM --</b></font></h4>", LogLevel.Warning, true, true, true);
App.Alert("-- TAMPERALARM --");
}
|
H4 = Level 4 Heading (text markup reference)
It should look like this:
The result in the Journal when a tamper alarm is triggered will look like this:
Play audio file
To play an audiofile in the PC where the Operator Client is running, we use the second line in the event triggered by the tamper switch:
- @*D1 M7F01 L(1)101 U0 W9 W0 W0 W0 W0
This command is hardcoded with the operator directory number. In this example 101.
And the first parameter here is 9.
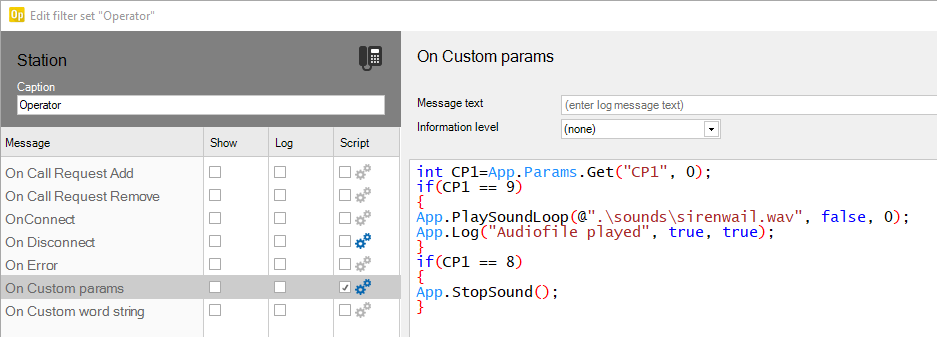
Equally in the Operator we need a filter on the Operator Station (101) that catches the 9. So we create a station filter, add a script for On Custom Params and put in this code:
int CP1=App.Params.Get("CP1", 0);
if(CP1 == 9)
{
App.PlaySoundLoop(@".\sounds\sirenwail.wav", false, 0);
App.Log("Audiofile played", true, true);
}
if(CP1 == 8)
{
App.StopSound();
}
|
This is the result:
Acknowledge and Reset
In this example we have chosen two actions to the Tamper Alarm:
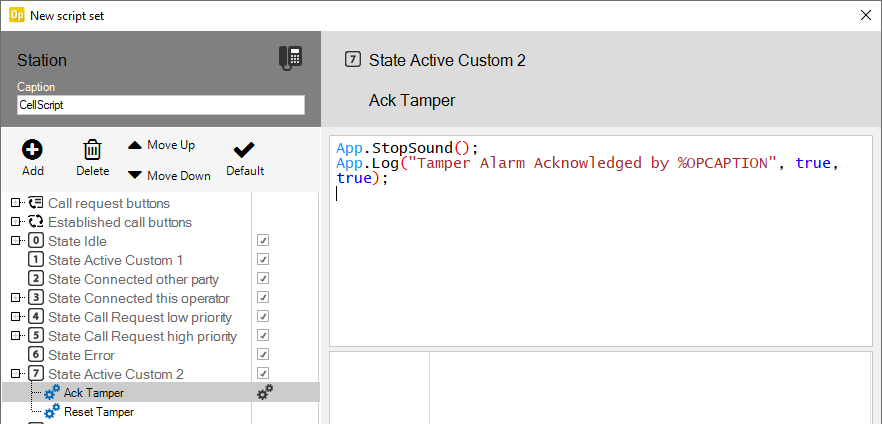
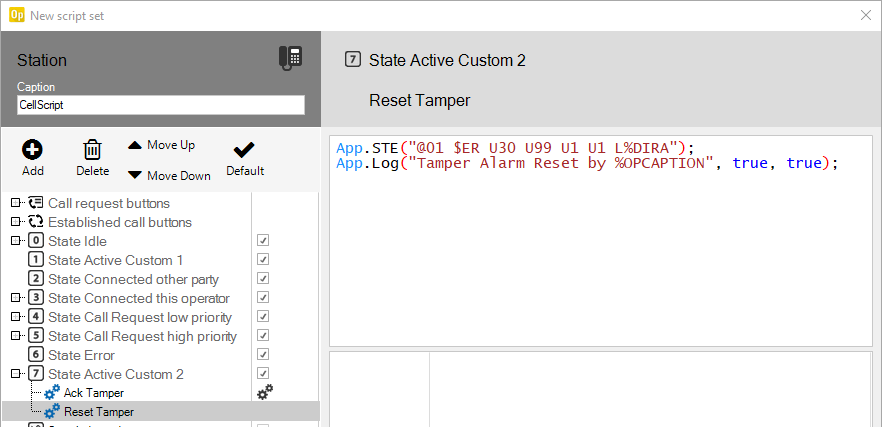
Both of these are available when the Cell Station is in Tamper Alarm state. In the previously created CellScript we add two actions for State 7 Active Custom 2:
Acknowledge (default action) will silence the audio file and write a text in the journal.
Reset will revert the station state back to normal by executing DAK99 for the Operator Station, and writes to the journal.
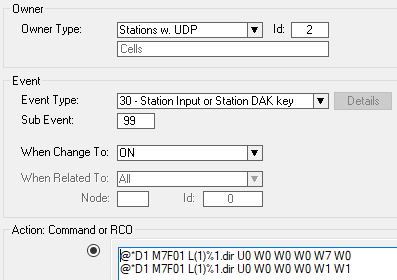
DAK99 on the Operator Station will trigger an event in the ICX that sets the correct Icon Status in the Operator Client:
Action commands:
@*D1 M7F01 L(1)%1.dir U0 W0 W0 W0 W7 W0
@*D1 M7F01 L(1)%1.dir U0 W0 W0 W0 W1 W1
The first line sets Station State 7 to off, and the second line sets Station State 1 to ON. Station State 1 is Active Custom 1 but it has the same look and behavior as Station State 0 which is the idle one.

