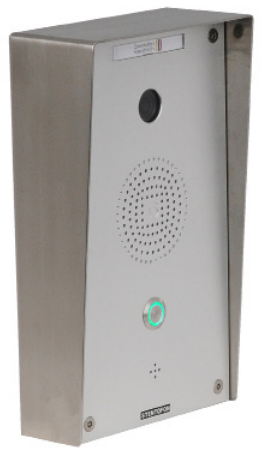
IP Video Door Station - 1401110100
From Zenitel Wiki
Camera Type: CP-Cam
The STENTOFON Vandal Resistant IP Video Station (item 1401110100) is tough, durable and resilient, and designed for use in the harshest of environments. The station is typically used as a communication, information or emergency point and connects directly to the IP network making it easy to deploy – anywhere and at any distance. Designed for CCoIP® the station offers a set of critical communication features such as integrated firewall, group call, call priority and over-ride, to name just a few. This enables you to deliver instant, efficient and secure voice, video and data services in an IP environment.
Contents
Installation
See article: IP Station Installation
Station Board Connectors and LED Indications
See article: IP Station Board Connections and Indications
IP Station Configuration
See article: IP Station Configuration
Reset to factory settings
See article: IP Station Restore Factory Defaults
Software Upgrade
See article: IP Station Software upgrade
Dimensions
See article: IP Stations Dimensions and Mounting Instructions
Camera
Connect to the camera using a webbrowser on default IP address 169.254.1.101.
In the menu that appears, click System Settings, and you will be asked to login:
Username: admin
Password: 1234
Compability
This table descibes the camera specific settings that must be set depending on the receiver
| Receiving unit | Resolution | Frame Rate | Compression | Other2 | Comments |
| IP Video Desktop | 320x240 | Unlimited | 30 | xx | yy |
| Cisco xxx | xx | xx | xx | xx | yy |
| SNOM IP Phone | xx | xx | xx | xx | yy |
| Grandstream xxx | xx | xx | xx | xx | yy |
| PhonerLite SIP Client | xx | xx | xx | xx | yy |
| DIVUS Videophone | xx | xx | xx | xx | yy |
These units have been tested and found to be not supported:
- BRIA (CounterPath) SIP client
- CPCAM viewer
Setup with STENTOFON Video Display Station
To configure the STENTOFON Video Display Station please see: IP Desktop Station with Video Display - 1408001635
This chapter describes the steps for configuring the CP-Cam:
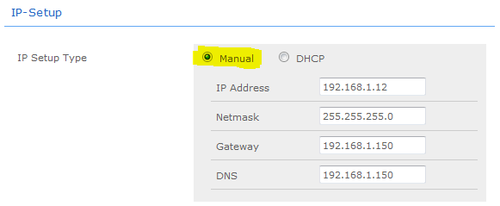
From the Main Menu select System Settings > Network
- 1. Under section IP-SETUP, set IP-SETUP Type to Manual
- 2. Enter a static IP adresss, Netmask, Gateway and DNS
- 3. Under section System, set Authentication required for Picture/Video to No
- 4. Click Save Changes at the bottom of the page
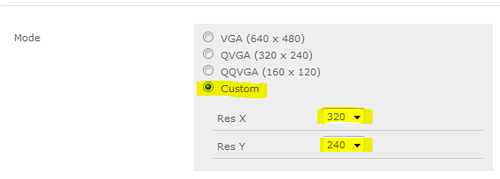
From the Main Menu select System Settings > Camera
- 1. Under section Settings, set Mode to Custom
- 2. Set Res X to 320
- 3. Set Res Y to 240
- 4. Under section Settings, set Frames per Second (Sensor) to 15


