FCDC-1
From Zenitel Wiki
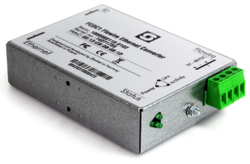
The Flowire Converter enables Ethernet to run on the same two wires as power, providing simpler cabling and opens up for longer cable hauls. The Flowire Converter is also capable of powering Ethernet devices attached to it, such as IP intercom stations or IP cameras.
Contents
Highlights
The FCDC-1 unit forwards the power received on the PLC line out to the spare pairs of the Ethernet port (PoE, mode B).
Configuration and Software Upgrade
Installation
Overview
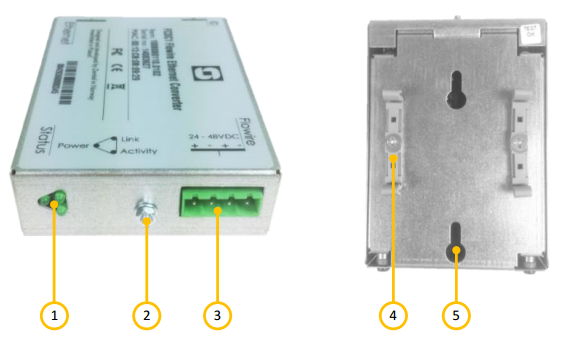
| 1 | Status indicators | Indicates status for power, link and activity |
| 2 | Ground connection | Ground connection for grounding of the unit |
| 3 | Flowire/Power ports | Connections for power and Flowire network |
| 4 | DIN mounting clips | Plastic clip to mount the Flowire Converter box to a DIN rail |
| 5 | Mounting holes |
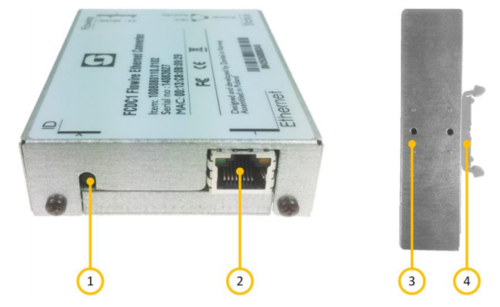
| 1 | Password Reset Button | Pressing and holding this button for more than 15 seconds will reset the NMK password to the default: HomePlugAV0123 |
| 2 | Ethernet connection | Ethernet connection with power |
| 3 | Alt. position for DIN clips | |
| 4 | DIN mounting clips | Plastic clip to mount the Flowire Converter box to a DIN rail |
The Password Reset Button will set the following factory defaults:
- Reset the NMK password to its default
- Enable DHCP
- IGMP snooping querier will be turned on

|
It is recommended to use FCDC1 only when you need to power the connected device via the spare pairs of the Ethernet port. In all other situations, use the FCDC2. |
Placement
When used in an equipment rack, the Flowire Converter can be placed at any accessible location.

|
When installing more than one Flowire network in the same equipment rack, precautions must be taken to reduce crosstalk between the networks. |
Mounting
The Flowire Converter is a DIN-rail mounted device, and hence requires a DIN rail. The DIN rail shall be mounted securely to the equipment rack, and properly stabilized. The DIN clips on the Flowire Converter can be placed on either the side or the bottom, thus giving different mounting options.
Grounding
It is always good practice to ground the cabinet of equipment installed in racks. This ensures safety and good EMC. The grounding connection of the Flowire Converter should be connected to the equipment rack’s ground strip using a ground wire of at least 0.75 mm² (AWG 19).
Power Supply
The Flowire Converter can operate over a wide range of voltages. The voltage selected depends on the type of equipment connected to the Flowire network:
- 24 Volts DC: When the Flowire Converter is used with explosion proof devices, i.e. TFIX intercoms and Exigo Ex Access panels, the Flowire shall be powered by a 24VDC power supply.
- 48 Volts DC: When the Flowire Converter is used with other Flowire unit(s), the Flowire Converter shall be powered by a 48VDC power supply.

|
Connect the power supply to any one of the two Flowire/power ports of the Flowire Converter using wires with a thickness of at least 1.5 mm² (AWG 15) and a length of at least 1 m |
Use of Shielded Cable
When using shielded cable (for improved EMC when used in high-EMI areas) the shield should be attached to the chassis of the Flowire unit and the central rack.
Cabling in Ex Areas
The TFIX intercoms and Exigo Ex Access panels are connected to the FCDC-2 at the central location using Ex certified 2-wire shielded cable. Flowire is used to extend the Ethernet connection and support power distribution on the 2-wire cabling infrastructure.
Reset to Factory defaults
Flowire can be reset to Factory defaults by pressing the Password Reset Button for 15 seconds. The button is located next to the Ethernet connector.
- Static IP address : 169.254.1.10
- DHCP enabled. If the unit obtains a dynamic IP address, it comes in addition to the static address.
- NMK Password: HomePlugAV0123
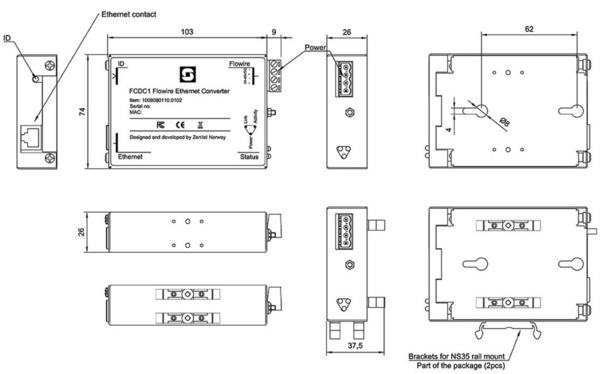
Dimensions


