VLAN Settings (Devices)
From Zenitel Wiki
VLAN Tagging is the practice of inserting a VLAN ID into a packet header in order to identify which VLAN (Virtual Local Area Network) the packet belongs to. More specifically, switches use the VLAN ID to determine which port(s), or interface(s), to send a broadcast packet to.
VLAN tagging is supported by stations in the INCA family, IP Desktop Master Station V2, IP Desktop Master Station with Handset V2, IP Flush Master Station V2 and IP CROR Master Station V2.
This guide is applicable for situations where the Network Administrator has configured an Access VLAN and a Voice VLAN, and expects that the IP Station shall connect to the Voice VLAN. In this case with Access and Voice VLANs, all non-VLAN aware equipment will be connected to the Access VLAN, and this may cause the IP Station to be isolated from the server and other Stations.
Information Required
Before beginning, ensure you have the correct details for the VLANs required, i.e.
- Access VLAN - 100
- Voice VLAN - 120
Obtain these from the Network Administrator and substitute the correct details in this page as you go along.
Version 2 stations
Configuration steps
In Stationweb, navigate to the Advanced Network tab, followed by VLAN. In SIP/EDGE mode, you will need to enable Advanced Configuration mode.
Trunk port with Access VLAN
This mode will support a network switchport that is configured for Trunk mode, with an Access VLAN ID for devices that are not tagged. In this way, the Intercom will be configured for the Voice VLAN, and the AUX port will automatically be assigned to the Access VLAN by the network switch.
- Enable VLAN by checking the option for Enabled
- For the Intercom port, check the Tag option and enter the VLAN for the Intercom.
Trunk Port with no Access VLAN
This mode will support a network switchport that is configured for Trunk mode and expects all packets to be tagged. In this way, the Intercom will be configured for the Voice VLAN, and the AUX port will automatically tag packets with the configured VLAN.
- Enable VLAN by checking the option for Enabled
- For the Intercom port, check the Tag option and enter the VLAN for the Intercom.
- For the Aux port, check the Tag option and enter the VLAN for the AUX port.
Version 1 stations
Configuration steps
In Stationweb, navigate to the Advanced Network tab, followed by VLAN. For firmware 2.11 and higher, you will need to enable Advanced Configuration mode.
Configuration is performed in 2 steps.
First, assign VLAN configurations to ports and then assign Ports to VLANs.
Assign VLAN configurations
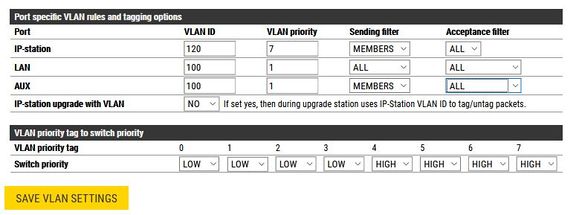
In the Port Specific VLAN Rules and tagging options, set the following;
- IP Station
- VLAN ID to the Voice VLAN - 120
- VLAN Priority to 7
- Sending Filter to Members
- LAN
- VLAN ID to the Access VLAN - 100
- VLAN Priority to 1
- Sending Filter to All
- Acceptance Filter to All
- AUX
- VLAN ID to the Access VLAN - 100
- VLAN Priority to 1
- Sending Filter to Members
- Acceptance Filter to All
Press SAVE VLAN SETTINGS
Assign Ports to VLANs
In the Add Ports to a VLAN section, set the following;
- IP Station Membership - Member, Egress tagging - Remove tag
- LAN Membership - Member, Egress tagging - Keep tag
- AUX Membership - Not Member
- VLAN ID - Voice VLAN 120
Then press ADD VLAN
Then set the following;
- IP Station Membership - Not Member
- LAN Membership - Member, Egress tagging - Remove tag
- AUX Membership - Member, Egress tagging - Remove tag
- VLAN ID - Access VLAN 100
Then press ADD VLAN
In the Remove VLAN by ID, enter VLAN ID 1 and press Remove VLAN.
Finalizing configuration
Change the Enable VLAN setting from No to Yes and click SAVE VLAN SETTINGS.
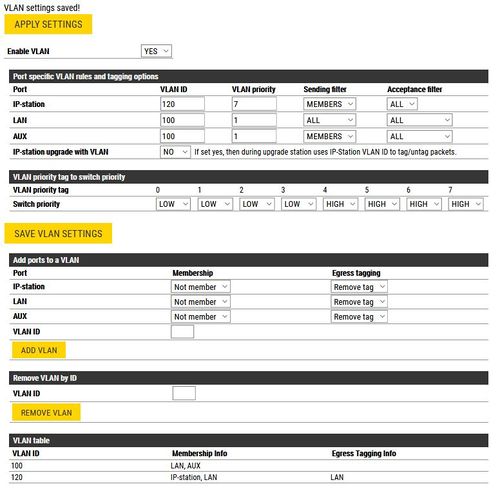
Ensure you have correctly set all attributes, so that the configuration matches the image here.
Press Apply Settings to enable the settings. You will need to then connect to the unit via it's Voice VLAN.
If you need the device to collect a new IP Address from the DHCP Server, Navigate to System Recovery and perform a Full Reboot. This should be performed instead of Apply Settings.
Recovery
If the station is uncontactable after configuration, then perform a Factory Reset on the device and configure again.
But what if...
The Network Administrator has defined the switch port to be a Trunk port, and the device connected to the AUX port is not VLAN aware?
Then set the following;
- IP Station Membership - Not Member
- LAN Membership - Member, Egress tagging - Keep tag
- AUX Membership - Member, Egress tagging - Remove tag
- VLAN ID - VLAN 100
Then press ADD VLAN
The Network Administrator has defined the switch port to be a Trunk port, and the device connected to the AUX port is VLAN aware and will be configured to it's VLAN?
Then set the following;
IP Station Membership - Not Member
- LAN Membership - Member, Egress tagging - Keep tag
- AUX Membership - Member, Egress tagging - Keep tag
- VLAN ID - VLAN 100
Then press ADD VLAN
In both these additional cases, there is no change to the IP Station VLAN configuration.


