UTStarcom F1000G WiFi phone
From Zenitel Wiki
This article describes the basic setup of the UTStarcom F1000G WiFi telephone from UTStarcom.
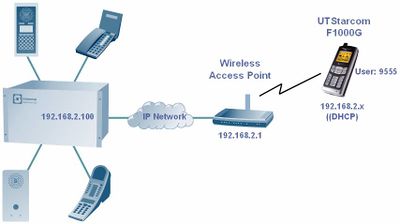
In the following example the handset is configured with number 9555, and set to registrer to the AlphaCom at IP address 192.168.2.100, mask 255.255.255.0. The wireless router has default IP address 192.168.2.1 and the handset will get 192.168.2.x (DHCP).
Configuration of AlphaCom
The AlphaCom needs to be configured with a SIP registrar node, and must be equipped with license for SIP stations.
Configuration of UTStarcom F1000G
The phone is configured from the keyboard.
Phone settings:
- Menu -> WiFi-Settings - > Signal Protocol -> SIP:
- SIP Registrar Server Mode: IP
- SIP Registrar Server IP Address: 192.168.2.100
- SIP Outbound Proxy Mode: IP
- SIP Outbound Server IP Address: 192.168.2.100
- SIP User Name: 9555
- Menu -> Network Service - > Personal Information: Caller ID = Johnson
This is the caller ID seen in the AlphaCom display station when the SIP phone calls the AlphaCom.
To search for the WiFi net from the telephone, select Menu -> WiFi-Settings -> Net Search. Now the SSID of your WiFi net should appear. Select your SSID and "Save" twice. Then "Security Mode" is displayed, select OK, then "Open AP" = OK. Finally "Activate" = OK.
The phone has a Web interface which also can be used for configuration of the phone. The IP address of the phone is found in Menu -> WiFi-Settings ->Network Parameter -> Network Info.
- Default username: user
- Default password: 888888
Additional information
- The configuration of the wireless router is not described in this article.
- In this configuration example the WiFi is open without any encryption, but in a real installation the WiFi network should be secured
- During the test it was noticed that if the wireless router was switched off and on, the phone did not connect to the WiFi network afterwards. You had to switch off and on the phone.

