Billing Installation Guide
From Zenitel Wiki
Contents
Billing Installation Guide
To install or upgrade from the billing version 1, follow the instructions below:
Billing version 2 is only supported on Alphacom XE platform and requires the board support package version 30.00 of the AMC IP Card.
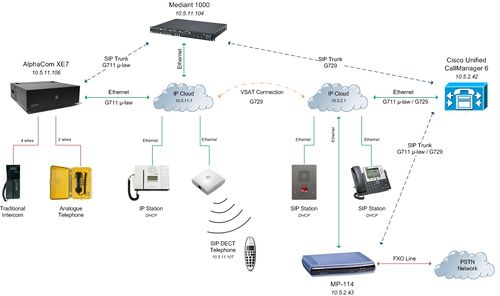
Components used in this example:
- AlphaCom XE7 (AMC Board Version 11.1.9.1)
- Cisco Unified Call Manager (System Version 6.1.2.1000-13)
- Mediant 1000 (Firmware Version 6)
- MP-114 (Firmware Version 5.4)
- AlphaCom Stations (Traditional Intercom, Analogue Telephone, IP Station, SIP Station)
- Cisco SIP Station 7961
Flash the latest image with support for BSP 30.00
Alpha Image Upgrade Application
Assign IP address to the AlphaCom XE7 Ethernet Port(s)
[[Image:|thumb|350px|Interfaces]]
Install the Log on to AlphaWeb and enter a valid IP address on the Ethernet port(s).
In the example below, Eth.0 has a default configuration and Eth.1 is used for AlphaNet.
Consult your network administrator to obtain the IP address.
2. Install the "Alphacom Flash Image Upgrade" application on your computer (Requires .NET Framework 3.0)
3. Copy the image file "alpha_uimage_20_billing.bin" (or desired image) to the "ServerRoot" catalogue selected while installing the program (default: C:\Program Files\STENTOFON\AlphaImageUpgrade\ServerRoot)
4. Install the new image file according to the AMC Flash Image Update Procedure.
5. If it exists a newer Billing package version that you want to install, do this before configuring the billing system. (alpha_billing_01_10.tbz2 is the latest release by 01.03.2009)
6. Insert a license key with desired SIP Trunk Lines
7. Enable the Billing Node Exchange under "Exchange & System -> NetRouting -> General Settings -> Billing Node"
8. Send Changes, and reset from AlphaPro to update database configuration in the Billing Web interface.

