ITSV-1 (Pulse)
From Zenitel Wiki
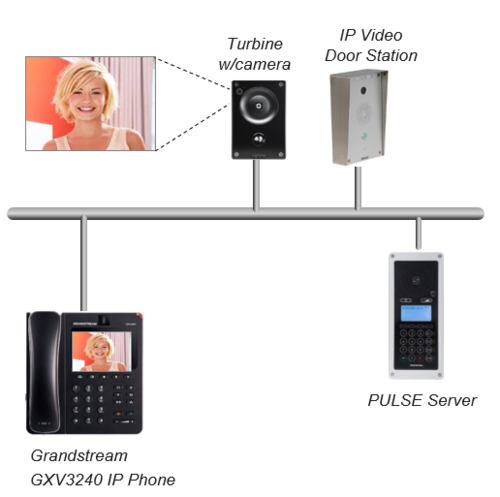
This article describes how to set up the IP Video Phone ITSV-1 to operate in a PULSE system. The phone can be used for audio only, or it can also be used to show the video image from a Vingtor-Stentofon Video Door Station.
Pulse Server configuration
A SIP phone license is required on the Pulse Server, and a SIP User account must be defined in the Pulse Server in order for the ITSV-1 phone to register.
Configuration of the ITSV-1 phone
Network settings
- Power up the phone
- Push on the touch screen, and select Settings > About phone > Network status to find the IP address.
- Open a web browser on your computer, enter the IP address into the addres bar (e.g. "http://192.168.0.160" or "192.168.0.160") and click Enter.
- Enter the user name (default: admin) and password (default: alphaadmin) in the pop-up dialogue box and click Login
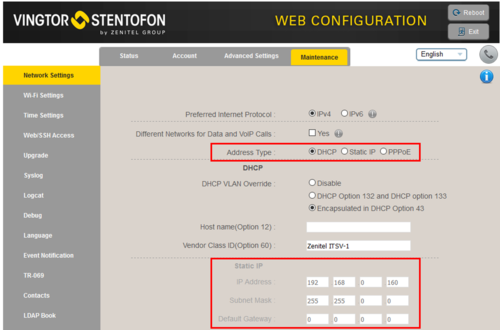
- Select Network Settings > Maintenance to configure the phone to use DHCP (obtain an IP address automatically) or Static IP address.
SIP account
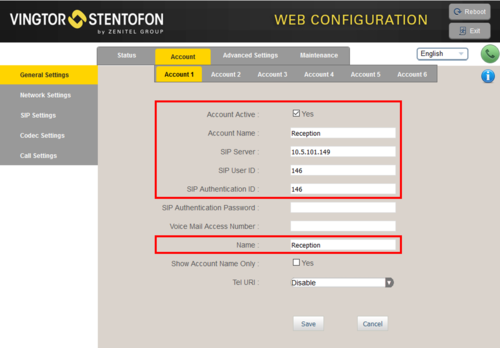
- Select Account 1 > General Settings
- Account active: Check "Yes"
- Account name: Is shown in the LCD screen to identify the account
- SIP Server: The Pulse server IP address
- SIP User ID: Must match with the directory number entered in the Pulse server
- SIP Authentication ID: This ID is identical to the "SIP User ID"
- Name: This text is shown as Caller ID when placing a call
Configuration for Video
The ITSV-1 phone can be configured to show video image from the following Video Door Stations:
- IP Video Door Station - 1401110100
- IP Video Door Station - 1401110200
- Turbine Compact IP Video - TCIV
The video is streamed in MJPEG format directly from the camera to the phone. The Pulse Server is not involved in the video stream. The cameras must have a static IP address. The ITSV-1 phone supports up to 30 cameras.
The directory number of the Video Door Station must be defined in the phone, together with the URL of the camera of the Video Door Station. When a call is received, the phone will look up in this Camera List, and find the correct URL for the associated camera.
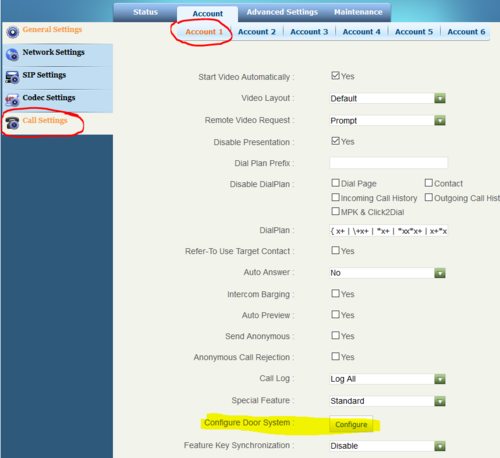
- In Account > Call Settings , select Account 1
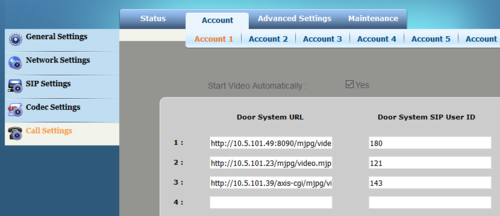
- Press the button Configure Door System to open the Camera List
- In the Camera List, enter the camera URL and the directory number of the Video Door station:
Which URL to use depends on the type/model of Video Door Station being used:
- Turbine Compact IP Video - TCIV: http://<IP address of the camera>:8090/mjpg/video.mjpg
- Example: http://10.5.101.49:8090/mjpg/video.mjpg
- IP Video Door Station - 1401110100 (CP-CAM camera): http://<IP address of the camera>/mjpg/video.mjpg
- Example: http://10.5.101.48/mjpg/video.mjpg
- IP Video Door Station - 1401110200 (Axis camera): http://<IP address of the camera>/axis-cgi/mjpg/video.cgi
- Example: http://10.5.101.39/axis-cgi/mjpg/video.cgi
Door Opening feature (optional)
During conversation with the Turbine Video Station TCIV the integrated relay of the station can be operated by pressing a digit (default: digit 6) on the phone. As the phone by default is using DTMF signaling by RFC 2833, and this is supported by the Turbine range of stations, no further settings are required in the phone.
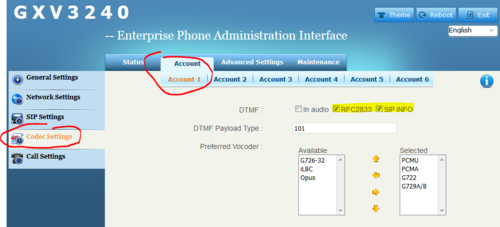
If the phone should operate the relay in other types of IP Substations (non-Turbine), the phone must be set to signal DTMF by SIP INFO.
- Click on Account 1 > Codec Settings, and check DTMF via "SIP INFO":
Camera Configuration
TCIV - Configuration of the camera
- Log on to the TCIV station (default username: admin, password: alphaadmin)
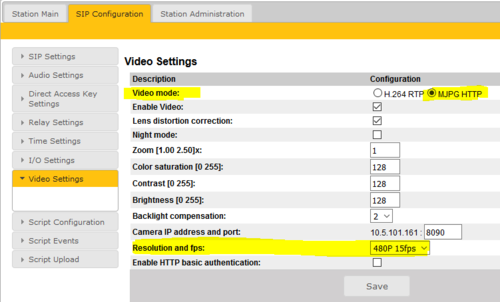
- Select SIP Configuration > Video Settings, and set:
- Video mode: MJPG HTTP
- Camera IP address and port: 8090 (if you use a different port number, the URL used in the phone Camera list must be changed accordingly)
- Resolution and fps: 480P 15fps
IP Video Door Station 1401110100 - Configuration of the CP-CAM camera
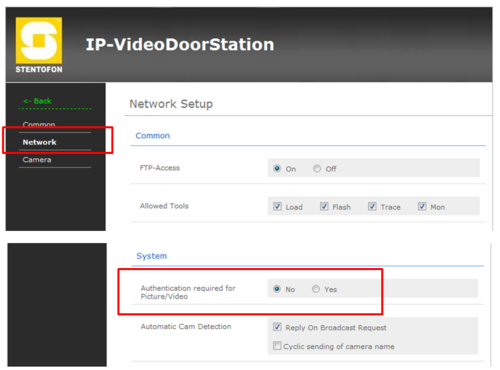
In the camera the authentication for the image/video display has to be deactivated.
- Log on to the CP-CAM camera (default username: admin, password: 1234)
- SelectSystem Settings > Network > System, and change the "Authentication required for Picture/Video" to "No".
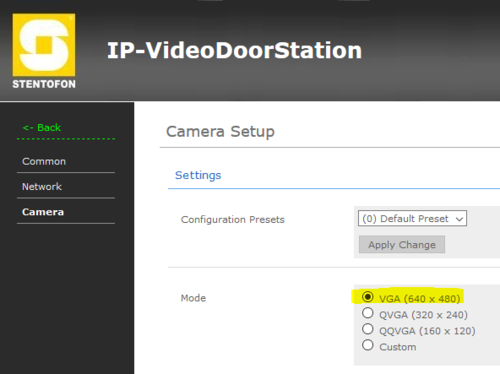
Set the resolution to 640 x 480 pixels:
- SelectSystem Settings > Camera, and set "Mode" to VGA (640 x 480).
IP Video Door Station 1401110200 - Configuration of the Axis camera
- Log on to the Axis camera (default username: root, password: 1234)
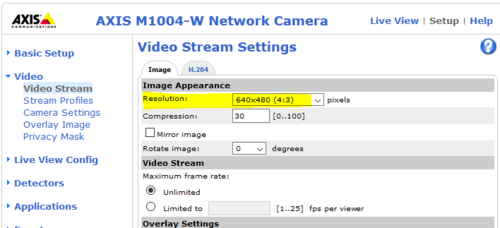
- Select Setup > Video > Video Stream and change the resolution to 640 x 480 pixels:

