IEEE 802.1X
From Zenitel Wiki
IEEE 802.1X is an IEEE Standard for port-based Network Access Control (PNAC). By "port" we mean a single point of attachment to the LAN infrastructure. It provides an authentication mechanism to devices wishing to attach to a LAN, either establishing a point-to-point connection or preventing it if authentication fails.
Contents
Intercoms and devices
Zenitel IP Devices
User interface
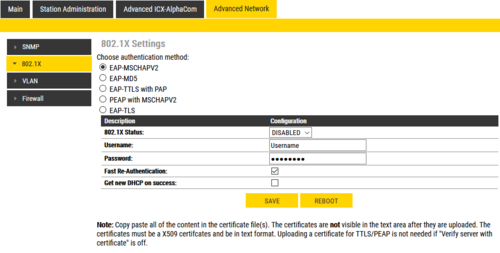
The 802.1X configuration is done from the IP-station web interface at Advanced Network > 802.1X.
Choose authentication method. The different authentication methods are:
- MSCHAPV2
- MD5
- TTLS with PAP
- PEAP with MSCHAPV2
- TLS
MSCHAPV2 and MD5 encrypts the password.
TTLS with PAP and PEAP with MSCHAPV2 encrypts both username and password.
Depending on the authentication method there are a few parameters to configure.
- 802.1X status: Enable or disable 802.1X
- Username: The username used to identify a station.
- Password: The password associated with the username.
- Fake username ["TTLS with PEAP" and "PEAP with MSCHAPV2" only]: The fake username sent outside of encrypted tunnel with TTLS with PAP and PEAP with MSCHAPV2. The user name is encrypted.
- Verify server with certificate [TTLS with PEAP, PEAP with MSCHAPV2 and TLS only]: Specifies that the client verifies that server certificates presented to the client have the correct signatures, have not expired, and were issued by a trusted root certification authority (CA). It's enabled by default.
- Fast Re-Authentication: EAP peer and an EAP server authenticate each other through a third party known as the EAP authenticator. When a peer moves from one authenticator to another, it is desirable to avoid a full EAP authentication to support fast handovers.
- Get new DHCP on success: If 802.1X authentication is successful, station will restart it's DHCP client.
- Insert CA Certificate [TTLS with PEAP, PEAP with MSCHAPV2 and TLS only]: Upload certificate (public key) used by authentication server. This is not required if "Verify server with certificate" option is disabled.
- Insert User Public Certificate [TLS only]: Upload certificate (public key) used by authentication client (user).
- Insert User Private Key [TLS only]: Upload the private key which is paired with user public certificate.
- Click Save to save the current settings
- Click Reboot. The new 802.1X settings will only come into effect after a reboot.
Software requirement
802.1X is supported:
- In INCA stations as from firmware 1.09.3.0.
- In Turbine stations in all firmware versions.
- In Pulse mode as from firmware 4.7 (Turbine) and 2.7 (INCA). (Previously supported only in SIP and AlphaCom mode).
802.1X and software upgrade
Turbine devices with Dual Partitions
On Turbine Devices with Dual Partitions, software upgrade can be performed also when the station is using 802.1X authentication.
This is applicable to all devices that come with firmware 5.1 or higher preinstalled from factory.
INCA stations and Turbine devices with single partition
On the following devices a software upgrade is not possible when the station is using 802.1X authentication:
- INCA stations
- Turbine devices with firmware 5.0 or earlier preinstalled from factory (Note that it is not sufficient to upgrade the firmware to version 5.1 or higher "in the field").
In order to upgrade these stations, one must either:
- Remove security on the switchport, upgrade and set security back on the switchport.
- Connect the station to a non-802.1X port and do a manual upgrade.
Note that in the Turbine stations the 802.1x certificate does not survive a software upgrade. The certificate must be uploaded to the station again after a software upgrade.
The reason that the station cannot be upgraded is that during the upgrade of the IP-station, 802.1X will not be running. Thus if 802.1X reauthentication is enabled and is performed during upgrade, the IP-station will lose contact with the tftp server (dependent on the configuration when 802.1X authentication fails). If the IP-station loses contact with the tftp server, it will not be upgraded. The same is also valid when upgrading via VS-IMT.
ITSV-2 and ITSV-3
By default, 802.1x is disabled. When it’s enabled, there are 3 different mode for selection: EAP-MD5, EAP-TLS and EAP-PEAP. 802.1x can be set up accordingly for media access control and network security purpose from web UI in Network Settings → Ethernet Settings → 802.1X Mode
- 802.1x mode - Enables and selects the 802.1x mode for the phone system. The supported 802.1x modes are: EAP-MD5, EAP-TLS, EAP-PEAP. The default setting is "Disable".
- 802.1x Identity - Enters the identity information for the selected 802.1x mode.
- 802.1x Secret - Enters the secret for the 802.1x mode.
- CA Certificate - Uploads the CA Certificate file to the phone. (This setting will be displayed only if the 802.1x TLS or EAP-PEAP mode is enabled)
- Client Certificate - Loads the Client Certificate file to the phone. (This setting will be displayed only if the 802.1 X TLS mode is enabled)
- Private Key - Loads the private key file to the phone. (This setting will be displayed only if the 802.1 X TLS mode is enabled)
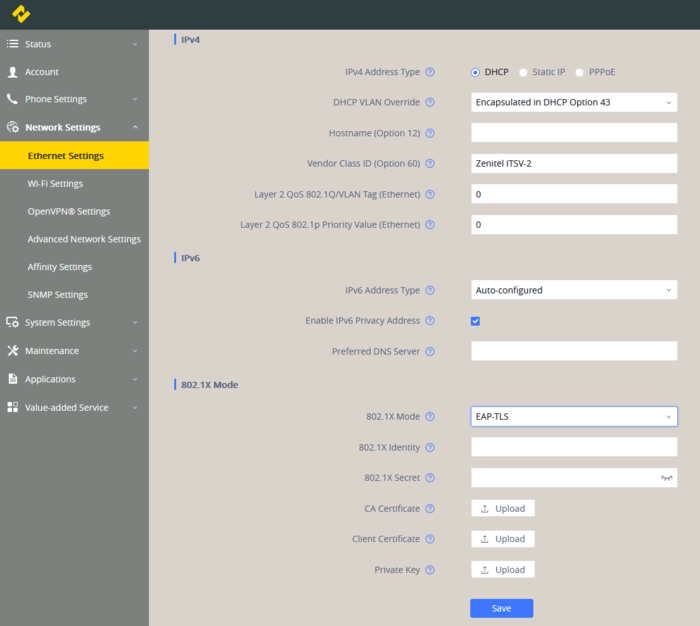 |
| 802.1x in ITSV-2 and ITSV-3 |
ITSV-4 and ITSV-5
By default, 802.1x is disabled. When it’s enabled, there are 3 different mode for selection: EAP-MD5, EAP-TLS and EAP-PEAP. 802.1x can be set up accordingly for media access control and network security purpose from web UI in Network Settings → Ethernet Settings → 802.1X Mode
- 802.1x mode - Enables and selects the 802.1x mode for the phone system. The supported 802.1x modes are: EAP-MD5, EAP-TLS, EAP-PEAP. The default setting is “Disable”.
- 802.1x Identity - Enters the identity information for the selected 802.1x mode. (This setting will be displayed only if 802.1 X mode is enabled).
- 802.1x Secret - Enters the secret for the 802.1x mode. This option will appear when 802.1x mode is EAP-MD5 or EAP-PEAP.
- 802.1X CA Certificate - Select the CA Certificate file to the phone. (This setting will be displayed only if the 802.1 X mode is enabled). To upload the certificates, click manage certificates and then add in the left top corner.
- 802.1X User Certificate - Select the Client Certificate file to the phone. (This setting will be displayed only if the 802.1 X TLS mode is enabled). To upload the certificates, click manage certificates and then add in the left top corner.
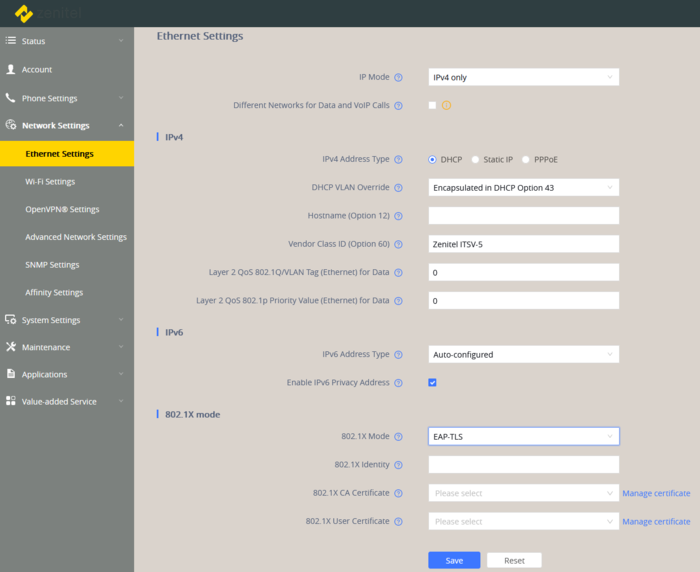 |
| 802.1x in ITSV-4 and ITSV-5 |
ICX-Alphacom
Software requirement
802.1X is supported:
- In ICX-AlphaCom, as from software version 1.1.3.0
User interface
The 802.1X configuration is done from the ICX-Alphacom web interface at System Configuration > 802.1X.
Choose authentication method. The different authentication methods are:
- MSCHAPV2
- MD5
- TLS with PAP
- PEAP with MSCHAPV2
- TLS
MSCHAPV2 and MD5 encrypts the password.
TLS with PAP and PEAP with MSCHAPV2 encrypts both username and password.
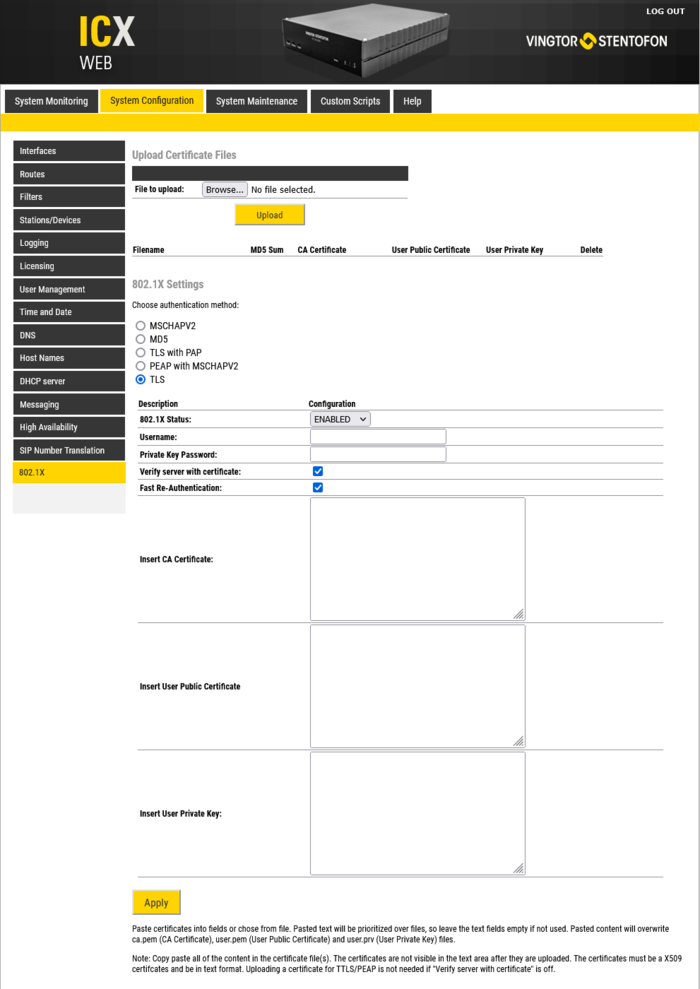 |
| Select the authentication method |
Depending on the authentication method there are a few parameters to configure.
- 802.1X status: Enable or disable 802.1X
- Username: The username used to identify a station.
- Password: The password associated with the username.
- Fake username ["TTLS with PEAP" and "PEAP with MSCHAPV2" only]: The fake username sent outside of encrypted tunnel with TTLS with PAP and PEAP with MSCHAPV2. The user name is encrypted.
- Verify server with certificate [TTLS with PEAP, PEAP with MSCHAPV2 and TLS only]: Specifies that the client verifies that server certificates presented to the client have the correct signatures, have not expired, and were issued by a trusted root certification authority (CA). It's enabled by default.
- Fast Re-Authentication: EAP peer and an EAP server authenticate each other through a third party known as the EAP authenticator. When a peer moves from one authenticator to another, it is desirable to avoid a full EAP authentication to support fast handovers.
- Get new DHCP on success: If 802.1X authentication is successful, station will restart it's DHCP client.
- Insert CA Certificate [TTLS with PEAP, PEAP with MSCHAPV2 and TLS only]: Upload certificate (public key) used by authentication server. This is not required if "Verify server with certificate" option is disabled. Certificates can either be copy-pasted in the field or uploaded and them mark the correct checkbox.
- Insert User Public Certificate [TLS only]: Upload certificate (public key) used by authentication client (user). Certificates can either be copy-pasted in the field or uploaded and them mark the correct checkbox.
- Insert User Private Key [TLS only]: Upload the private key which is paired with user public certificate. Certificates can either be copy-pasted in the field or uploaded and them mark the correct checkbox.
- Click Apply to save the current settings
Copy and paste certificates
Certificates can be copied to the corresponding fields as shown in the image bellow.
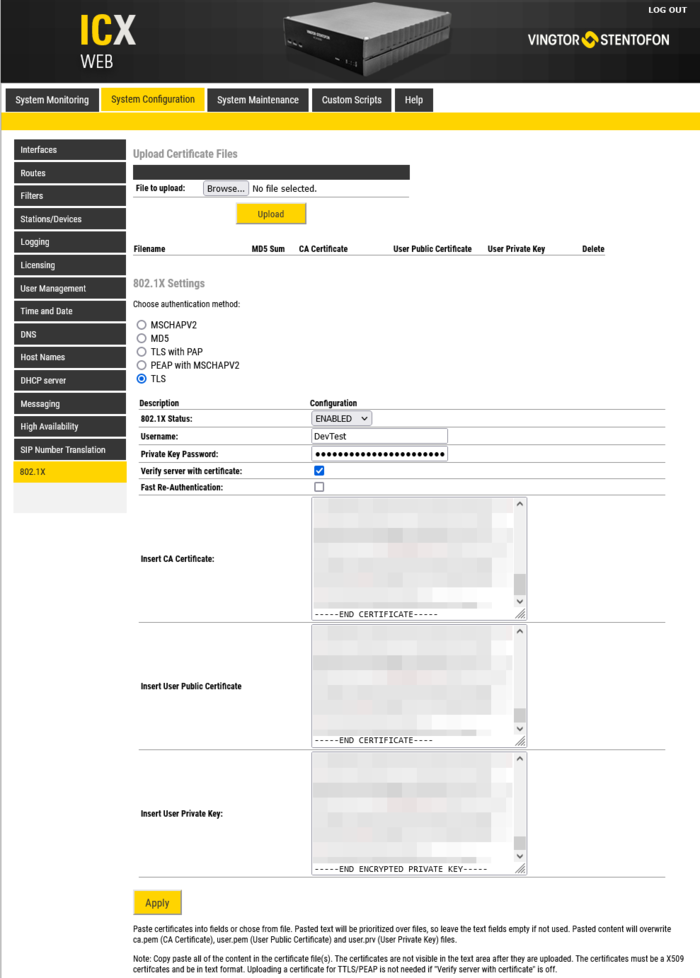 |
| Copy the certificates |
After clicking Apply files with the certificates content will be created.
Uploading certificates
It is also possible to upload the certificates by browsing to the folder where the certificate is and upload it. After that the field for the type of certificate should be checked.
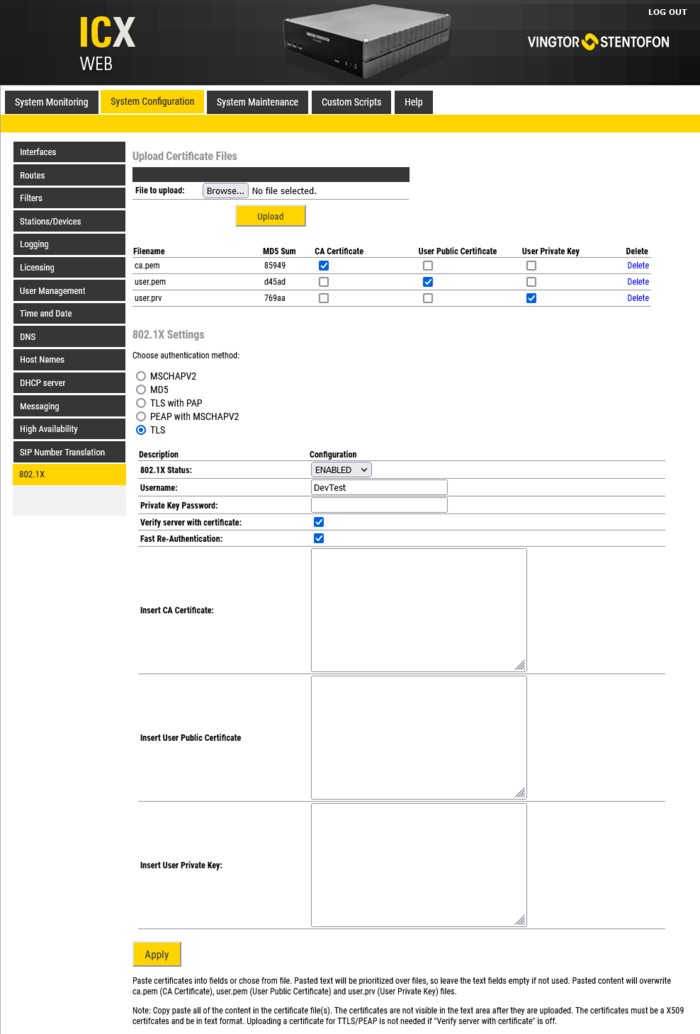 |
| Uploaded certificates |


