Difference between revisions of "TAX-3"
From Zenitel Wiki
(→Connecting TAX-3 to TFIX) |
(→Handset operation) |
||
| (20 intermediate revisions by 2 users not shown) | |||
| Line 1: | Line 1: | ||
| − | + | [[File:1008150030.PNG|thumb|500px|The TAX-3 handset]] | |
| − | [[File:1008150030.PNG|thumb|500px]] | ||
The TAX-3 handset comes with a Push-To-Talk (PTT) button and 3.5-meter long cable. | The TAX-3 handset comes with a Push-To-Talk (PTT) button and 3.5-meter long cable. | ||
| − | == | + | ==Highlights== |
* Rugged handset for Ex application | * Rugged handset for Ex application | ||
* PTT-key for simplex operation in extremely noisy environments | * PTT-key for simplex operation in extremely noisy environments | ||
| Line 9: | Line 8: | ||
* High quality digital background noise reduction | * High quality digital background noise reduction | ||
* HD-voice compatible | * HD-voice compatible | ||
| − | |||
* Designed for Exigo & Turbine EX explosion-proof Intercoms | * Designed for Exigo & Turbine EX explosion-proof Intercoms | ||
[[File:TA-23 Side.png|right|250px]] | [[File:TA-23 Side.png|right|250px]] | ||
| + | <br> | ||
| − | == | + | ==Connecting the TAX-3 handset to the TFIX-V2 station== |
| − | + | * Connect the wire ferrules on the Handset cable to the [[TFIX-V2 Connections|connectors]] according to the pin configuration below. | |
| − | * Connect the wire ferrules on the Handset cable to the | ||
| − | [[File:TAX-3 | + | [[File:Connection of Handset TAX-3 on TFIX-V2.png|thumb|left|500px]] |
<br style="clear:both;" /> | <br style="clear:both;" /> | ||
| + | <br> | ||
| − | ===< | + | ==Connecting the TAX-3 handset to the TFIX station (Obsolete)== |
| + | * [[Open the TFIE/TFIX Enclosure|Open the TFIX Enclosure]] | ||
| + | * Connect the wire ferrules on the Handset cable to the [[TFIX Connections|terminal block]] according to the pin configuration below. | ||
| + | |||
| + | [[File:TAX-3 Connections.png|thumb|left|350px]] | ||
| + | <br style="clear:both;" /> | ||
| + | <br> | ||
| + | |||
| + | ==Configuration== | ||
| + | * [[Logging into an Zenitel IP Device|Log in to the station web interface]] | ||
| + | * Navigate to '''Audio Settings'''. | ||
| + | * Set "Accessories" to "'''Handset'''" | ||
| + | * Reboot the station. | ||
| + | [[File:TFIE Handset.PNG|thumb|left|700px|TAX-3 Handset accessory setting]] | ||
| + | <br style="clear:both;" /> | ||
| + | |||
| + | <br> | ||
| + | |||
| + | ==Handset operation== | ||
| + | [[File:TFIX Toggle.png|thumb|200px|Toggle Button in the TFIX-1 station]] | ||
| + | * When "Accessories" is set to "'''Handset'''" the station is by default in loudspeaking mode, i.e. the audio is routed to the speaker and microphone of the front panel of the TFIX station. Audio is also routed to the handset speaker, but the handset microphone is disabled. | ||
| + | * When a call is received, handset mode is activated by pressing the PTT button in the handset. The audio will then be routed to the handset, and the loudspeaker and the microphone in the front panel is muted. | ||
| + | * When the TFIX station returns to idle, e.g. when a call is ended, the station will automatically return to loudspeaking mode. | ||
| + | * In stations with '''Toggle''' button ([[TFIX-1]] only), one can also use this button to activate the handset. The button lets you toggle between loudspeaking and handset mode. The LED in the toggle button shows the status: | ||
| + | ** Green LED = Loudspeaking mode | ||
| + | ** Red LED = Handset mode | ||
| + | |||
| + | <br> | ||
| + | |||
| + | ==Dimensional drawing== | ||
[[File:TA-23.PNG|thumb|left|500px]] | [[File:TA-23.PNG|thumb|left|500px]] | ||
<br style="clear:both;" /> | <br style="clear:both;" /> | ||
| − | === | + | ==Related Information== |
| + | * [http://www.zenitel.com/product/tax-3 Additional Documentation on Zenitel.com] | ||
[[Category: Turbine Backboxes and accessories]] | [[Category: Turbine Backboxes and accessories]] | ||
Latest revision as of 10:29, 5 September 2024
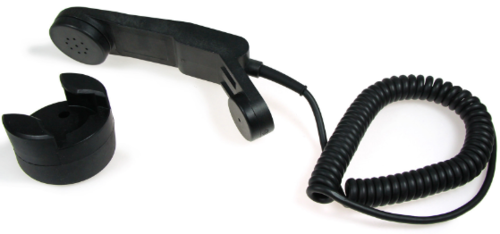
The TAX-3 handset comes with a Push-To-Talk (PTT) button and 3.5-meter long cable.
Contents
Highlights
- Rugged handset for Ex application
- PTT-key for simplex operation in extremely noisy environments
- Noise-cancelling microphone
- High quality digital background noise reduction
- HD-voice compatible
- Designed for Exigo & Turbine EX explosion-proof Intercoms
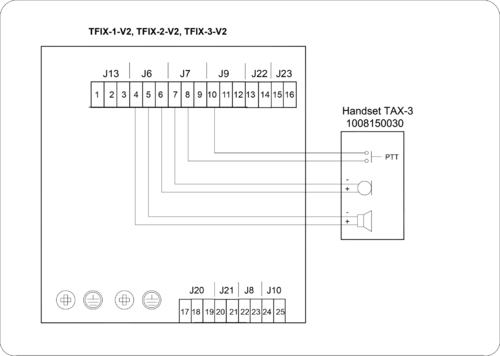
Connecting the TAX-3 handset to the TFIX-V2 station
- Connect the wire ferrules on the Handset cable to the connectors according to the pin configuration below.
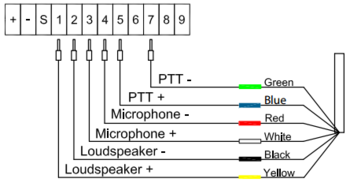
Connecting the TAX-3 handset to the TFIX station (Obsolete)
- Open the TFIX Enclosure
- Connect the wire ferrules on the Handset cable to the terminal block according to the pin configuration below.
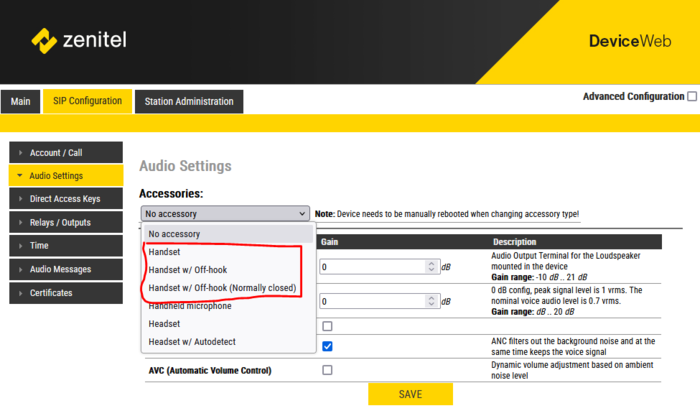
Configuration
- Log in to the station web interface
- Navigate to Audio Settings.
- Set "Accessories" to "Handset"
- Reboot the station.
Handset operation
- When "Accessories" is set to "Handset" the station is by default in loudspeaking mode, i.e. the audio is routed to the speaker and microphone of the front panel of the TFIX station. Audio is also routed to the handset speaker, but the handset microphone is disabled.
- When a call is received, handset mode is activated by pressing the PTT button in the handset. The audio will then be routed to the handset, and the loudspeaker and the microphone in the front panel is muted.
- When the TFIX station returns to idle, e.g. when a call is ended, the station will automatically return to loudspeaking mode.
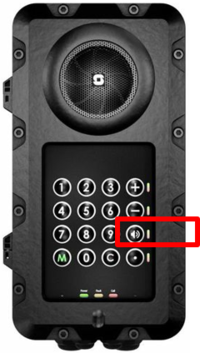
- In stations with Toggle button (TFIX-1 only), one can also use this button to activate the handset. The button lets you toggle between loudspeaking and handset mode. The LED in the toggle button shows the status:
- Green LED = Loudspeaking mode
- Red LED = Handset mode
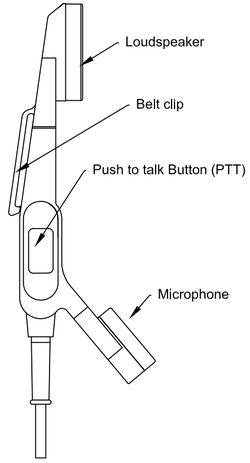
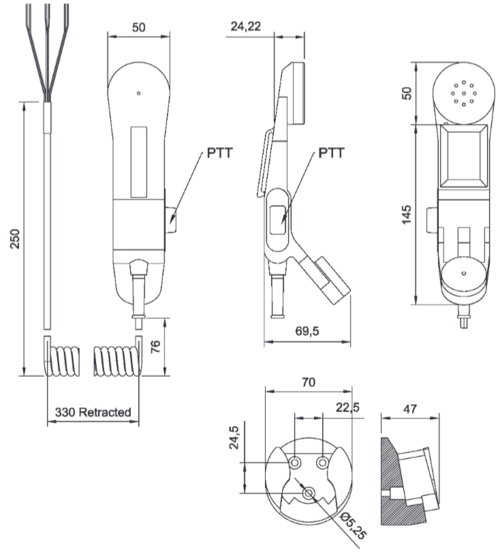
Dimensional drawing

