FCDC-3: Difference between revisions
From Zenitel Wiki
| (111 intermediate revisions by 2 users not shown) | |||
| Line 1: | Line 1: | ||
{{AEIPS}}[[File:FCDC-3.png|thumb|250px|Flowire FCDC-3 ( | {{AEIPS}}[[File:FCDC-3.png|thumb|250px|Flowire FCDC-3 (1008080310)]] | ||
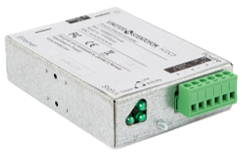
The [[Flowire|Flowire Converter]] enables Ethernet to run on the same two wires as power, providing simpler cabling and opens up for longer cable hauls. The Flowire Converter is also capable of powering Ethernet devices attached to it, such as IP intercom stations or IP cameras. | |||
==Highlights== | ==Highlights== | ||
* | *[[FCDC-3#PoE-power_forwarding|PoE-power forwarding]] enable/disable by switch | ||
*Separate Power input – isolated from the PLC bus | |||
*Several Flowire Clusters can be powered from same power supply | |||
* | *[[FCDC-3 - Backwards compatibility|Backwards compatible]] with FCDC1/2/TFIX after software upgrade | ||
* | *Replacement for [[FCDC-1]] and [[FCDC-2]] | ||
* [[ | |||
* [[ | |||
== Installation == | == Installation == | ||
===Overview === | ===Overview === | ||
[[File:FCDC3 | [[File:FCDC3 conn1.png|left|400px|FCDC-3]] | ||
<br style="clear:both;" /> | <br style="clear:both;" /> | ||
[[File: | |||
[[File:FCDC3 conn2.png|left|400px]] | |||
<br style="clear:both;" /> | <br style="clear:both;" /> | ||
===Mounting=== | |||
The Flowire Converter should be mounted on-wall by using 2 x 4 mm screws, or on NS35 DIN rail by using the mounting clips provided. Maximum ambient temperature is 70°C but to extend life span of the product it is recommended mounted in a normal and ventilated indoor environment. | |||
{{obs|Due to heat dissipation, it is recommended to mount multiple Flowire units minimum 2cm apart from each other}} | |||
===Grounding=== | ===Grounding=== | ||
It is always good practice to ground the cabinet of equipment installed in racks. This ensures safety and good EMC. The grounding connection of the Flowire Converter should be connected to the | It is always good practice to ground the cabinet of equipment installed in racks. This ensures safety and good EMC. The grounding connection of the Flowire Converter should be connected to the | ||
equipment rack’s ground strip using a ground wire of at least 0.75 mm² (AWG 19). | equipment rack’s ground strip using a ground wire of at least 0.75 mm² (AWG 19). | ||
===Use of Shielded Cable=== | |||
When using shielded cable (for improved EMC when used in high-EMI areas) the shield should be attached to the chassis of the Flowire unit and to the central rack. At the remote end the shield should be floating. | |||
===Power Supply=== | ===Power Supply=== | ||
The | The FCDC3 should be powered from a 48VDC power supply. | ||
* Recommended power supply: [https://www.zenitel.com/product/power-supply-100-240vac48vdc-2a 48VDC, 2A PSU (Item 2990000065)] | |||
{{ | {{note|When the Flowire Converter is used with the now discontinued explosion proof devices [[:Category:Stations#Turbine_stations|'''TFIX v1''' intercoms]] and Exigo Ex Access panels, the Flowire shall be powered by a '''24VDC power supply'''.}} | ||
See also Power considerations when using [[Flowire clusters]]. | |||
{{obs|Max power feed is 3A. If the power supply can deliver more, an external fuse is recommended. The FCDC-3 has a coil before the PSU connection, so the need for a 1m minimum cable length like it is on previous models is no longer a requirement.}} | |||
===Cabling in Ex Areas=== | ===Cabling in Ex Areas=== | ||
The [[:Category:Stations#Turbine_stations|TFIX intercoms]] and Exigo Ex Access panels are connected to the FCDC- | The [[:Category:Stations#Turbine_stations|TFIX intercoms]] and Exigo Ex Access panels are connected to the FCDC-3 at the central location using Ex certified 2-wire shielded cable. | ||
For detailed installation and cabling instructions in Ex areas, please refer to the manual [https://www.zenitel.com/product/tfix-1 A100K11499 Exigo & Turbine Ex Installation & Maintenance]. | |||
<br> | |||
== Factory reset == | |||
Pressing and holding the '''Password Reset Button''' for more than 15 seconds will reset following factory defaults: | |||
* Reset the NMK password to its default '''HomePlugAV0123''' | |||
* Enable '''DHCP'''. Fall back static IP address in case no automatic IP address is assigned: '''169.254.1.10''' | |||
* IGMP snooping disabled (from vsf-fcdc3-1.0.3.1) | |||
* HTTP and Telnet credentials: admin:alphaadmin | |||
* Auto CCo election | |||
<br> | |||
== PoE-power forwarding == | |||
The FCDC-3 unit can forward the power received on the PLC line out on the spare pairs of the Ethernet port (PoE, mode B). The "PoE-power forwarding" is enabled or disabled by the switch located next to the "Password Reset Button". | |||
Switch settings: | |||
* '''PoE Off''' (default): Power is not forwarded to the ethernet port | |||
* '''PoE On''': Power is forwarded to the ethernet port | |||
{{Note| | |||
* ''The power out on the ethernet port is not true PoE – the power is present at all time''<br> | |||
* ''The '''PoE-power forwarding''' should be enabled only when you need to power the device connected to the ethernet port. In all other situations, the switch should be set in the '''PoE Off''' position''.}} | |||
== Management == | |||
FCDC3 support web page management, both via HTTP and HTTPS. HTTPS is only via self signed certificate though. Since only Basic HTTP authentication is supported, where password is essentially passed in the clear, using HTTPS is recommended where cyber security is a concern. | |||
Username/password is admin/alphaadmin. | |||
Available configuration parameters in the web: | |||
* IP address: DHCP or static IP address/mask (''Advanced Setup > LAN'') | |||
* Default IP gateway (''Advanced Setup > LAN'') | |||
* [[Flowire clusters|HomePlug password]], both for security and to isolate clusters. (''Advanced Setup > HomePlug > Network password'') | |||
* Configure CCo role. "Forced delay" can be set to 116 to support long lines. (''Advanced Setup > HomePlug'') | |||
* ZAP based monitoring in Exigo PA System: Configure controller address and username. (''Advanced Setup > Exigo'') | |||
* IGMP snooping enable/disable (''Advanced Setup > IGMP'') | |||
* Change management password )(''Management > Access Control'') | |||
* General IP routing rules for advanced cases (''Advanced Setup > Routing'') | |||
The Flowire Web Interface: | |||
[[File:FCDC3 Web.PNG|thumb|left|700px|FCDC-3 '''Device Info''' page]] | |||
<br style="clear:both;" /> | |||
Under '''Associated Devices''' you can see all other Flowire units this one is communicating with. Please note that the MAC address is one higher than what is printed on the Flowire unit. | |||
{{Note|When there are more than 4 nodes in the network, phy rate is not measured, and you can only see default value of 11. Phy rate gets measured again when there is some traffic, but only for those links where there is traffic.}} | |||
=== How to find the IP address === | |||
If there is a DHCP server in the network, the Flowire unit will obtain its '''IP address from the DHCP server'''. If there is no DHCP server on the network, the Flowire units will by default have a static '''IP address 169.254.1.10'''. | |||
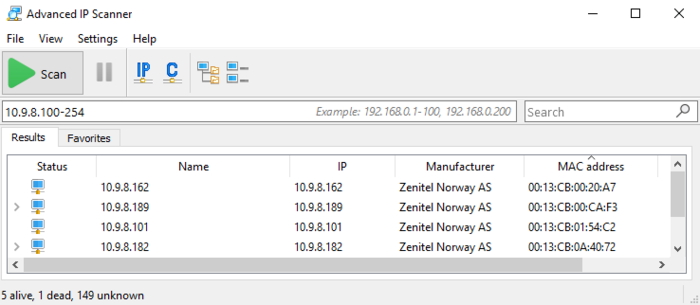
In case the Flowire gets its IP adress from DHCP, you can use an "IP/MAC scanner" software to scan the local network. By comparing the MAC address printed on the FCDC-3 unit with the list in the scanner software, you will find the IP address. | |||
Below is an example, using the freeware [https://www.advanced-ip-scanner.com/ Advanced IP Scanner]: | |||
[[File:IP Scanner.PNG|left|700px|thumb|Scanning the network with "Advanced IP Scanner"]] | |||
<br style="clear:both;" /> | |||
==Multicast and IGMP== | |||
FCDC3 has support for IGMP snooping. By default, IGMP snooping is disabled. It is possible to enable and disable IGMP snooping from the FCDC web (Advanced Setup/IGMP). (Versions prior to vsf-fcdc3-1.0.3.1 has IGMP snooping enabled, and no web config support for IGMP snooping). | |||
FCDC3 does not have built in IGMP querier. | |||
When IGMP snooping is disabled, FCDC3 will send a multicast packet to all other devices in the cluster. The packet is sent separately to each of the other devices on a fast unicast channel. (As opposed to sending it once on a slow broadcast channel) | |||
When IGMP snooping is enabled, FCDC3 will only send a multicast packet to the devices that has expressed interest in the multicast address via IGMP. | |||
FCDC3 IGMP snooping has some limitations, that is why it is disabled by default. | |||
*It does not work properly with IGMPv2 for groupcalls. There is a delay of multiple seconds before all stations join the groupcall. | |||
*FCDC3 can only track 16 different multicast streams ( usually not a problem) | |||
*Each multicast group can only have 8 members. | |||
If the network use IGMPv3, and there are less than 9 FCDC in the cluster, it is safe to enable IGMP snooping. On point-to-point links IGMP snooping do not add any value. | |||
==Dimensions== | ==Dimensions== | ||
[[File: | [[File:FCDC3 dimensions.PNG|thumb|left|800px]] | ||
<br style="clear:both;" /> | <br style="clear:both;" /> | ||
== Accessories == | |||
Power supply: [https://www.zenitel.com/product/power-supply-100-240vac48vdc-2a 48VDC, 2A PSU (Item 2990000065)] | |||
==Related articles== | ==Related articles== | ||
* [http://www.zenitel.com/product/ | * [[Flowire clusters]] | ||
* [[FCDC-3 - Software Upgrade Procedure|Software Upgrade Procedure]] | |||
* [http://www.zenitel.com/product/fcdc3 Additional Documentation on Zenitel.com] | |||
* [[:Category:Flowire Release notes|Software Release Notes]] | |||
[[Category: Flowire]] | [[Category: Flowire]] | ||
[[Category: Backboxes and accessories]] | |||
Latest revision as of 08:49, 19 December 2025
The Flowire Converter enables Ethernet to run on the same two wires as power, providing simpler cabling and opens up for longer cable hauls. The Flowire Converter is also capable of powering Ethernet devices attached to it, such as IP intercom stations or IP cameras.
Highlights
- PoE-power forwarding enable/disable by switch
- Separate Power input – isolated from the PLC bus
- Several Flowire Clusters can be powered from same power supply
- Backwards compatible with FCDC1/2/TFIX after software upgrade
- Replacement for FCDC-1 and FCDC-2
Installation
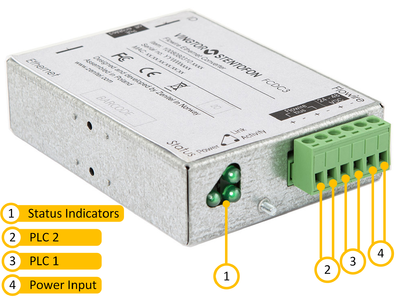
Overview
Mounting
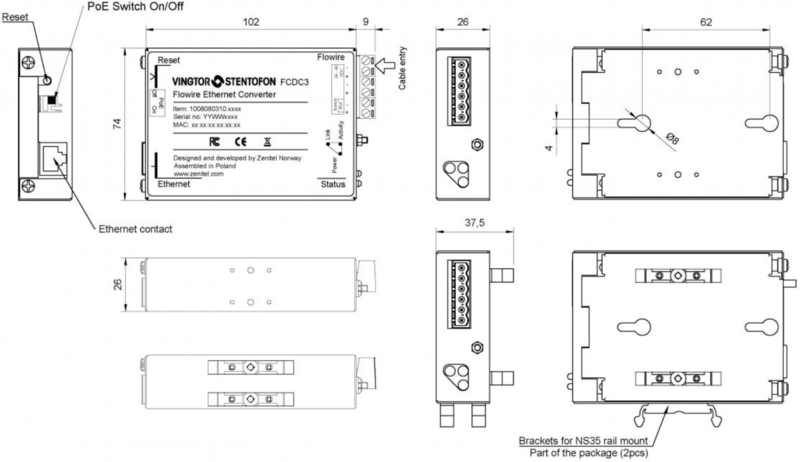
The Flowire Converter should be mounted on-wall by using 2 x 4 mm screws, or on NS35 DIN rail by using the mounting clips provided. Maximum ambient temperature is 70°C but to extend life span of the product it is recommended mounted in a normal and ventilated indoor environment.

|
Due to heat dissipation, it is recommended to mount multiple Flowire units minimum 2cm apart from each other |
Grounding
It is always good practice to ground the cabinet of equipment installed in racks. This ensures safety and good EMC. The grounding connection of the Flowire Converter should be connected to the equipment rack’s ground strip using a ground wire of at least 0.75 mm² (AWG 19).
Use of Shielded Cable
When using shielded cable (for improved EMC when used in high-EMI areas) the shield should be attached to the chassis of the Flowire unit and to the central rack. At the remote end the shield should be floating.
Power Supply
The FCDC3 should be powered from a 48VDC power supply.
- Recommended power supply: 48VDC, 2A PSU (Item 2990000065)

|
When the Flowire Converter is used with the now discontinued explosion proof devices TFIX v1 intercoms and Exigo Ex Access panels, the Flowire shall be powered by a 24VDC power supply. |
See also Power considerations when using Flowire clusters.
Cabling in Ex Areas
The TFIX intercoms and Exigo Ex Access panels are connected to the FCDC-3 at the central location using Ex certified 2-wire shielded cable.
For detailed installation and cabling instructions in Ex areas, please refer to the manual A100K11499 Exigo & Turbine Ex Installation & Maintenance.
Factory reset
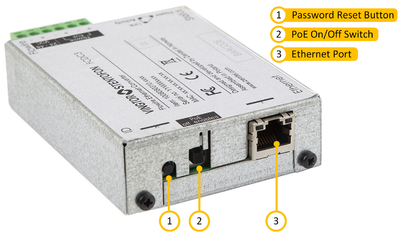
Pressing and holding the Password Reset Button for more than 15 seconds will reset following factory defaults:
- Reset the NMK password to its default HomePlugAV0123
- Enable DHCP. Fall back static IP address in case no automatic IP address is assigned: 169.254.1.10
- IGMP snooping disabled (from vsf-fcdc3-1.0.3.1)
- HTTP and Telnet credentials: admin:alphaadmin
- Auto CCo election
PoE-power forwarding
The FCDC-3 unit can forward the power received on the PLC line out on the spare pairs of the Ethernet port (PoE, mode B). The "PoE-power forwarding" is enabled or disabled by the switch located next to the "Password Reset Button".
Switch settings:
- PoE Off (default): Power is not forwarded to the ethernet port
- PoE On: Power is forwarded to the ethernet port
Management
FCDC3 support web page management, both via HTTP and HTTPS. HTTPS is only via self signed certificate though. Since only Basic HTTP authentication is supported, where password is essentially passed in the clear, using HTTPS is recommended where cyber security is a concern.
Username/password is admin/alphaadmin.
Available configuration parameters in the web:
- IP address: DHCP or static IP address/mask (Advanced Setup > LAN)
- Default IP gateway (Advanced Setup > LAN)
- HomePlug password, both for security and to isolate clusters. (Advanced Setup > HomePlug > Network password)
- Configure CCo role. "Forced delay" can be set to 116 to support long lines. (Advanced Setup > HomePlug)
- ZAP based monitoring in Exigo PA System: Configure controller address and username. (Advanced Setup > Exigo)
- IGMP snooping enable/disable (Advanced Setup > IGMP)
- Change management password )(Management > Access Control)
- General IP routing rules for advanced cases (Advanced Setup > Routing)
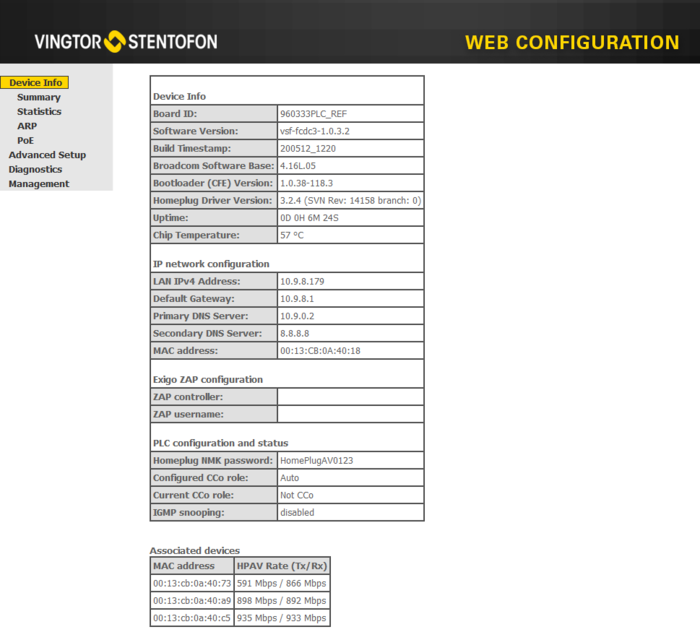
The Flowire Web Interface:
Under Associated Devices you can see all other Flowire units this one is communicating with. Please note that the MAC address is one higher than what is printed on the Flowire unit.
How to find the IP address
If there is a DHCP server in the network, the Flowire unit will obtain its IP address from the DHCP server. If there is no DHCP server on the network, the Flowire units will by default have a static IP address 169.254.1.10.
In case the Flowire gets its IP adress from DHCP, you can use an "IP/MAC scanner" software to scan the local network. By comparing the MAC address printed on the FCDC-3 unit with the list in the scanner software, you will find the IP address.
Below is an example, using the freeware Advanced IP Scanner:
Multicast and IGMP
FCDC3 has support for IGMP snooping. By default, IGMP snooping is disabled. It is possible to enable and disable IGMP snooping from the FCDC web (Advanced Setup/IGMP). (Versions prior to vsf-fcdc3-1.0.3.1 has IGMP snooping enabled, and no web config support for IGMP snooping).
FCDC3 does not have built in IGMP querier.
When IGMP snooping is disabled, FCDC3 will send a multicast packet to all other devices in the cluster. The packet is sent separately to each of the other devices on a fast unicast channel. (As opposed to sending it once on a slow broadcast channel)
When IGMP snooping is enabled, FCDC3 will only send a multicast packet to the devices that has expressed interest in the multicast address via IGMP.
FCDC3 IGMP snooping has some limitations, that is why it is disabled by default.
- It does not work properly with IGMPv2 for groupcalls. There is a delay of multiple seconds before all stations join the groupcall.
- FCDC3 can only track 16 different multicast streams ( usually not a problem)
- Each multicast group can only have 8 members.
If the network use IGMPv3, and there are less than 9 FCDC in the cluster, it is safe to enable IGMP snooping. On point-to-point links IGMP snooping do not add any value.
Dimensions
Accessories
Power supply: 48VDC, 2A PSU (Item 2990000065)


