Difference between revisions of "MADR - Applications"
From Zenitel Wiki
(→Related articles) |
(→Equipment List) |
||
| (29 intermediate revisions by 2 users not shown) | |||
| Line 1: | Line 1: | ||
| − | ==Calling Through Loudspeaker | + | ==Calling Through Loudspeaker, Answer in Called Speaker== |
| − | [[Image:FIG MADR 1 1.png|thumb|350px|Figure 1.1 Calling Through Loudspeaker | + | [[Image:FIG MADR 1 1.png|thumb|350px|Figure 1.1 Calling Through Loudspeaker, Answer in Called Speaker]] |
| + | This feature enables calling through loudspeaker with answer through the same speaker. | ||
| − | + | Calling is done by dialling the directory number of the loudspeaker. Press M-key to speak, release to listen. The loudspeaker functions as both loudspeaker and microphone. Cancel the conversation by pressing the C-key. | |
| − | The | + | |
| − | + | Group call, audio program and alarm messages will also be distributed. | |
===Equipment List=== | ===Equipment List=== | ||
| − | * | + | * Microphone Amplifier Board Dynamic with Relay MADR, item 1009960100 |
| − | * [[ | + | * 20-63 Ohm loudspeaker, e.g. item VML-1520 (20 ohm/15W) |
| − | + | * [[Power Distribution Board|Power Distribution Board PDB, item 1009970100]] (required in AlphaCom XE26 only) to power the MADR. See also [[Powering Additional Equipment]] | |
| − | In particularly noisy environments, the MADR board should be placed close to the loudspeaker. A MRBD board is then connected between the RCO output and the MADR board input. A local supply of 24 V to the relay on the MADR is needed. | + | |
| − | + | In particularly noisy environments, the MADR board should be placed close to the loudspeaker. A [[MRBD|MRBD board]] is then connected between the RCO output and the MADR board input. A local supply of 24 V to the relay on the MADR is needed. | |
===Installation=== | ===Installation=== | ||
| − | + | * Fasten the MADR board onto one of the mounting rails on the distribution field | |
| − | + | * Supply the board with 24 V and 0 V (GND) from the Power Distribution Board | |
| − | |||
| − | |||
| − | * Fasten the MADR board onto one of the mounting rails on the distribution field | ||
| − | * Supply the board with 24 V and 0 V (GND) from the Power Distribution Board | ||
* Connect the wires according to Figure 1.1 Calling through loudspeaker with answer in called speaker | * Connect the wires according to Figure 1.1 Calling through loudspeaker with answer in called speaker | ||
* Set all [[MADR_-_Microphone_Amplifier_for_Dynamic_Microphone#Connectors_and_Switches|switches]] (S1-S4) in position 2-3. | * Set all [[MADR_-_Microphone_Amplifier_for_Dynamic_Microphone#Connectors_and_Switches|switches]] (S1-S4) in position 2-3. | ||
| − | * | + | * Adjust the sensitivity of the microphone on the MADR board |
===Programming=== | ===Programming=== | ||
| − | The voice direction | + | The voice direction is switched with the M-key on the calling station. The M-key controls a [[RCO - Set Remote Control Output|RCO command]], which operates a relay on the MADR board. |
How to configure the relay operation: | How to configure the relay operation: | ||
| − | |||
* In [[Users_%26_Stations_%28AlphaPro%29|Users & Stations]] select the MADR directory number in the list box, and press the button 'Events'. 'Insert' a new event with the following attributes: | * In [[Users_%26_Stations_%28AlphaPro%29|Users & Stations]] select the MADR directory number in the list box, and press the button 'Events'. 'Insert' a new event with the following attributes: | ||
[[Image:FIG MADR 1 2.JPG|thumb|350px|Event to control the voice direction]] | [[Image:FIG MADR 1 2.JPG|thumb|350px|Event to control the voice direction]] | ||
| Line 51: | Line 47: | ||
<br style="clear:both;" /> | <br style="clear:both;" /> | ||
| − | |||
| − | |||
| − | |||
==Calling Through Loudspeaker with Answer in Separate Microphone== | ==Calling Through Loudspeaker with Answer in Separate Microphone== | ||
| Line 59: | Line 52: | ||
===Feature Description=== | ===Feature Description=== | ||
| − | The AlphaCom can distribute audio through loudspeakers with the possibility to answer in the separate electret or dynamic microphones | + | The AlphaCom can distribute audio through loudspeakers with the possibility to answer in the separate electret or dynamic microphones. |
===Equipment List=== | ===Equipment List=== | ||
| − | + | * Microphone Amplifier Board Dynamic with Relay MADR, item 1009960100 | |
| − | * Microphone Amplifier Board Dynamic with Relay MADR 1009960100 | + | * 20-63 Ohm loudspeaker, e.g. item VML-1520 (20 ohm/15W) |
| − | * [[ | + | * [[Power Distribution Board|Power Distribution Board PDB, item 1009970100]] (required in AlphaCom XE26 only) to power the MADR. See also [[Powering Additional Equipment]] |
| + | * Additional dynamic or electret microphone | ||
===Installation=== | ===Installation=== | ||
| − | |||
| − | |||
| − | |||
| − | |||
* Place the MADR board near the microphone. | * Place the MADR board near the microphone. | ||
* Connect the wires according to Figure 2.1. | * Connect the wires according to Figure 2.1. | ||
| Line 79: | Line 69: | ||
===Programming=== | ===Programming=== | ||
* No programming in necessary to use this application. We do however recommend that you program the physical connection for the PA system as a substation. | * No programming in necessary to use this application. We do however recommend that you program the physical connection for the PA system as a substation. | ||
| + | |||
| + | ===Additional information=== | ||
| + | If an electret microphone is used, the MADR board has to be modified. | ||
<br/> | <br/> | ||
<br/> | <br/> | ||
| + | |||
=Related articles= | =Related articles= | ||
* [[MADR - Microphone Amplifier for Dynamic Microphone]] | * [[MADR - Microphone Amplifier for Dynamic Microphone]] | ||
* [[WK20 - Applications]] | * [[WK20 - Applications]] | ||
| + | |||
| + | [[Category:Additional equipment]] | ||
Latest revision as of 12:01, 3 November 2016
Contents
Calling Through Loudspeaker, Answer in Called Speaker
This feature enables calling through loudspeaker with answer through the same speaker.
Calling is done by dialling the directory number of the loudspeaker. Press M-key to speak, release to listen. The loudspeaker functions as both loudspeaker and microphone. Cancel the conversation by pressing the C-key.
Group call, audio program and alarm messages will also be distributed.
Equipment List
- Microphone Amplifier Board Dynamic with Relay MADR, item 1009960100
- 20-63 Ohm loudspeaker, e.g. item VML-1520 (20 ohm/15W)
- Power Distribution Board PDB, item 1009970100 (required in AlphaCom XE26 only) to power the MADR. See also Powering Additional Equipment
In particularly noisy environments, the MADR board should be placed close to the loudspeaker. A MRBD board is then connected between the RCO output and the MADR board input. A local supply of 24 V to the relay on the MADR is needed.
Installation
- Fasten the MADR board onto one of the mounting rails on the distribution field
- Supply the board with 24 V and 0 V (GND) from the Power Distribution Board
- Connect the wires according to Figure 1.1 Calling through loudspeaker with answer in called speaker
- Set all switches (S1-S4) in position 2-3.
- Adjust the sensitivity of the microphone on the MADR board
Programming
The voice direction is switched with the M-key on the calling station. The M-key controls a RCO command, which operates a relay on the MADR board.
How to configure the relay operation:
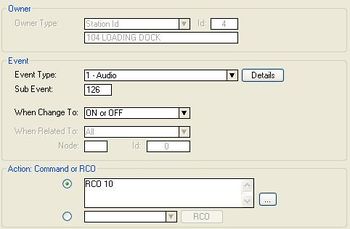
- In Users & Stations select the MADR directory number in the list box, and press the button 'Events'. 'Insert' a new event with the following attributes:
| Event Owner: | The MADR directory number |
| Event type: | 1 - Audio |
| Subevent: | 126 (Press 'Details' to select which types of audio. 126 means all types of audio) |
| When change to: | ON or OFF |
| When related to: | (not used) |
| Action: | RCO 10 |
RCO 10 is used as an example. Use the RCO number you have assigned to the MADR physical connection.
Calling Through Loudspeaker with Answer in Separate Microphone
Feature Description
The AlphaCom can distribute audio through loudspeakers with the possibility to answer in the separate electret or dynamic microphones.
Equipment List
- Microphone Amplifier Board Dynamic with Relay MADR, item 1009960100
- 20-63 Ohm loudspeaker, e.g. item VML-1520 (20 ohm/15W)
- Power Distribution Board PDB, item 1009970100 (required in AlphaCom XE26 only) to power the MADR. See also Powering Additional Equipment
- Additional dynamic or electret microphone
Installation
- Place the MADR board near the microphone.
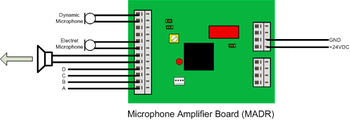
- Connect the wires according to Figure 2.1.
- Set all switches (S1-S4) in position 2-3.
- Adjust the sensitivity of the microphone on the MADR board.
It is possible to place the MADR board on one of the mounting rails in the connection field of the exchange. Then you must run a screened cable from the microphone to the MADR board and run the GND wire to exchange GND on the Subscriber connection board.
Programming
- No programming in necessary to use this application. We do however recommend that you program the physical connection for the PA system as a substation.
Additional information
If an electret microphone is used, the MADR board has to be modified.


