Difference between revisions of "Mobile App - Configuration"
From Zenitel Wiki
| Line 27: | Line 27: | ||
===License requirements=== | ===License requirements=== | ||
| − | Zenitel Mobile requires a license (item number 1009666000) and this is supported as part of the Edge Controller licensing mechanism. | + | Zenitel Mobile requires a license (item number 1009666000) and this is supported as part of the Edge Controller licensing mechanism. A maximum of 10 Zenitel Mobiles can be registered on each Edge controller. Each Zenitel Mobile that is registered to the Edge Controller takes 1 Mobile Extension license. To release a mobile license and reuse it, the Zenitel mobile must be removed from the device list in the Edge controller. For more information on licensing and how to install a license in IC-EDGE system, please go to [[Licensing_in_IC-EDGE|Licensing in IC-EDGE]] |
<br/> | <br/> | ||
Revision as of 16:28, 7 January 2021
This article describes, step by step, how to configure Zenitel Mobile application in IC-EDGE system.
The Zenitel Mobile is a mobile application for Android and IOS devices. Zenitel Mobile enables you to use your mobile device as an intercom station in the IC-EDGE system. Some of the main functions of Zenitel Mobile application are:
- Android and iPhone (iOS) support
- Audio and video calls including video preview
- Action buttons for remote control of doors and gates
- Integration with Apple and Google push notification for waking up app
- Remote provisioning using QR code
Contents
Prerequisites
Basic requirements
- Already configured IC-EDGE system. For more information on how to configure IC-EDGE system, please go to Getting Started (IC-Edge)
- Wireless connection on the same network to which the IC-EDGE system is deployed, with an enabled internet connection. Internet connection is required for proper work of the push notification. For more information, go to Push Notifications
Software requirements
- The Edge Controller must have software version 5.1.3.x
- Minimum Android software version 8.0 or minimum iOS software version 12.0
License requirements
Zenitel Mobile requires a license (item number 1009666000) and this is supported as part of the Edge Controller licensing mechanism. A maximum of 10 Zenitel Mobiles can be registered on each Edge controller. Each Zenitel Mobile that is registered to the Edge Controller takes 1 Mobile Extension license. To release a mobile license and reuse it, the Zenitel mobile must be removed from the device list in the Edge controller. For more information on licensing and how to install a license in IC-EDGE system, please go to Licensing in IC-EDGE
Edge Controller configuration
Add the Zenitel Mobile to the Edge Controller
You need to manually add the Zenitel Mobile to the Edge Controller. When you add the Zenitel Mobile, it will automatically be assigned a number and name, which can be modified if required.
- Log on to the Edge Controller
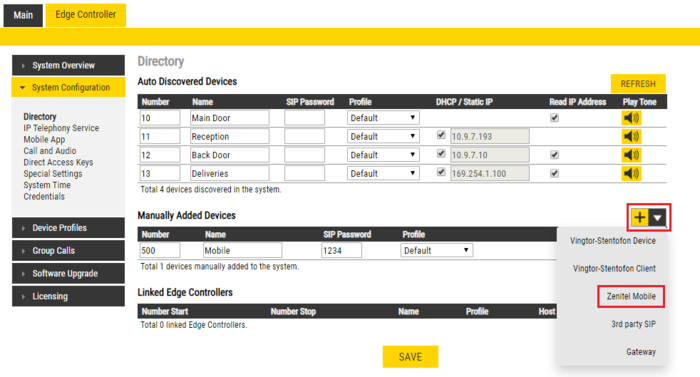
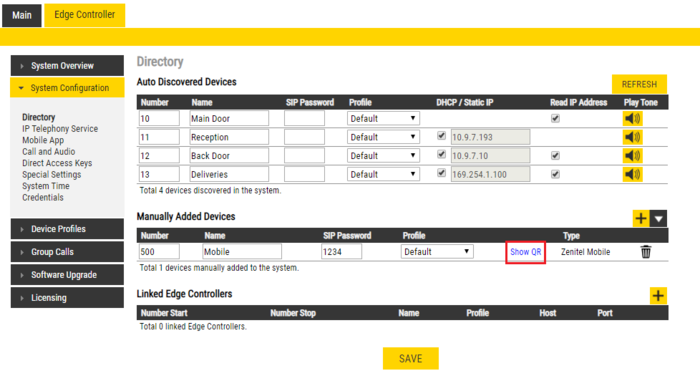
- From the menu Edge Controller > System Configuration > Directory, under the Manually Added Devices section, press the "+" button
- Select Zenitel Mobile from the dropdown list
- Modify Number and Name as required
- SIP Password must be added. The password is used as authentication during the registration process
- Press Save to store the new device in the Edge Controller
Address Book
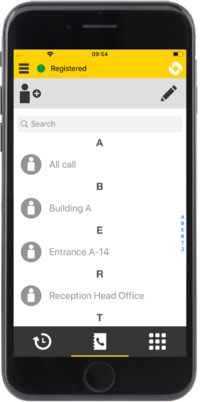
Zenitel Mobile has an address book that can be created from the Edge Controller or the user can create entries manually.
Address book from Edge Controller
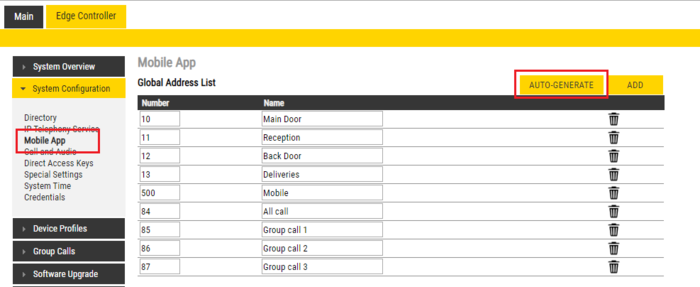
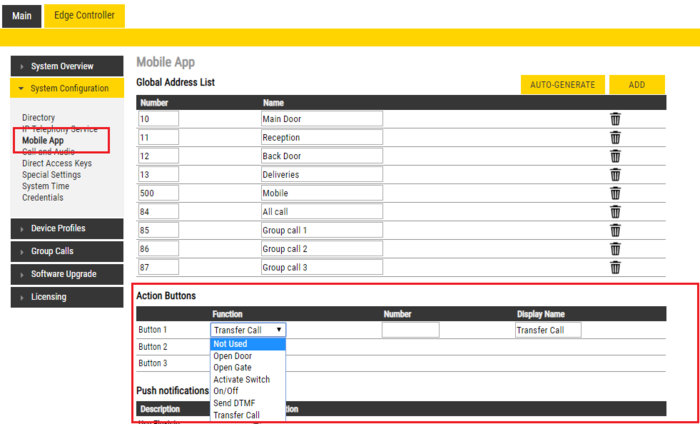
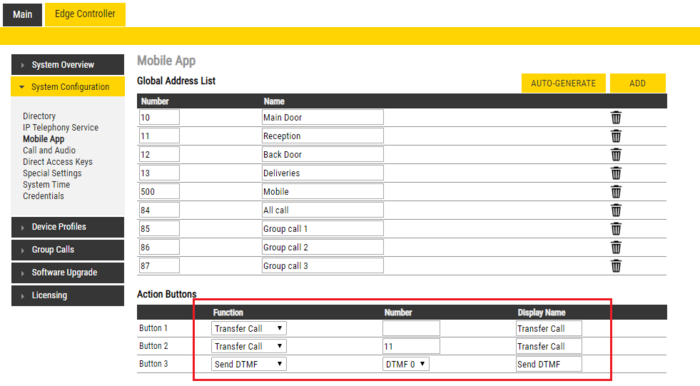
To create an address book in the Edge Controller go to Edge Controller > System Configuration > Mobile App. Changes to the address book are automatically synchronized to all registered Zenitel Mobile.
With clicking AUTO-GENERATE, a global address list will be created that will contain all registered devices and all groups. The entries in the list can be edited or deleted.
Entries can be added manually by clicking ADD and entering Number and Name.
Manual entry in Address Book
Users can manually add contacts in the Zenitel Mobile address book. This can be done in 2 ways.
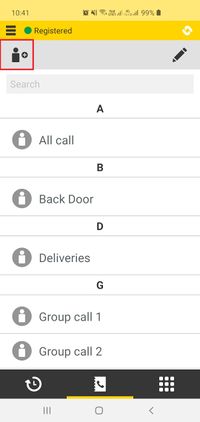
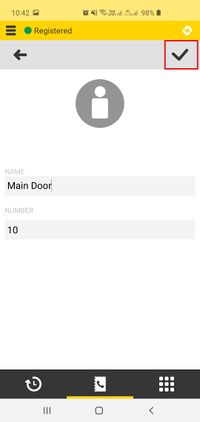
- Go to Zenitel Mobile Address book and click the Add Contact icon. Enter Name and Number for the Contact and click the icon ✔ to save the contact
-
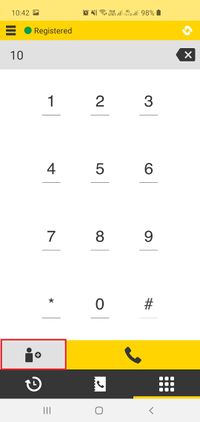
Dial the number on the dial and then select Add contact. The number is automatically filled, just enter Name for the Contact and click the icon ✔ to save the contact
Action buttons
Zenitel Mobile, with the help of three action buttons, enables the user to transfer calls, operate relays or send DTMF during calls.
To set the action buttons go to Edge Controller > System Configuration > Mobile App. In the Action buttons section, select what Function each of the action buttons will have, set the Display Name for each button and press Save. Changes to the action buttons are automatically synchronized to all registered Zenitel Mobile.
There are 6 functions for the action buttons:
- Open Door - activates the relay
- Open Gate - activates the relay
- Activate Switch - activates the relay
- On/Off - activates the relay
- Send DTMF - sends the DTMF that is selected
- Transfer Call - transfer calls to a predefined contact or to a manually selected contact in Zenitel Mobile
Push Notifications
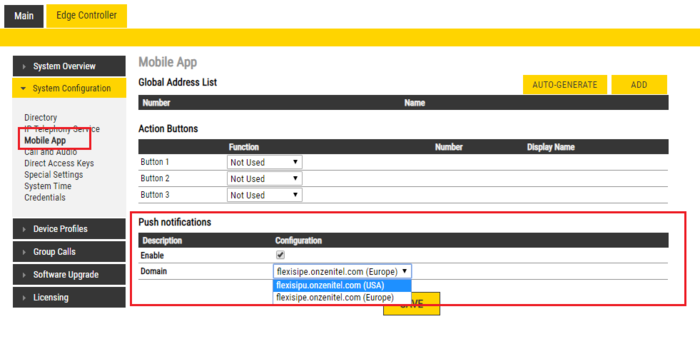
Push notification is a mechanism for waking the mobile application when they are in background/doze mode. These are the requirements for push notifications to work properly on Zenitel Mobile:
- Internet connection required on the WLAN
- Choose Flexisip domain based on your geographical location ("Americas" or "Rest of the World").
- In general inbound traffic can stay blocked, a connection can stay open just for outbound traffic, easiest is to allow all outbound traffic but if you need to open only ports that will really be used, set up following firewall rules:
- ALLOW outbound traffic: UDP 5060 (SIP UDP from Edge controller to Flexisip)
- ALLOW outbound traffic TCP 443 (https from app to Flexisip account manager to create push gateway SIP accounts)
- ALLOW outbound TCP to push notification servers (5223 for Apple servers and 5228, 5229, 5230 for Android)
In case there is no internet connection on the WLAN, the Flexisip domain must be disabled. Then this solution will partly work (outgoing calls okay, incoming calls only if Zenitel Mobile is opened) for the latest mobile phones as they have a strict policy of putting apps in doze mode (background). Since Android devices are less strict and it is possible to set them up to work even without push notification solution. Two ways for setting this up:
- In the app: Settings > Advanced > Background mode – set it enabled
- Using phone settings: for each phone vendor, it is different, go to https://dontkillmyapp.com for more instructions on how to do this.
Configuration of Zenitel Mobile
Get the QR code from the Edge Controller
- Log on to the Edge Controller
- From the menu Edge Controller > System Configuration > Directory, under the Manually Added Devices section, press "Show QR". The QR code will now be displayed on the PC screen.
Prepare the mobile phone
- Connect the mobile phone to the Wireless connection that is on the same network as the Edge Controller
- Install the Zenitel Mobile application from Google Play Store for Android devices and the App Store for iOS devices
Setting up Zenitel Mobile
- Start the Zenitel Mobile application
- Select Scan QR code
- Scan the QR code
- Select Fetch and Apply
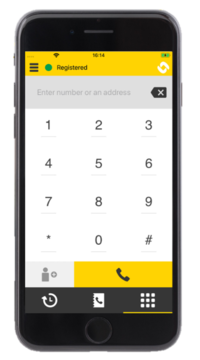
- Zenitel Mobile has a registration status in the upper left corner that indicates the registration state
- Registration states: Registered (green), Registration Failed (red) or Registration in progress (orange)

|
For Zenitel Mobile to work properly we recommend to give all required permissions and to disable power monitoring for Zenitel Mobile |
Removing and moving Zenitel Mobile
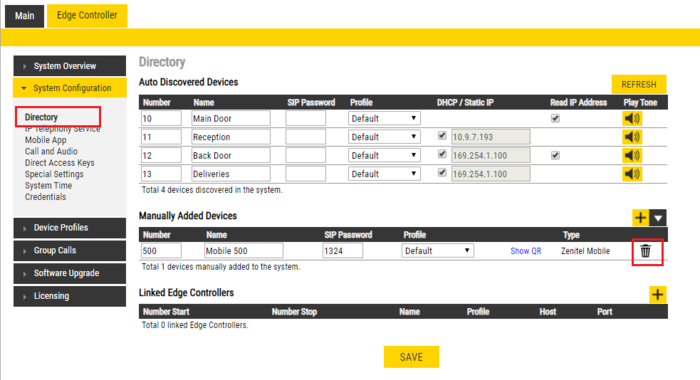
If Zenitel Mobile needs to be moved to different controller or is no longer in use, Zenitel Mobile must be deleted from the list of devices in the Edge controller.
Removing Zenitel mobile from Edge controller
To remove Zenitel Mobile, it must be deleted from the Manually Added Devices list in Edge Controller > System Configuration > Directory. This is done by clicking the Trash Can icon, and then Save.
Moving Zenitel Mobile to another Edge controller
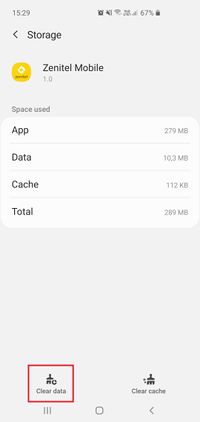
If Zenitel Mobile needs to be moved and connected to another Edge controller, the application data must be cleared from the phone.
Troubleshooting
When scanning the QR code, the Mobile App will not register:
- The Mobile App is not on same wifi as Edge controller
- Push notification enabled
- No DNS server is defined
- No access to internet
- Previous account not deleted before registering with new account

