Difference between revisions of "SIP trunk node - configuration"
From Zenitel Wiki
(→Door Opening Feature) |
(→Door Opening Feature) |
||
| Line 147: | Line 147: | ||
The Door Opening feature is programmed in the Event Handler. When SIP trunk is involved, there are two separate events for the door opening feature, depending on who is the <u>calling</u> side: | The Door Opening feature is programmed in the Event Handler. When SIP trunk is involved, there are two separate events for the door opening feature, depending on who is the <u>calling</u> side: | ||
| − | |||
| − | |||
| − | + | '''Incoming call from the SIP Trunk to the AlphaCom door station:''' | |
The '''Standard''' door opening event is used: | The '''Standard''' door opening event is used: | ||
| Line 156: | Line 154: | ||
<br style="clear:both;" /> | <br style="clear:both;" /> | ||
| − | + | '''Outgoing call from the AlphaCom door station to an external telephone via the SIP Trunk:''' | |
When the phone presses digit 6, the event type '''Event Trigger Feature''' (15) is reported, with the digit 6 as sub event. The calling AlphaCom station is Event Owner, and called SIP phone number and node number is Related To. The RCO pulse time is specified as an additional parameter in the RCO action string, i.e. RCO 3 ON 20 means pulse RCO 3 for 2 seconds. | When the phone presses digit 6, the event type '''Event Trigger Feature''' (15) is reported, with the digit 6 as sub event. The calling AlphaCom station is Event Owner, and called SIP phone number and node number is Related To. The RCO pulse time is specified as an additional parameter in the RCO action string, i.e. RCO 3 ON 20 means pulse RCO 3 for 2 seconds. | ||
Revision as of 17:12, 28 November 2013
This article describes how to configure a SIP Trunk in the AlphaCom XE. It is possible to define multiple SIP trunks.
Contents
AlphaWeb Configuration
Assign IP address to the AlphaCom XE Ethernet Port(s)
Log on to AlphaWeb. In System Configuration -> Interfaces, enter a valid IP address on the Ethernet port. In the example to the right, Ethernet port 1 is used. Consult your network administrator to obtain the IP address.
Assign IP routing to the AlphaCom XE Ethernet Port(s)
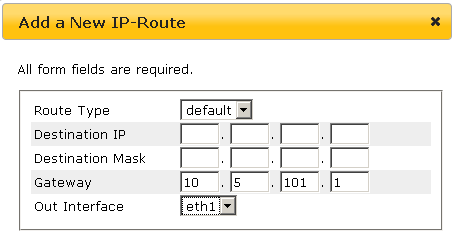
In System Configuration -> Routes, create a default routing. This is essential if the SIP device and AlphaCom are on two different networks.
Insert SIP Trunk licenses
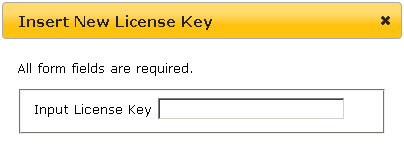
In System Configuration -> License key, install the SIP Trunk License.
Firewall (filter) settings
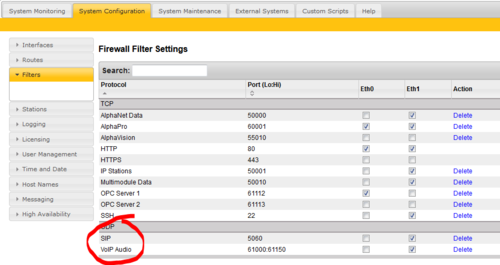
In System Configuration -> Filters, enable the SIP and VoIP Audio on the desired Ethernet port (default enabled for Ethernet port 1).
AlphaPro Configuration
Create a SIP Trunk Node
From the AlphaPro main menu, use the ‘+’ button next to the ‘Select Exchange’ dropdown list to create a new exchange. The exchange type must be set to ‘SIP Node’.
Set the parameters as shown in the figure to the right.
The SIP Trunk line IP address must be identical to the IP address of the SIP gateway or iPBX.
Hostname
If a hostname is required, check the Host Name checkbox, and enter the required destination hostname.
If hostname is required both for the "destination" domain and the "from" domain, enter “destination.domain;from.domain”, no spaces. (Require AMC software 11.1.3.5 or newer).
The link between the hostname and the IP address is defined in AlphaWeb, System Configuration - > Hostnames.
Define the AlphaCom - SIP routing
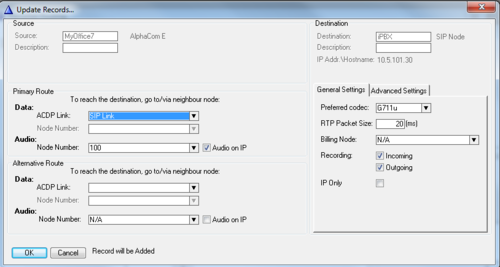
In Exchange & System > Net Routing use the Insert button to create a route between the AlphaCom and SIP device.
- Set ACDP Link = SIP Link
- Node number = The node number used for the SIP Trunk
- Set Preferred codec to G711u and RTP Packet Size to 20 ms.
Create access numbers
The SIP trunk can be accessed in three different ways:
- Prefix number: Dial Prefix + Phone number. “Phone number” will be called
- Integrated Prefix number: Dial Prefix + Phone number. The prefix will be included as a part of the called telephone number.
- Global number: Dial the phone number without using prefix
Prefix number, Two Stage dialing
When two-stage dialing is used (also called "overlap dialing"), the SIP Device seizes one of the PSTN/PBX lines without performing any dialing, connects the AlphaCom station to the PSTN/PBX, and all further signaling (dialing and Call Progress Tones) is performed directly with the PBX without the SIP device's intervention. The digits are sent to the SIP device as SIP INFO messages.
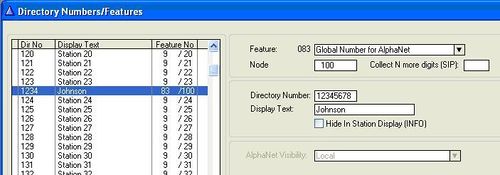
The directory number must be programmed in the AlphaCom directory table with feature 83 and Node = SIP Trunk node number.
Prefix number, One Stage dialing
When one-stage dialing (also called "enbloc dialing") is used, the digit collection is done in the AlphaCom. The destination phone number is included in the INVITE message from the AlphaCom.
The directory number must be programmed in the AlphaCom directory table with feature 81 and Node = SIP Trunk node number (100 in this example). In the field “Collect N more digits (SIP)” you must enter the maximum number of digits in a phone number.
When the prefix is dialed, the AlphaCom will wait for more digits. When the number of digits specified in the “Collect N more digits (SIP)” is collected, a call setup message is sent to the SIP device. If fewer digits are entered, the AlphaCom will time out after 4 seconds, and the call setup message will be sent. You can also terminate the digit collection by pressing the M-key. The call setup message will then be sent immediately.
In the example below the directory number 0 is used as a prefix.
Dialing examples:
- 0 + 12345678: Telephone number 12345678 will be called
- 0 + 1234: After a 4 second timeout, telephone number 1234 will be called
- 0 + 1234 + M: Telephone number 1234 will be called
Integrated Prefix number
The directory number must be programmed in the AlphaCom directory table with feature 83 and Node = SIP Trunk node number (100 in this example). In the field “Collect N more digits (SIP)” you must enter the maximum number of digits in a phone number.
When the prefix is dialed, the AlphaCom will wait for further digits. When the number of digits specified in the “Collect N more digits (SIP)” is collected, a call setup message is sent to the SIP device. If fewer digits are entered, the AlphaCom will time out after 4 seconds, and the call setup message will be sent. You can also terminate the digit collection by pressing the M-key. The call setup message will then be sent immediately.
In the example below the directory number 57 is used as a prefix.
Dialing examples:
- 57 + 12345678: Telephone number 5712345678 will be called
- 57 + 1234: After a 4 second timeout, telephone number 571234 will be called
- 57 + 1234 + M: Telephone number 571234 will be called
Global number
The directory number must be programmed in the AlphaCom directory table with feature 83 and Node = SIP Trunk node number (100 in this example). The field “Collect N more digits (SIP)” must be left blank.
When the global number is dialed, the AlphaCom will immediately send a call setup message to the SIP device.
In the example below the directory number 12345678 is defined as a global number.
When dialing this number a call setup message is sent to the SIP Device, instructing it to call this phone number.
Example on how to use Access Codes:
This example shows the different options on how to call from an AlphaCom station to a SIP user 571234.
Update the exchange
Log on to the exchange and update the exchange by pressing the SendAll button. Reset the exchange when the transfer is finnished.
Optional configuration
Incoming Calls in Private Ringing mode
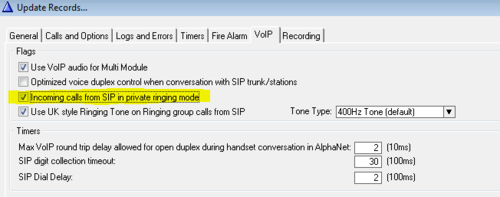
Incoming calls from the SIP Trunk can be forced to be in private ringing mode, independent of the private/open switch of the intercom station.
Check the flag Incoming calls from SIP in private ringing mode in AlphaPro (Exchange & System > System > VoIP).
Ringing signal on Incoming Calls to Ringing Group
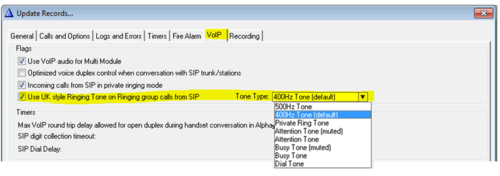
When an incoming call from a SIP trunk is routed to a Ringing Group, one can choose to have a different ringing signal in the receiving station(s) than the standard Private Ringing signal. This can be useful in order to differentiate external calls from internal calls.
In AlphaPro, Exchange & System > System > VoIP, check the flag Use UK style Ringing Tone on Ringing group calls from SIP, and select which tone to use for the ringing signal. If this flag is unchecked, one will get standard Private Ringing signal.
Door Opening Feature
During a conversation between a door station and a telephone, the telephone operator can activate the Door Opening feature in the AlphaCom by pressing digit 6.
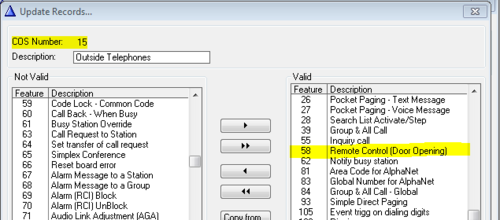
A SIP Trunk is automatically using Class of Service 15. This Class of Service group does not have the option for remote door opening enabled by default. In AlphaPro go to Class of Service, select number 15 (Outside Telephones), press change and locate feature number 58 in the "Not Valid" list. Highlight Feature 58 and use the single arrow key to move it to the "valid" list.
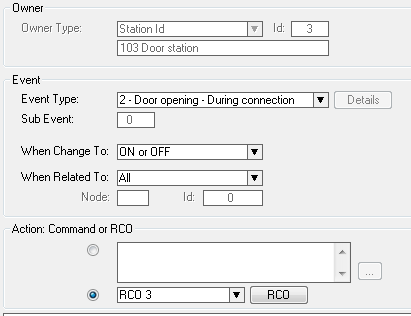
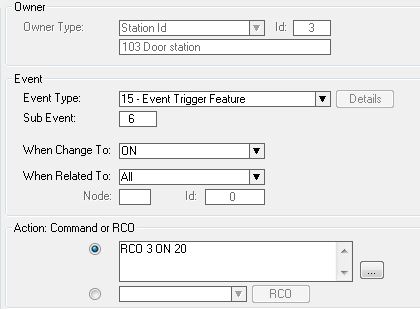
The Door Opening feature is programmed in the Event Handler. When SIP trunk is involved, there are two separate events for the door opening feature, depending on who is the calling side:
Incoming call from the SIP Trunk to the AlphaCom door station:
The Standard door opening event is used:
Outgoing call from the AlphaCom door station to an external telephone via the SIP Trunk:
When the phone presses digit 6, the event type Event Trigger Feature (15) is reported, with the digit 6 as sub event. The calling AlphaCom station is Event Owner, and called SIP phone number and node number is Related To. The RCO pulse time is specified as an additional parameter in the RCO action string, i.e. RCO 3 ON 20 means pulse RCO 3 for 2 seconds.
Voice Switching in Noisy Environment
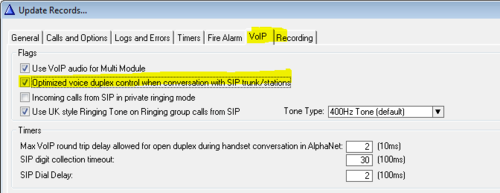
If the intercom station is located in a noisy environment, it might be difficult to switch the voice direction from the telephone towards the intercom station. However, there is a setting in the AlphaCom to overcome this problem. In AlphaPro, Exchange & System > System > VoIP, set the parameter Optimized voice duplex control when conversation with SIP trunk/stations
When this flag is set, the initial voice direction is forced to be from the intercom towards the telephone. When the phone operator starts to speak, the voice direction will switch towards the intercom station, regardless of the level of the audio signal from the intercom station. As soon as the phone operator stops speaking, the voice direction will switch back to the initial direction.
VoIP Audio Channels
Call capacity
The overall maximum call capacity on SIP trunk calls are as follows:
- Maximum outgoing conversations: 32
- Maximum incoming conversations: 16
The actual number of simultaneous calls are limited by the SIP license installed.
SIP trunk calls are using resources from a common pool of VoIP channels, which is also used by other VoIP services, such as AlphaNet calls and MultiModule calls. In addition to the limit set by the SIP license, the maximum number of simultaneous SIP trunk calls will also depend on other VoIP traffic currently active in the system.
Reserving VoIP channels for a SIP trunk
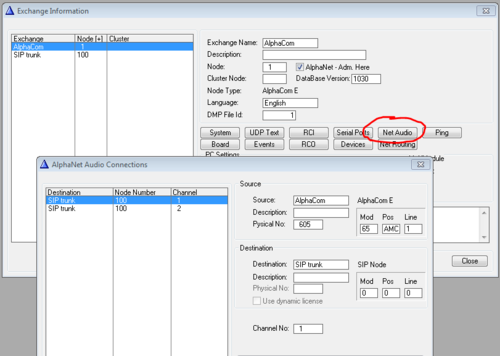
The VoIP channels used by SIP Trunk(s) are assigned dynamically. However, it is possible to reserve one or several of the VoIP channels for a specific SIP trunk. In this way one can make sure that there will always be VoIP channels available to this trunk.
The VoIP channels have virtual physical numbers in the AlphaCom, starting from 605 to 634. To reserve a VoIP channel for a SIP Trunk, select Exchange & System -> NetAudio in AlphaPro. Press Insert, and select the SIP trunk from the list of nodes. Now enter the physical number of the VoIP channel, i.e. a number between 605 to 634. It is good practice to start with 605 and go upwards.
The SIP trunk with reserved VoIP channels will still have access to the other free VoIP channels available according to the SIP Trunk license.
Limiting the number of VoIP channels used by a SIP Trunk
The SIP Trunk license sets the overall limit on how many simultaneous calls that can be made on SIP trunks. In addition to this, it is possible to set further limits on how many VoIP channels a specific SIP Trunk should be able to use. This could be useful if there are multiple SIP trunks, and one might want to set restrictions on how many VoIP channels one particular trunk can use.
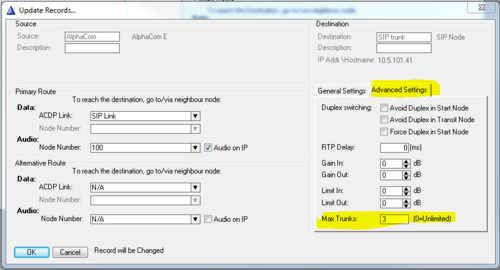
To set the maximum VoIP channels that should be available for a SIP Trunk, select Exchange & System -> NetRouting in AlphaPro. Press the Change button, and select the Advanced Settings tab. In the field Max Trunks, enter the number of VoIP channels this trunk should have access to.
Priority mechanism for dedicated stations
When "Max Trunks" are specified, and a call is made and there are no more free VoIP channels, you will get a busy tone. It is possible to Camp On, and wait for the SIP trunk to become free. Stations with Call Setup Priority = Alarm will get a forced connection to the SIP trunk.
When using MP114/118 gateway, the "Guard Time Between Calls" must be set to 0 for the Alarm Call Setup to work (Configuration -> VoIP -> GW and IP to IP -> Analog Gateway -> FXO Settings -> Guard Time Between Calls).


