Difference between revisions of "Exchange & System (AlphaPro)"
From Zenitel Wiki
(→NetAudio) |
(→Board) |
||
| Line 413: | Line 413: | ||
==Board == | ==Board == | ||
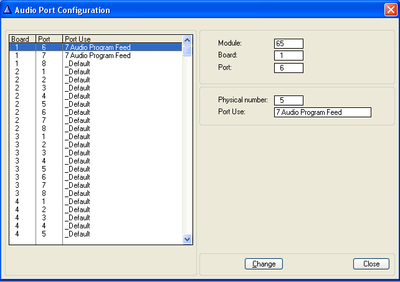
| − | [[Image:Board.png|thumb|400px| The Exchange & | + | [[Image:Board.png|thumb|400px| The Exchange & System > Board window]] |
{|border="1" | {|border="1" | ||
|Module, Board, Port||Is entered automatically by AlphaPro according to the highlighted port | |Module, Board, Port||Is entered automatically by AlphaPro according to the highlighted port | ||
Revision as of 15:27, 13 August 2008
Contents
Exchange and System
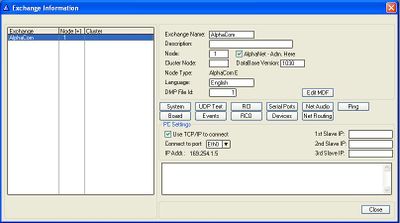
The Exchange & System window shows information about the exchange and the PC settings. The information can be edited from the System window or by double clicking the exchange in the listbox to the left.
| Exchange name: | The name was choosen when the database was created. Can be edited from the System window. |
|---|---|
| Description: | Here you can enter a more detailed exchange name (the text is stored in this PC, and is not sent to the exchange). Can be edited from the System window. |
| Node: | Default node number is 1. The node number is for communication between exchanges in AlphaNet. The node number was choosen when the exchange was created. Can be edited from the System window. |
| AlphaNet - Adm. here: | Enabled: The exchange was created with full database. Disabled: The exchange was created without database. The flag can be edited from the System window (as from version 10.40). |
| Cluster Node: | Cluster programming is a option to simplify programming and updating of numbers in AlphaNet when operating with integrated number series. Nodes with the same Cluster Node Number (1-255) are members of the same cluster. |
| Database Version: | Shows the database version for the FoxPro database used by the AlphaPro program. The information is automatically entered. |
| Node Type: | Reflects the choice you made when you created the exchange. It is possible to change node type in the System window. |
| Language: | Reflects the language choosen when the exchange database was created. This choice influences the display texts in the stations. |
| DMP File Id: | The name of the dmp file is DMP_x.DMP, where x is the DMP File Id. |
| PC Settings: | Shows information on how the PC connects to the exchange |
| 1st/2nd/3rd Slave IP: | Shows the IP address of the slave module(s) when MultiModule is used. If the Node Type is set to AlphaCom (and not AlphaCom E) it will change slightly, and instead show which modules are enabled. |
| Comments field: | Any additional information is shown here. Note that this information is not sent to the exchange, but is only stored in the PC. Can be edited from the System window. |
System
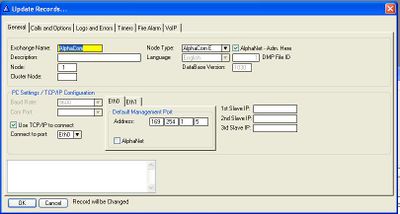
General
| Exchange name: | The name was choosen when the database was created. The name will be sent and stored in the AlphaCom exchange. The name can be edited from this window. |
|---|---|
| Description: | Here you can enter a more detailed exchange name (the text is stored in this PC only, it is not sent to the exchange). |
| Node: | Default node number is 1. The node number is for communication between exchanges in AlphaNet. The node number was choosen when the exchange was created. Can be edited from this window. |
| Cluster Node: | Cluster programming is a option to simplify programming and updating of numbers in AlphaNet when operating with integrated number series. Nodes with the same Cluster Node Number (1-255) are members of the same cluster. |
| Node Type: | Reflects the choice you made when you created the exchange. It is possible to change the node type from AlphaCom to AlphaCom E or vice versa after the database has been created. |
| AlphaNet - Adm. here: | Enabled: The exchange was created with full database. Disabled: The exchange was created without database. The flag can be edited from the System window (as from version 10.40). |
| Language: | Reflects the language choosen when the exchange database was created. This choice influences the display texts in the stations. |
| DMP File Id: | The name of the dmp file is DMP_x.DMP, where x is the DMP File Id. The information is automatically entered. |
| Database Version: | Shows the database version for the FoxPro database used by the AlphaPro program. The information is automatically entered. |
| PC Settings/TCP-IP Configuration: | Use TCP/IP to connect: Select if communication between PC and AlphaCom should be on ethernet or via Com-port Connect to port: Specifies which of the two ethernet ports of the AlphaCom the PC is connected to |
| 1st/2nd/3rd Slave IP: | IP address of the slave module(s) when MultiModule is used. If the Node Type is set to AlphaCom (and not AlphaCom E) this information will change slightly, and you can enable which modules are in use. |
| Comments field: | Any additional information might be entered here. Note that this information is not sent to the exchange, but will be stored in the PC only. |
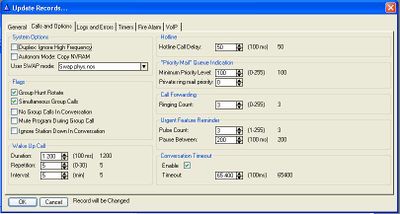
Calls and Options
| System Options | |
| Duplex: Ignore High Frequency | The high frequency evaluation in the duplex algoritm can be switched off by setting this flag. This may be useful in surroundings with high frequeny noise from fans or aircondition, as the high frequecies might influence on the duplex voice switching. |
| Autonom Mode: Copy NVRAM | This option must be enabled if you want to run the slave modules in autonomy mode in case of communication break with the master in a MultiModule system. The configuration of the Master AMC board will be copied in the background to the slave AMC boards. |
| User SWAP Mode | The options are:
|
| Flags | |
| Group Hunt Rotate | The Group hunt can be programmed either to:
|
| Simultaneous Group Calls | Checked: Several group calls might be active at the same time if there are no overlapping members. When several group calls are active simultanously, a group call can only be answered from a station belonging to the group.
Note that the "gong" is a common resource for all groups and can only be used by one group at the time. Unchecked: It is not possible to have more than one active group call at a time. |
| No Group Calls In Conversation | When enabled no group call audio will be received when a station is active in a conversation. |
| Mute Program During Group Call | By default Audio Program and group call audio is mixed. When enabled the Audio Program will be muted when a group call is received. |
| Ignore Station Down In Conversation | If a station is reported faulty while in conversation the conversation will not cancel. Might resolve a problem experienced with some older substations which cancels the call immediately after connection. |
| Wake Up Call | |
| Duration | Duration of private ringing for Wake-up Calls |
| Repetition | Number of times the Wake-up Call is repeated if not answered |
| Interval | Time between repetitions |
| Hotline | |
| Hotline Call Delay | Autoload = 5 sec. The time from the handset is lifted till the hotline number is dialed (if the feature is enabled for the station). During this time it is possible to use the keypad for ordinary dialing. If all telephones/stations with the hotline option are going to be used for hotline dialing only, set the delay to 0. |
| "Priority Mail" Queue Indication | |
| Minimum Priority Level | Description Missing |
| Private ring mail priority | Description Missing |
| Call Forwarding | |
| Ring Count | Description Missing |
| Urgent Feature Reminder | |
| Pulse Count | Description Missing |
| Pause Between | Description Missing |
| Conversation Timeout | |
| Enable | Description Missing |
| Timeout | Description Missing |
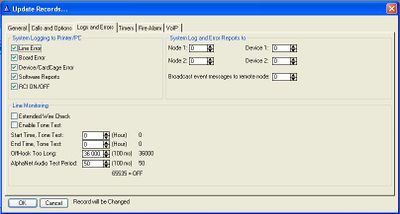
Logs and Errors
| System Logging to Printer/PC | |
| Line Error | Short-circuit or break on audio wires to a station |
| Board Error | Any board in the system |
| Device/CardCage Error | Includes the following devices:
|
| Software Reports | Various messages during start-up and normal operation |
| RCI ON/OFF | RCI inputs ON or OFF on the APC board or a RIO Unit. |
| Line Monitoring | |
| Extended Wire Check | Checks cd-wires even if ab-wires are OK. |
| Enable Tone Test | Must be set to activate the tone test in the system |
| Start time, Tone Test | Enter the time (24-hour notation) you want the tone test to start |
| End Time, Tone Test | : Enter the time (24-hour notation) you want the tone test to stop If start and end time are set to 0, the tone test runs continuously. |
| OffHook Too Long | Description Missing |
| AlphaNet Audio Test Period | Set the value to 65535 if you want to disable the tone test in AlphaNet. This may be necessary in installations with multiplexes where the tone test may cause a line error. |
| System Log and Error Reports to | |
| Node 1 | Description Missing |
| Node 2 | Description Missing |
| Device 1 | Description Missing |
| Device 2 | Description Missing |
| Broadcast event messages to remote node | Description Missing |
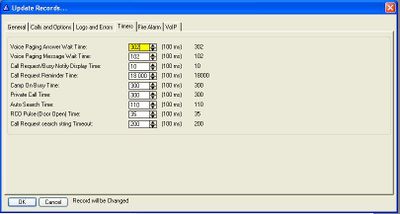
Timers
| Voice paging answer wait time: | Answer time after a Group Call or All Call. |
| Voice Paging Message Wait Time | Time from a Group Call or All Call is made till the M-key must be pressed. |
| Call Request/Busy Notify Display Time | The time a Call Request Message or a Busy Notify Message is displayed at the receiving station. |
| Call Request Reminder Time | If you send a Call Request to the same station several times, it is only registered as one call(if unanswered) within the Reminder Time that is set. |
| Camp On Busy Time | Description not available at the moment, leave a message |
| Private Call Time | Sets the time-out for Private Call ringing. |
| Auto Search Time | Time before auto-search on private call is activated (if the feature is enabled). |
| RCO (door open) Pulse Time | The time the RCO signal is active for the features “Door Opening during connection” and “Automatic lock”. |
| Call Request search string Timeout | Description Missing |
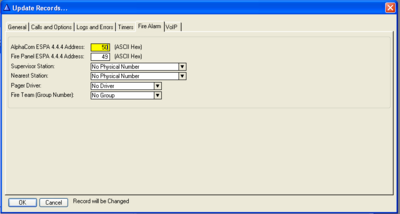
Fire Alarm
| AlphaCom ESPA 4.4.4 Adress | Link address in the ESPA 4.4.4 protocol for communication for AlphaCom. Is used for communication between AlphaCom exchange and the Fire Alarm Control Panel. |
| Fire Panel 4.4.4 Adress | Link address in the ESPA 4.4.4 protocol for the fire alarm panel. Is used for communication between AlphaCom exchange and the Fire Alarm Control Panel. The value is by default set to 49. |
| Supervisor Station | The station receiving the pre-alarm message. |
| Nearest Startion | When a prewarning message is displayed at the supervisor station, pressing 8 at the supervisor station sets up a connection to the station closest to the Fire Alarm Control Panel. |
| Pager Driver | The following options are available:
No driver Tateco T940SI (Driver 1) Ericsson PSP800 (Driver 2) Stentofon/Multitone RPE 351/651/Mk7 (Driver 3) |
| Fire Team (Group Number) | The group receiving the Fire Pre-Alarm and the Fire Alarm messages to their pagers. |
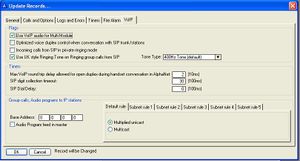
VoIP
| Flags | |
| Use VolP Audio for Multi Module | Disable this flag when using AGA or AE1 for audio distribution in MultiModule, and not VoIP. Note that it is also possible to use a mix of VoIP audio and conventional AGA/AE1 links. Then this flag must be enabled. |
| Optimized voice duplex control when conversation with SIP trunk/station | When calling SIP there can be problems with the standard duplex algorithm due to DSP echo cancelling in the SIP station. A new duplex algorithm is available for duplex towards SIP stations that is speech controlled only from volume of the microphone signal from the SIP link. When this flag is set, the initial voice direction is forced to be from the intercom towards the telephone. When the phone operator starts to speak, the voice direction will switch towards the intercom station, regardless of the level of the audio signal from the intercom station. As soon as the phone operator stops speaking, the voice direction will switch back to the initial direction. |
| Incoming calls from SIP in private ring module | When enabled incoming calls from SIP trunk line or SIP phones will be forced in private ringing mode, regardless of the private/open switch of the intercom station. |
| Use UK style Ringing Tone on Ringing Group Calls from SIP | Description Missing |
| Timers | |
| Max VolP round Trip Delay allowed for open duplex during handset conversation in AlphaNet |
AlphaNet calls: The roundtrip delay on a VoIP AlphaNet conversation is measured by the AlphaCom. If the delay is more than the value specified in this parameter, a handset to handset conversation will be forced in voice switched duplex. This is to prevent echo in the handset due to crosstalk in AlphaCom handset (and no echo cancelling). |
| SIP digit collection timeout: | Specifies how long the AlphaCom should wait for more digits before setting up the connection to a SIP device. The timeout is used by feature 81 and feature 83 when the field "Collect N more digits (SIP)" is used. |
| SIP Dial Delay | After having made a connection to a SIP gateway, further dialing is delayed by the time specified by this timer. |
| Group Calls, Audio Program to IP stations | |
| Base Address | First multicast address used by this node. Default is empty. If empty the address 239.192.nnn.0 is used, where nnn is node number. Usually this default can be used. Only need to be changed if conflicts with other multicasting applications on the same net. Alphacom may use up to 31 adresses following the base-address. These adresses are used for group call, program conference and audio program to IP stations. |
| Audio Program feed in master | When this flag is enabled Audio Programs need only to be connected to the master in a MultiModule. When the flag is disabled Audio Program must be connected in parallel to all modules, as before. Exchange reset is needed after changing the flag. |
| Default rule | Determine how Group Audio is transmitted to IP stations. The default rule is a two-way choice:
This rule applies to all IP stations which do not match any of the subnet rules 1 - 5. See also Multicast in AlphaCom |
| Subnet rule 1 - 5 | Up to 5 Subnet Rules can be defined to make exceptions from the Default Rule.
A Subnet Rule applies to IP stations with IP addresses within a given range. The IP address range for the rule is defined using the IP-address + subnet-mask scheme familiar from IP routing tables, see http://en.wikipedia.org/wiki/Subnetwork . A dropdown list with three alternatives tell how each of the 5 subnets are handled :
After changing the Subnet Rules, AlphaCom has to be reset. When a station registers with the AlphaCom, AlphaCom checks the 5 rules in turn to find a address match. The search stops when the first match is found. This means that it is possible to specify a rule with a narrow address range, followed by a different rule for a address range which is superset of the first rule. Stations which do not match rule 1, but rule 2 will use rule 2. |
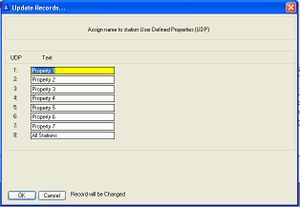
UDP Text
The User Defines Properties (UDP) are defined in three steps:
- You define the text (names) for the properties (from this window)
- You allocate properties to the stations (from Stations - UDP)
- You set up the behavior of the User Defined Properties (from the Event Window).
Note: that if the exchange is part of an AlphaNet installation, the UDPs should have identical programming in all exchanges.
RCI
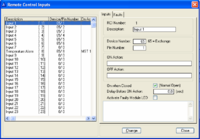
Inputs
| Descrption | Description Missing |
| Device number | 1 - 64 = External devices like RIO - matches address switch setting on the RIO board; see AlphaCom Installation Manual, A100K10002.
65 = Exchange |
| Pin number | APC board - 1 - 6 (device number 65) RCO - 1 - 8 on each RIO unit (the units must have different device numbers) See pin number overview in Appendix from page 237 onwards.
|
| On Action | Enter the command for the action to take place when the RCI input is turned on. It is possible to have several commands separated by semicolons <;>. |
| Off Action | Enter the command for the action to take place when the RCI input is turned off. It is possible to have several commands separated by semicolons <;>. |
| On When Closed | Generates alarm on closed or open contact
Normal Open (NO) Normal Closed (NC)
|
| Delay ON Action | The time from the RCI is activated to the action is carried out. If the RCI in the waiting time is deactivated, the action is not carried out. Value is shown in 100 msec units. Maximum value 65 000 = 1 hour 48 minutes. This can be used for two purposes:
Stabilizing of the line, to debounce any unwanted signals. For example, used with an alarm button in a lift. The button will have to be pressed down for a certain time to activate the alarm signal. Thus an unintended short press will be ignored. |
| Activate Faulty Module LED | Description Missing |
Faults
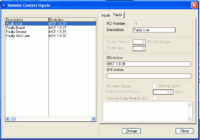
| Descrption | Description Missing |
| On Action | Description Missing |
| Off Action | Description Missing |
Serial Ports
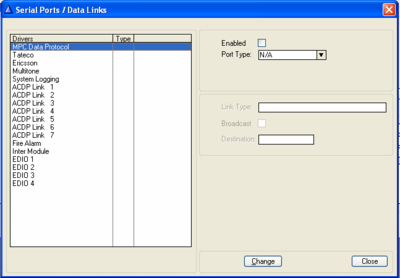
| Enabled | Description missing |
| Port Type | Description missing |
NetAudio
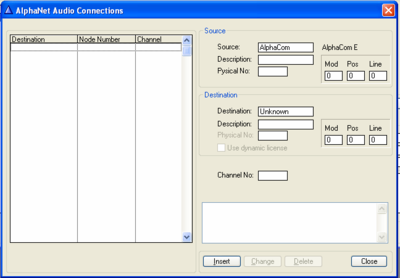
| Source | |
|---|---|
| Source | Description Missing |
| Discription | Description Missing |
| Physical No: | Description Missing |
| Mod | Description Missing |
| Pos | Description Missing |
| Line | Description Missing |
| Destination | |
| Destination | Description Missing |
| Description | Description Missing |
| Mod | Description Missing |
| Pos | Description Missing |
| Line | Description Missing |
| Channel No. | Description Missing |
Ping
Board
| Module, Board, Port | Is entered automatically by AlphaPro according to the highlighted port |
| Physical Number | The physical position where the relevant AGA board is installed - see Appendix page 229 for board positions. |
| Port use | The following options are available:
Default - uses the default setup for AGA board; see Appendix page 229 for functions of AGA board in different positions Station - this option is intended for connection of audio equipment not using the audio interface on the ASLT board. Typically this option can be used to connect a mobile radio system without using the FBSAR board. The equipment is treated like a station in the AlphaCom system Multiconference Monitor - is used with the multiconference feature. Reserved 5 - for special purposes.
|
Events
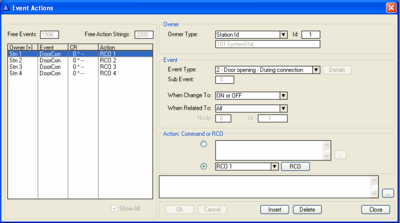
| Owner | |
|---|---|
| Owner Type | The options are:
reflects the station’s physical number. If you come from the station screen to the event screen, the field is set to the current station and cannot be changed. If you come from the system window to the event screen, you can fill in the owner field for any station or User Defined Properties UDP. Note that when the entry has been saved, the owner field cannot be changed. The event owner is always within your local exchange.
is used when a group of stations with identical properties should react to an event. |
| Event | |
| Event Type | What exchange event should cause the action. The drop-down list gives all possible exchange events, 01 - 19, see details in the Event List on page 94 |
| Sub event | Some events have a subtype. Audio events: the number here is entered when you activate the different flags. |
| Details | Click Flags to get access to the flag help. Sets the event subtype. Also see details in the Event List on page 94. |
| When change to | The action is executed at a specific event transition, i.e. when the defined event goes on and/or off. The options are:
Always Default value. Both ON and OFF transitions match. |
| When Related to | *All
The event is carried out with no check on the related number, i.e. works for all stations. Many events have no related number available, and in that case the field is not available.
The action is executed when the event owner is connected to the defined station/feature. The id field is two-part:
The action is executed when the event owner is connected to any station with this User Defined Properties UDP. The id is a property flag 1 - 8. |
| Action Command or RCO | |
| Action Command or RCO | *Upper radio button = Command. You use a defined set of command strings; see the table below. Press the button “Action ?” at the top to display help for the command strings on the screen. It is possible to do a copy/paste from the help window to the command field in this window.
Here you define the RCO output you want to activate for the defined event. |
RCO
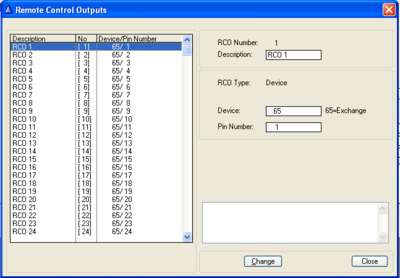
| RCO number | Description...Dream on, honey! |
| Description | Can help to identify the RCO outputs. Is only used by AlphaPro and will be reflected in the listbox to the left. The information is not sent to the exchange. |
| RCO type | Description is gone!! |
| Device | 1 - 64 = External devices like RIO - matches address switch setting on the RIO board. Each unit must have a unique device number.
65 = Master Module |
| Pin number | Each ASLT board provides 6 RCOs. See table in Appendix on page 237.
ASLT/ATLB boards: For Device 65 pin 1 - 138 is possible |
Devices
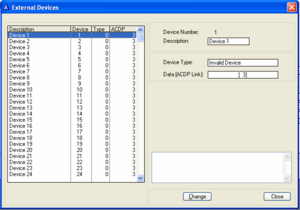
| Device Number | Reflects the choice highlighted in the listbox to the left. |
| Description | Here you enter the device name, max. 22 - 36 characters. The name is used in the listbox to the left. The information is not transferred to the exchange, but stored in the PC file. |
| Device Type | There are five options:
|
| Data [ACDP Link]: | Lists the serial ports numbers with the default drivers for the ports. Overview of the serial ports settings - see page 187. |
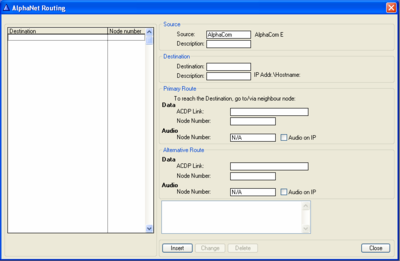
NetRouting
| Source | ||
|---|---|---|
| Source | Description missing | |
| Description | Description missing | |
| Destination | ||
| Destination | Description missing | |
| Description | Description missing | |
| Primary Route | ||
| Data - ACDP Link | Description missing | |
| Data - Node Number | Description missing | |
| Audio - Node Number | Description missing | |
| Alternative Route | ||
| Data - ACDP Link | Description missing | |
| Data - Node Number | Description missing | |
| Audio - Node Number | Description missing | |

