Device Configuration (Zenitel Connect Pro)
From Zenitel Wiki
This article describes how to add devices and stations to Zenitel Connect Pro.
Contents
Scanning the network for devices
To add devices to Zenitel Connect Pro they need to be in factory default state (with DHCP) and connected to the network.

|
|
Select Devices and Connections > Configuration from the web interface and click Start Scan .
By default the server will scan the subnet(s) defined on the ethernet port(s). Additional subnets can be defined by pressing the icon.
After the devices are discovered, one can identify a device by pressing the "play" icon . The device will then play a sound in the loudspeaker for 6 seconds. This only works with native Zenitel devices.
Now there are two options.
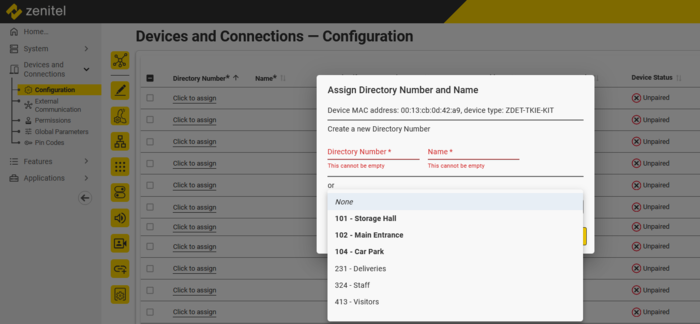
- Select Click to assign, and enter a new Directory Number and Name, or
- Select Click to assign, and pick a predefined number from the drop-down list. These are numbers that have been predefined either by Import from Excel Spreadsheet, or by Manually adding devices
The Zenitel Connect Pro will now push configuration out to the device, the device will register to the server, and should get the configuration status "Configured" in the web interface. The device is now operational.
Note that if the MAC-address was included on predefined devices they will automatically be assigned.
Pre-configuration in Excel spreadsheet
For larger systems with many devices the best practice is often to use an Excel spreadsheet to prepare the initial configuration of Zenitel Connect Pro. When on site the spreadsheet can be imported into Zenitel Connect Pro.
- Download and open the Excel template file
- Select the tab Devices, and fill in:
- Directory Number: The number you want to dial to reach the device
- Name: The name you want to identify the device by
- Type: Type of device; A drop-down list is available; Not mandatory
- MAC address: A 12-character code found on the label of the device, and from the 2D code on the device box; Not mandatory
- Location: Any descriptive text; Not mandatory
- Comments: Any descriptive text; Not imported into Zenitel Connect; Not mandatory
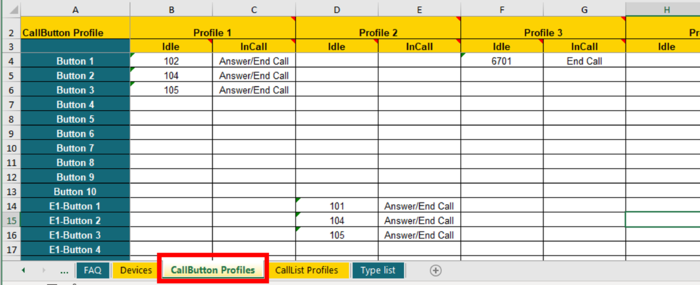
- CallButton Profile: Used to define the number to dial when a call button is pressed; Typically used for one- or two-button devices; You can use the same profile for several devices
- Select the tab CallButton Profiles, and for the relevant profile enter the directory number to call when the call button is pressed ("Idle" cell), and optionally what action to take if the call button is pressed during a call ("InCall" cell).
- Save the spreadsheet using a descriptive file name.
- Log in to the web interface of Zenitel Connect Pro, and go to Devices and Connections > Configuration, and select the Import icon and select the Excel file you just created.
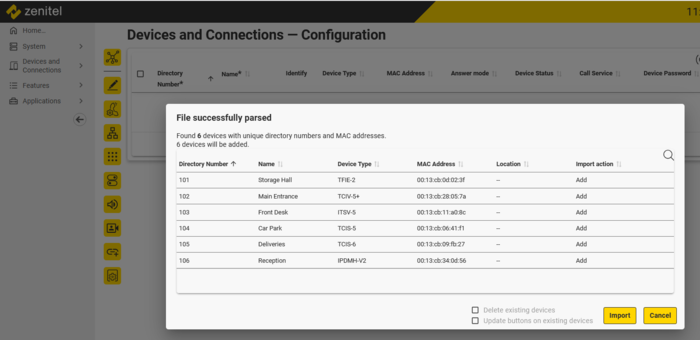
A message will appear that the file has been parsed, select the appropriate options:
- The Excel spreadsheet may contain devices which are already configured in Zenitel Connect Pro; it is possible to select to delete those from Zenitel Connect Pro and import them again or to ignore them during the import
- A second possibility is to ignore the import of the already defined devices, but to update the call button configuration with the information as defined in the spreadsheet
After importing the Excel file the new devices will appear in the configuration table of Zenitel Connect Pro:
When the devices are connected to the network, run the Scan function to discover the devices:
- If the MAC-address was included in the import from the spreadsheet, the discovered devices will automatically be assigned
- If the MAC-address was not included in the import from the spreadsheet, select "Click to assign" on a discovered device, and pick the directory number you want to assign to the device from the drop down list.
Manually adding devices
If devices are not yet connected to the network one can also manually add the devices by selecting Devices and Connections > Configuration from the web interface.
In the Zenitel Connect Pro web interface select Devices and Connections -> Configuration, select the icon to add a new device. Enter:
- Directory Number
- Name
- Device Type (optional)
- MAC Address (optional)
- Answer Mode
- Call Service
- Location: Any free text (optional)
Save by pressing the icon to the right.
It is possible to change the entered parameters by selecting the device and clicking Edit
.
When the devices are connected to the network, run the Scan function to discover the devices:
- If the MAC-address was included the discovered devices will automatically be assigned
- If the MAC-address was not included select "Click to assign" on a discovered device, and pick the directory number you want to assign to the device from the drop down list.
Configuration of device parameters
Once devices have been defined in one of the above described manners, it is possible to configure their parameters by selecting a device and clicking one of the icons on the left side. It is also possible to multiselect devices; only the parameters which are in common will be shown in case these devices are different types. It can take some seconds before the parameters are shown when multiselecting devices of different types, especially when a new device type is part of the mix. Zenitel Connect Pro caches the information, subsequent selections will be faster.
- Edit
- Auto Answer, Call Forwarding, Door Opening
- Device Network
- Call and Function Buttons
- Inputs and Outputs Selection
- Audio
- Video
- Device Integration
- Display Settings
Deleting devices
When a device is to be removed from Zenitel Connect Pro, the best way is to delete it from the configuration page while the device is still connected. On deletion, the device will get a command to factory reset itself with DHCP setting.
If the same device has to be re-enrolled to the Zenitel Connect Pro system, then make certain to wait for the device to finish its factory reset procedure before scanning the network again to enroll the device.
To delete a device, select it and click


