Difference between revisions of "IP-LCM Configuration (AlphaCom mode)"
From Zenitel Wiki
(→Basic configuration) |
(→Inputs) |
||
| Line 24: | Line 24: | ||
* 6 inputs on the The [[TKIS-2]] module itself | * 6 inputs on the The [[TKIS-2]] module itself | ||
| − | {{Note| The six TKIS I/O's are configurable inputs or outputs. By default the I/O's are set as inputs. The [[ | + | {{Note| The six TKIS I/O's are configurable inputs or outputs. By default the I/O's are set as inputs. The [[Station_Web_Interface_-_ICX-AlphaCom_mode#I.2FO_Settings|I/O Settings]] are done in the web interface of the module.}} |
[[File:IP-LCM Inputs.png|thumb|left|600px|Available inputs on the IP-LCM module]] | [[File:IP-LCM Inputs.png|thumb|left|600px|Available inputs on the IP-LCM module]] | ||
Revision as of 08:54, 25 March 2021
This article describes how to configure the IP-LCM Module when used with an AlphaCom server.
Contents
Basic configuration
The IP-LCM requires an IP Station License in the AlphaCom server in order to get registered.
To make a IP-LCM Module operational, perform these steps from web interface of the module.
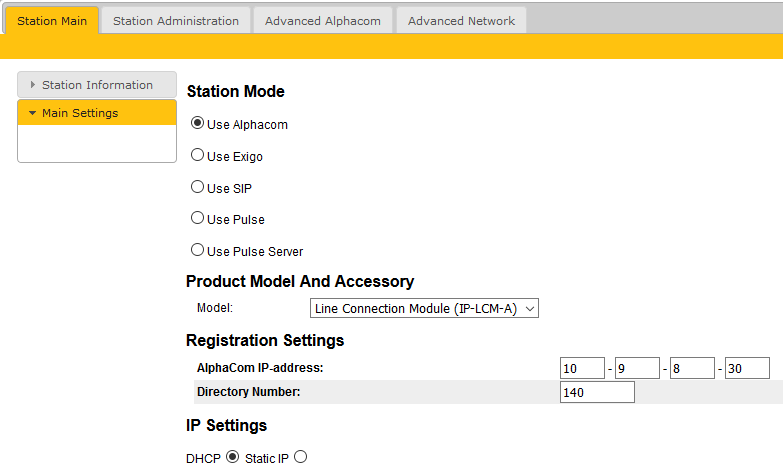
- Log In to the module, go to Station Main > Main Settings
- Set Station Mode = "Use AlphaCom"
- Set Product Model = Line Connection Module (IP-LCM-A)
- Enter the AlphaCom IP-address
- Enter Station Directory Number
- Configure the IP Settings (DHCP pr static IP address) of the IP-LCM
The Directory Number must be defined in the AlphaCom Server using the AlphaPro configuration tool.
Inputs
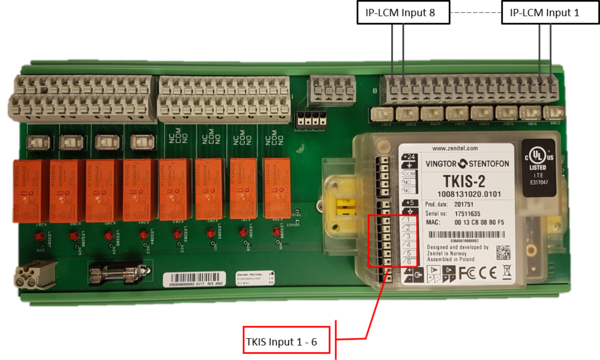
The IP-LCM module has in total 14 inputs:
- 8 inputs on the IP-LCM board
- 6 inputs on the The TKIS-2 module itself

|
The six TKIS I/O's are configurable inputs or outputs. By default the I/O's are set as inputs. The I/O Settings are done in the web interface of the module. |
- The six inputs on the TKIS-2 module are triggered by connecting the Input to GND via a closed contact.
- Depending on switch settings on the IP-LCM module the eight inputs on the IP-LCM board are triggered either by a close contact (default), or by a DC voltage signal. See IP-LCM Connections for details.
Configuration of the inputs
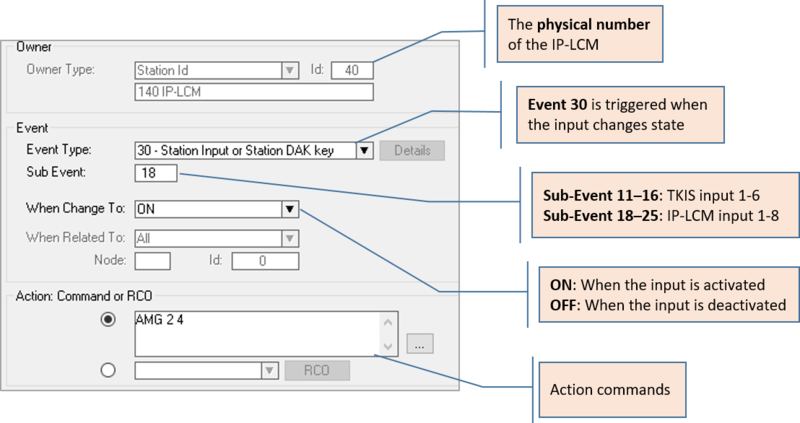
Input actions are configured in the Event Handler of the AlphaCom server. Inputs will trigger the event 30 - Station Input or Station DAK key, and the Sub-Event is used to identify which input is being triggered.
In AlphaPro, go to Users & Stations, and select the IP-LCM from the list box. Select Events, and Insert a new event with the following properties:
Here is a list of some useful Action commands.
Outputs
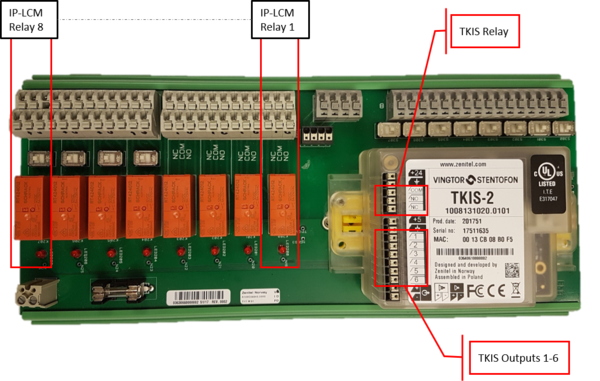
The IP-LCM module has in total 9 relays:
- 8 relays in the IP-LCM board
- 1 relay in the TKIS-2 module itself
In addition the TKIS-2 module has 6 I/O's which can be set as "Outputs".

|
The six TKIS I/O's are configurable inputs or outputs. By default the I/O's are set as inputs. The I/O Settings are done in the web interface of the module. |
Configuration of Relays and Outputs
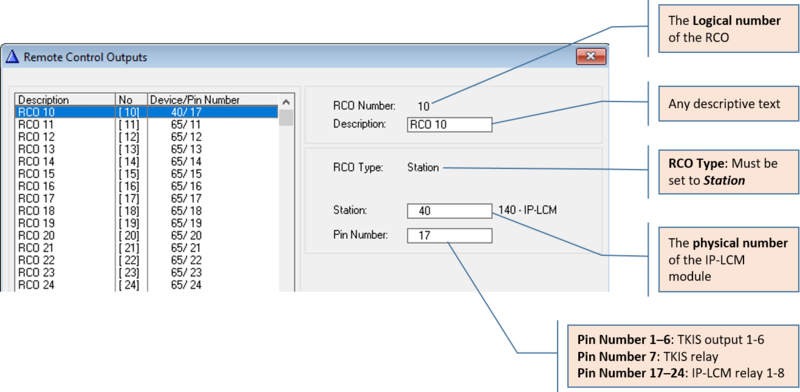
The physical address of the relays and outputs must be mapped (linked) to a "logical" RCO (Remote Control Output). This is done from AlphaPro. Go to Exchange & System > RCO, and select from the listbox an unused logical RCO.
The outputs are activated in the Event Handler by linking events to the RCO command.
For more information about RCOs, see main article RCO - Remote Control Output


